Showing posts with label Faux Food. Show all posts

Friday, April 15, 2011

Play Food ~ How To Make Canned Sliced Carrots & Canned Green Beans ~ Felt Food

If you have been following my craft blog for awhile now...you will have noticed that I design and post a lot of felt food patterns here on my blog. For almost 2 years now, I have been making a lot of playfood for my little grand daughters kitchen play set! If you love making felt food, I think you will appreciate this craft project as it's really simple to make.

I took 2 large clear plastic medicine bottles (not with child proof lids) and washed them out to use as 'store cans' for my grand daughters canned foods. I then cut down some scrapbooking paper and used a glue pen to glue the paper around the sides of each plastic can. I used my Cricut machine to cut out 2 ovals on the number 2 setting. I used my chalks and chalked around the oval's edge and then glued those onto the front of my cans. I simply used scrapbooking markers to write the name of the food items onto the label. You can get fancy if you want and write nutrition info on the back so that they resemble more like a can of food, that is entirely up to you.

You can find my free patterns for the felt sliced carrot rounds and the felt green beans here on my blog. I plan on doing a few more 'canned' food items for her playset next week.


Saturday, January 22, 2011

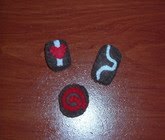
Craft Project ~ Cute Felt Faux Candy In Valentine's Day Heart Box

Love to decorate your home for Valentine's Day? Are you looking for a super easy Valentine's Day craft project? If so, I got a cute one to share with you today! This craft project consists of hand sewn faux chocolate candies that are made out of your traditional craft felt. In addition to a few standard craft and sewing supplies, you will need a small heart shaped candy box that is empty and clean. This is a really cool item to use in your holiday decorating.

* note: You are basically forming boxes out of felt to make these candies.

Supplies Needed To Make The Project:

Felt: 1 sheet of dark brown, chocolate brown, white and red
Embroidery floss to match the colors of your felt
Embroidery Needle and Scissors
Small amount of fiber-fill stuffing
1 clean and empty heart shaped candy box

Paper Patterns to use as templates: On a piece of paper, draw out a 1 3/4" diameter circle, 2" square and a rectangle that measures 1 1/2" by 2" in size. Cut out these shapes and use them as patterns.

Round Chocolate Candy: Cut two round shapes out of chocolate brown colored felt, cut one strip that measures 1/4" wide by 5 3/4" long. From red felt, cut out a swirl shape that is the diameter of your circle temple by about 1/8" wide. Using two strands of embroidery floss and your sewing needle, blanket stitch the thin strip around the edges of one circle and fasten off. Using two strands of red embroidery floss, hand stitch the red swirl to one of the chocolate brown circles using tiny whip stitches, fasten off. Using two strands of brown floss, blanket stitch the remaining circle onto the other side of the skinny strip. Right before you have it completely sewn shut, insert in a little bit of stuffing inside and then finish stitching it shut.

Square Chocolate Candy: Cut two square shapes out of white colored felt, cut one strip that measures 1/4" wide by the 8 1/4" long. From chocolate brown colored felt, cut four strips that each measure 1/8" by 2" long. From red felt, cut a heart that measures approximately 1/2" in diameter. Using two strands of brown embroidery floss, sew the tiny brown strips across one of the white squares. Using two strands of red embroidery floss, sew the heart on top of the brown strips in the center of the white square. Use two strands of white embroidery floss and hand stitch the white strip around all four edges of the square. Using hand stitches, sew the other square onto the other edge of the strip. Right before you have it completely sewn shut, insert a little bit of stuffing inside and then finish stitching it shut.

Rectangle Chocolate Candy: Cut two rectangle shapes out of dark brown felt, cut one strip from dark brown felt that measures 1/4" wide by 7" long. Hand cut out of white felt a swirl shape that measures 1/8" wide by 2" long and hand sew this swirl to the top of one your rectangles. Using two strands of dark brown embroidery floss, hand sew the strip to all four edges of one of your rectangles. Sew the other rectangle onto the other side of the strip. Right before you have it completely sewn shut, insert a little bit of stuffing inside and then finish stitching it shut.

This project was designed by Shelly Hill, copyright 2011, All Rights Reserved.

Sunday, January 16, 2011

How To Make Valentine's Day Chocolate Candy Magnets Out Of Craft Felt


How To Make Valentine's Day Chocolate Candy Magnets Out Of Craft Felt
Do you enjoy making handmade craft items to decorate your home with for Valentine's Day? If so, I've got a really easy craft project to share with you today. These little chocolate candies are completely hand sewn and crafted together out of your classic crafter's felt.

Once you complete them, you can add magnets onto the back side of them and place them on your refrigerator or file cabinet. If you have a little girl in your family, you can place them inside an empty clean Valentine's Day candy box so that she can use them as pretend food with her little toy dishes. No matter how you decide to use them, they are super easy to make and work up quickly.

Here is what you will need to make them:

1 sheet of craft felt in each of these colors: pink, red, chocolate brown, dark brown, white and vanilla.
Embroidery floss (to make all colors of your felt)
Small amount of poly fiber fill stuffing
Sharp Scissors, Embroidery Needle, Measuring Tape
Paper Shape Templates (use as patterns)
Round Magnets
All Purpose Liquid Quick Drying Craft Glue

To Make Paper Pattern: On a piece of paper, draw out a 1 3/4" diameter circle, 2" square and a rectangle that measures 1 1/2" by 2" in size. Cut out these shapes and use them as patterns.

Round Chocolate Candy: Cut two round shapes out of chocolate brown colored felt, cut one strip that measures 1/4" wide by 5 3/4" long. From red felt, cut out a swirl shape that is the diameter of your circle temple by about 1/8" wide. Using two strands of embroidery floss and your sewing needle, blanket stitch the thin strip around the edges of one circle and fasten off. Using two strands of red embroidery floss, hand stitch the red swirl to one of the chocolate brown circles using tiny whip stitches, fasten off. Using two strands of brown floss, blanket stitch the remaining circle onto the other side of the skinny strip. Right before you have it completely sewn shut, insert in a little bit of stuffing and then finish stitching it shut.

Square Chocolate Candy: Use your square paper pattern and cut two squares from dark brown felt. Cut a strip that measures 1/2" wide by 4 3/4" long. From white felt cut a strip that measures 1/8" by 2" and from red felt cut a heart shape that measures approximately 1/2" in diameter. Using two strands of white embroidery floss, hand stitch the white strip to one of the brown squares using tiny whip stitches. Using two strands of red floss, hand stitch the heart on top of the white strip using whip stitches. Using two strands of brown floss and a blanket stitch, attach the dark brown strip around the sides of the square you just decorated. Pick up your blank square and attach that to the other side of the strip using a blanket stitch. Right before closing, insert some stuffing inside and finish your stitching. Fasten off and hide your ends inside the square.

Rectangular Chocolate Candy: This is made just like the square but decorated a little bit differently. For this piece of candy, I used vanilla colored felt for my base. I then cut four tiny strips from brown felt and hand sewn them on top to resemble lines of icing. On top of that, I sewed on a red heart to decorate it. You will assemble this piece just like the other pieces.

Variations: You can change up the colors of your felt and make various theme'd shapes to decorate them...like little flowers, hearts, cupid's arrow, etc.

Once you are all done stitching them, you can glue magnets on the back and use them as cute holiday refrigerator magnets.

This project, instructions and idea is written by Shelly Hill, copyright 2011, All Rights Reserved.

Play Food - FREE Pattern For Felt Fish, Felt Burger & Felt Chicken Leg

For the past year I have been super busy making play food aka felt food for my little grand daughter's kitchen play set so last weekend I decided to make her a few felt dinner items. I made her a hamburger pattie, piece of fish and a chicken leg (drum stick) for her to use with her kitchen set.

I was able to make all 3 of them pretty quickly. You can hand sew them together with blanket stitches or sew the pieces together via a sewing machine...the choice is yours.

To Make The Felt Fish:

1 sheet of vanilla colored felt
vanilla embroidery floss
small amount of stuffing

I simple hand drew out a fish shape onto paper. Mine measures 5" long by 1 1/2" at the tail and 2 1/4" at the body by 2" at the head...just to give you a rough measurement. I cut out 2 body pieces and then 1 strip that measures 1/4" by the circumference of my fish. Using 2 strands of embroidery floss and a blanket stitch, I attached the strip to one body piece. I then attached the other body piece to the other side of the strip. Right before closing, I inserted some poly fiber fill stuffing. Don't over fill it or it will get too puffy on you. Finish your stitching and fasten off.

Picture shows me hand sewing the strip onto the fish body.

To Make The Felt Hamburger Pattie:

1 sheet of dark brown colored felt
dark brown embroidery floss
small amount of stuffing

I made a circle pattern by tracing around the bottom of a 4" diameter drinking glass. You will need to cut 2 circles from brown felt. You will need 1 piece of brown felt strip that measures 1/4" by the circumference of your circle. Using 2 strands of embroidery floss and the blanket stitch, attach the strip to one of your circles. Once it has been connected, attach the other circle to the other side of the strip. Right before closing, insert some stuffing to give it a puffy burger shape, then fasten off.

To Make The Felt Chicken Drumstick:

1 tan colored piece of felt and small amount of vanilla colored felt
tan & vanilla colored embroidery floss
small amount of stuffing

I drew out a chicken drumstick shape that measures approximately 5" long by 2 1/2" wide at it's widest point. I cut 2 of these shapes from tan felt. I then cut 2 bone ends using my paper pattern from vanilla felt. (see photo). Using 2 strands of vanilla floss, I hand stitched on the vanilla bone pieces onto the end of my tan piece using tiny whip stitches. You will do this for each piece (sides). Once done, place the wrong sides together (if hand sewing), use 2 strands of tan embroidery floss and whip stitch or blanket stitch the 2 pieces together. Right before closing insert a small amount of stuffing inside, finish stitching & fasten off.

There you have it...3 more pieces to your felt foodie collection. I will be posting many more FREE patterns over the next several months so keep checking back or follow my blog via Google Friend Connect to stay updated. Enjoy!


Happy Crafting!

Tuesday, January 4, 2011

Play Food ~ Free Felt Food Ice Cream Sandwich Pattern!

If you have been following my blog...you will have read & seen a lot of the free felt food patterns that I have been designing and making for my little grand daughters pretend play kitchen that she has. Well...today I am posting yet another FREE felt food pattern for you to enjoy.

Below you will find my instructions on how I made an Ice Cream Sandwich for her kitchen play set using craft felt. I did mine completely with hand sewn stitches but you can machine sew it together too.

Play Food ~ Felt Ice Cream Sandwich Pattern

Chocolate Brown and White Craft or Wool Felt
Chocolate Brown and White Embroidery Floss or Sewing Thread
Small Amount of Fiberfill Stuffing
Scissors & Sewing Needle

Pattern: 2 1/4" by 4 1/2" paper pattern + 1" by 13 1/2" paper pattern

Directions: From chocolate brown felt, cut 4 pieces that measure 2 1/4" by 4 1/2" in size. From chocolate brown felt, cut 1 piece that measures 1" by 13 1/2" in size, from white felt cut 1 piece that measures 3/4" by 13 1/2" in size (the white strip needs to be slightly smaller in it's width than your chocolate strip).

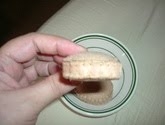
Place 2 chocolate brown rectangles together and using 3 strands of brown embroidery floss, hold those 2 pieces together and make random french knots on them to simulate the indents of a real chocolate wafer. You will then repeat this with the other 2 rectangles. Your next step is to use 2 stands of chocolate brown embroidery floss and blanket stitch the 1" by 13 1/2" chocolate brown strip around one of the rectangles. Once completed (attached) blanket stitch it to the other chocolate rectangle. Before closing it up to resemble a brick, insert some polyfiber fill but don't over-fill it or it will get too puffy. Finish up. At this point, it should look like a chocolate brick. Your next step is to attach the white strip around the sides of the chocolate brick to resemble the vanilla ice cream. You can blanket stitch it on using 2 strands of embroidery floss or just make simple tiny hand sewn stitches to attach it. If in a hurry, you can glue it on with some craft glue.

You have now completed your felt ice cream sandwich. The size I made is an ACTUAL size of a real ice cream sandwich but if you want to make a smaller one to fit toddler hands, just shorten the measurements on the paper pattern.

You can find more of my FREE felt food patterns ----> HERE

Happy Crafting!

Friday, December 31, 2010

Play Food - FREE Felt Food Cheese Blocks Pattern

My little grand daughter loves to snack on little blocks of cheese so I decided to make some out of felt so that she can use them with her play kitchen. This is the 94th piece of play food aka felt food that I have made for her so she has a well-stocked kitchen now! These cheese blocks are super easy to make...completely made with hand sewing and you can use up your smaller pieces of felt scraps.

I used acrylic felt for the cheese blocks in a light orange color. I did hand sewing and did a blanket stitch around all of the edges to form oblong blocks and inside I just put in some fiberfill stuffing so that they would hold their shapes.

The two small ends of the block measure 1" square and the rectanular sides of the block measure 1" by 1 1/2" in size. Just use 2 strands of matching embroidery floss and blanket stitch all of the sides together to form the block! Super easy! I made 4 blocks of cheese for her play food set.

You can find more of my FREE felt food patterns ----> HERE

Happy Crafting!


Sunday, December 26, 2010

PlayFood - FREE Felt French Fries Play Food Pattern


Here is my next installment in FREE felt food aka play food patterns for your little girl's kitchen and playfood sets. Today's installment features french fries and a splat of ketchup on the side. I decided to hand sew these together since working with skinny pieces of felt was trying my patience on the sewing machine.

Felt French Fries with Splat of Ketchup:

1 piece of vanilla colored craft or wool felt
vanilla colored embroidery floss & needle
scrap piece of red felt with red embroidery floss
Scissors

For the splat of ketchup, I just cut out a splat shape from 2 pieces of red felt. My splat measures about 2" in diameter...I made mine odd shape, not a perfect circle. I then did a blanket stitch and stitched the 2 splats together using red floss.

The french fries were a little big of a challenge for me. I decided to make the fries various sizes...after all, no 2 french fries are ever the same. From vanilla felt I cut out 2 pieces that each measure 5" long by 1 1/4" wide. You will want to vary these measurements for each french fry and each fry will take 2 matching pieces of vanilla felt. I used 2 strands of embroidery floss and just made tiny running stitches up 1 long side, across the one short side and halfway down the other long side. I then flipped it right side out and used tiny whip stitches to sew the fry shut. I didn't use any stuffing inside as the felt was the perfect bulk all on it's own. For our french fry set...I made 6 french fries.

Happy Crafting!

Tuesday, December 21, 2010

Play Food - FREE Felt Chicken Nuggets Play Food Pattern!

 Here is my next installment in my felt food aka play food patterns! I have been making felt food for my grand daughter's kitchen play set for a year now and let me tell you...she has a large collection of it!

Today's installment is for felt chicken nuggets which happens to be one of her favorite foods! You can make 2 chicken nuggets in less than an hour and there is no machine sewing. I made mine by blanket stitching my pieces together.

For each nugget...you will need to matching sized pieces for each side. Mine measure about 2 1/2" by 2" and I cut them oblong but not a perfect oval...after all..chicken nuggets are not a perfect oval. You can make yours any shape you would like or trace around an actual chicken nugget to get your pattern. I made mine out of tan craft felt.

Once I had my 2 sides cut out...I cut a strip from the felt that measures 1/4" by the circumference of my nugget. I then did a blanket stitch using 3 strands of tan colored embroidery floss to connect the strip to the side piece and then repeated it for the other side piece. Right before I had it completely sewn...I stuffed it with some fiber-fill. As you can see...pretty dang gone easy!

You can find more of my FREE felt food patterns right here on my blog by checking out my faux food and my felt project categories. Happy Crafting!

Monday, December 13, 2010

Play Food - FREE Felt Food Hot Dog Pattern

Here is my next installment on how to make felt food for your little girl's kitchen play sets. I think this hot dog came out really cute. It is complete with a squirt of ketchup and mustard! I was able to make this hot dog completely by hand with no machine sewing....although you can machine sew it if you want to.

Felt Hot Dog:

1 sheet of tan colored craft or wool felt
scraps of red and yellow felt
red and yellow embroidery floss
small amount of fiber-fill stuffing
scissors and needle

Pattern: piece of paper measuring 5 1/4" long by 2" wide. From tan felt, cut 2 pieces.

For the ketchup and mustard squirt, I just free-handed that from scraps of felt. I used 2 strands of red embroidery floss and hand sewed it onto one of the tan pieces of felt using tiny stitches. On top of the red squirt, I simply hand sewed on the yellow mustard squirt. Place the 2 tan pieces of felt wrong sides together and use 2 pieces of tan embroidery floss and make a running stitch up the 2 long sides. Turn the "tube" right side out and stuff firmly with fiber-fill. Using tiny stitches...gather up each end with stitches and fasten off. You want your ends to be tightly gathered up so it looks like a hot dog.

You can find more of my FREE felt food patterns ----> HERE

Happy Crafting!
Shelly

Saturday, December 4, 2010

Play Food - FREE Felt Food Pattern - Holiday Peppermint Candies

Here is my next installment on free felt food patterns! I decided to make a holiday theme'd food item this time for my grand daughter play food & kitchen set that I have been working on for over a year now. This little felt peppermint candy works up super quickly and you can make one using your felt scraps. If desired, you could turn this into a Christmas Tree ornament by just threading through some string at the top.

Felt Peppermint Candy:

Scraps of white and red craft or wool felt
white and red embroidery floss and needle
stuffing
scissors

For my pattern: I made mine a little bigger than a normal sized peppermint candy so that wee one could hold it better & so it wouldn't get lost as easily. Mine measures 1 1/2" in diameter, so you will need a paper circle measuring 1 1/2" diameter for your pattern.

Use your pattern to cut out 2 circles from white felt. For the red stripes/swirls...I totally winged it and just used scraps that I cut to fit. I then used 2 strands of red embroidery floss and hand stiched my 5 swirls/stripes onto one side of each white circle...remember, you want your candy to be 2-sided. I then cut out a strip from white felt that measures 1/8" wide by the circumference of my circle. I used 2 strands of white floss and stitched the strip to once circle and then stitched it to the second circle. (make sure your red patter is facing outward when placing your 2 white circles together). Right before closing, I inserted just a tad of stuffing so that it would hold it's shape or you could insert a cotton ball inside it. Finish your stitch and your done! I was able to make 3 of these in just one hour.

You can find more of my FREE felt food patterns ----> HERE

Happy Crafting!
Shelly

Thursday, November 25, 2010

Play Food - FREE Felt Fudgesicles Popsicles Pattern!

If you have been following my craft blog...you will have noticed that I love making play food aka felt food for my little grand daughters kitchen set. Today I am posting my next installment which is how to make popsicles or in this case...how to make fudgesicles out of craft felt. This project is really easy to do and you can make one in less than 1 hours time. You can hand sew or machine sew the popsicle together...choice is yours! You can change the colors of your felt to make a variety of popsicle flavors...use peach or light orange to make creamsicles or use purple or lime green to make summer popsicles.

Felt Popsicles:
1 sheet of craft or wool felt (I used brown so I could make a fudgesicle)
1 wooden popsicle stick (washed & dried)
small piece of quilt batting that is 1/4" thick
small amount of craft glue
brown embroidery floss & needle if sewing by hand or brown thread if machine sewing

Pattern: I drew my own from a sheet of paper. You can trace around a normal sized popsicle to get the shape and size right.

From brown felt, cut 2 front and backs for your popsicle. For the sides, you will want to cut a strip from brown felt that measures 1/4" by the entire circumference of your popsicle. Using 2 strands of embroidery floss, stitch the long strip to the front of your popsicle felt piece using tiny little stitches, leaving the bottom of the popsicle open. Using 2 strands of brown floss, stitch the back piece to the long strip, again leaving the bottom open. Using scissors, cut a very small slit the width of your wooden popsicle stick in the strip of felt that runs across the bottom of your popsicle. Place the quilt batting inside the popsicle shape. Place some craft glue onto the wooden popsicle stick and insert it up through the slit in the felt so that 2/3 of the stick remains out. Using 2 strands of brown floss, handstitch the bottom together and let dry.
You can make these in any color combination that you want and it's a great way to reuse wooden popsicle sticks that you normally throw out. You can find more felt food aka play food patterns on my blog -----> HERE

Happy Crafting!!!
Shelly

Tuesday, November 23, 2010

Play Food - FREE Felt Food Whoopie Pie Pattern!

Here in Pennsylvania, Chocolate Whoopie pies are very popular and here in my household...that is no exception! I decided to make some whoopie pies out of felt for my little grand daughters play food collection that she uses in her play kitchen. These whoopie pies are super easy to make and you can hand sew or machine sew them together.

Felt Whoopie Pies:
chocolate brown and white craft or wool felt
brown and white embroidery floss with needle
small amount of stuffing
scissors

Pattern: I made my own from a piece of paper. You will need two 3 1/4" diameter circles cut from chocolate brown felt.

From brown felt, cut out two circles with each one measuring 3 1/4" in diameter. From white felt cut a strip that measures 1/4" by the circumferece of your circle...my strip measures 1/4" by 10 3/4" long. You will also need a strip cut from brown felt that measures 1/4" by 10 3/4" long. Using 2 strands of brown floss, handstitch the brown strip to one of your brown circles. Once you have it attached, handstitch the other edge of the strip to the other brown circle. Right before you close it up, insert some stuffing and then finish your stitching. For the white icing aka vanilla filling...you can hand sew it onto the whoopie pie around the sides or do what I did and that was just glue it on with some tacky glue. Isn't the whoopie pie cute? LOL

Very quick and easy project that little girl's would love to have these felt foodie items for their kitchen play sets. Great items for creative fun!

Tuesday, July 27, 2010

Play Food - How To Make Felt Vegetable Soup - Play Food Pattern


Here is my next installment on faux food - felt food items for your little girls play food & kitchen sets. This is my pattern on how to make a pasta vegetable soup all by using scraps of felt and its completely done by hand sewing all of the ingredients aka pieces together. A great little project to use up all of your scraps!

The container that I used to hold my soup is a plastic clear salad dressing container that I snatched from a local eatery...brought it home, washed it out and its ready to go (it even has a lid).

For The Pasta Bow-Ties: I cut out oblong pieces from vanilla colored felt that measure 1/2" wide by 1 1/4" long. I simply used 3 strands of vanilla colored embroidery floss and wrapped it a few times around the center to give it that bow tie shape.

Carrots: I simply cut small 1/2" squares from my scrap orange felt and folded them in half and stitched around the edges to make it look like square carrots. Use 2 strands of orange embroidery floss for your stitching.

Peas: From olive green felt, I just cut out 1/4" diameter circles and hand sewed 2 of them together around the edges using little whip stitches for my little round green peas.

Corn: Using scraps of yellow felt, I cut out a corn kernel shape that measures about 1/4" in size. I simply took 2 strands of yellow floss and just sewed them together with tiny whip stitches.

Green Beans: From olive green craft felt scraps, I cut out pieces that measure 1/4" by 3/4" in size. You will place 2 of these together and sew around the edges using tiny whip stitches and olive green floss.

As you can see...its basically pretty easy and you can make a variety of vegetables for your pasta vegetable soup and it's a great way to use up all of those felt scraps.

You will want to store your felt soup in a plastic container (see above what I used) with a lid so that all of the ingredients don't get lost.

You can find additional free patterns for felt food ---> HERE

Happy Crafting,
Shelly

Sunday, July 25, 2010

Play Food - Free Felt Potato Chips Pattern


Here is my next installment on how to make faux food - potato chips made out of vanilla colored craft felt. You can make these very easily by hand sewing them or you can make them by machine sewing them...the choice is yours. You can make your chips in a variety of sizes or make them all the same size.

Supplies Needed:

Vanilla colored craft felt
Vanilla colored embroidery floss
Scissors
Sewing Needle

Pattern: I hand drew an oval shape on a piece of paper and used it for my pattern. You can also trace around a real potato chip to get your pattern.

You will first want to cut out your 2 matching oval shapes from vanilla colored craft felt. Using 3 strands of vanilla colored embroidery floss, hand sew vertical lines (stitches) on each oval piece of felt. These lines will represent the ripples in your potato chips. Once you have done that to both ovals, place your 2 ovals together with the wrong sides touching. Using 2 strands of vanilla colored embroidery floss, whip stitch the two ovals together. If you pull your stitches semi-tightly, it will cause your felt chip to curl up a bit...to give you the natural shape of the chip.

If desired, skip the hand sewing and use your sewing machine which saves a lot of time.

You can find additional free patterns for felt food ---> HERE

Happy Crafting,
Shelly

Saturday, July 17, 2010

Faux Felt Food - Free Sliced Onions Pattern


Here is my next installment on faux food patterns that you make out of craft felt. These are great items to make for all of your little girls kitchen playsets. This faux food pattern is for sliced onions made out of white craft felt. You can make 3 slices of onions in less than 30 minutes and its completely done with hand sewing techniques.

Here is what you will need to make 3 onion slices:

1/3 sheet of white craft felt
white embroidery floss
sewing needle
scissors
paper template - For mine, I drew a 4", 3" and 2" diameter circles for my pattern and then cut the inside out so that I had a 1/4" wide ring.

You will simply place 2 of your white felt rings together and hand sew them together by first going around the inside diameter with small whip stitches using 2 strands of white embridery floss. Then hand sew the outer edges together using small whip stitches. Fasten off and hide your ends in between the 2 pieces.

You will do this for all of your onion ring slices. I decided to make mine in 3 different sizes...after all, you never get the same size twice if cutting a real onion.

You can find additional free patterns for felt food ---> HERE

Happy Crafting,
Shelly

Tuesday, June 15, 2010

How To Make Felt Animal Shaped Cookies - FREE Pattern!

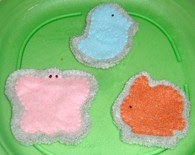
As part of my onoging series on how to make felt food items for your little girl kitchen play sets, I came across this FREE pattern & instructions online to make felt animal crackers...although I think they look a lot like iced animal shaped cookies. I decided to make a bunny, chick and a butterfly.

I dug out my Tupperware (tm) Spring and Easter Cookie Cutter Set and decided to make a set for my grand daughters felt foodie collection. I used the cookie cutters for my pattern of the Spring set I made 2 weeks ago.

You can find the free patterns & instructions on the Lit'l Brown Bird's Blog and she gives GREAT detailed instructions on how you can make them. You will need tan colored felt along with various colors of felt to use for your frosting.

While you are visiting her site, you can find other FREE felt foodie patterns too so make sure you check them all out while you are there!


Monday, May 17, 2010

Easy Felt Food Mini Tea Cakes Pattern


I finally found some time to work on more felt foodie (food) items for my little grand daughters felt play food set that I have been making for her. Today's project consists of these little mini felt tea cakes which stitch up quickly and are easy to make. I was able to make 3 of them in about an hours worth of time using some of my leftover felt scraps.

Valentine's Day Mini Tea Cake

Scraps of pink, red and white felt
red embroidery floss and sewing needle
scissors
1 1/2" diameter paper pattern (circle)
small amount of stuffing

The first thing I did was cut out two 1 1/2" diameter circles from pink felt. From white felt, I cut out a strip that measures 1/4" by 5 1/4" long, this strip will be the side strip. I then free handed a tiny red heart and cut that out of red felt. Using 2 strands of red embroidery floss, I stitched the heart onto the center of one of my pink round circles. Using 2 strands of red floss, I blanket stitch the white strip to the same pink circle and then continued by attaching the final pink circle using the blanket stitch. Right before I finished my stitching, I inserted a tiny amount of stuffing inside so that it would hold its shape.

Blueberry Mini Tea Cake

Scraps of dark blue and vanilla colored felt
Dark blue embroidery floss and sewing needle
Scissors
Paper Pattern 1 1/2" diameter circle
Small amount of stuffing
Dark Blue seed beads with shiny finish
Off-white sewing thread

Cut out 2 circles from vanilla colored felt. From dark blue felt, cut a strip that measures 1/4" by 5 1/4" long. Using off-white sewing thread, attach the seed beads onto the top of one of the vanilla colored felt circles in a random pattern. Using 2 strands of dark blue embroidery floss, blanket stitch the dark blue felt strip around the circle (it forms the side of your tea cake) and then attach the bottom vanilla colored circle with the blanket stitch. Right before you finish your stitching, insert some stuffing inside so that it holds it shape.

Orange Cream Mini Tea Cake

Scraps of orange and white felt
Orange embroidery floss with sewing needle
Scissors
Paper Pattern 1 1/2" diameter circle
1 white flat bead (1/8" in diameter)
Small amount of stuffing

From white felt, cut out two 1 1/2" diameter circles. From orange felt, cut out a 1/2" diameter circle and a strip that measures 1/4" by 5 1/4" in length. Using 2 strands of orange embroidery floss, stitch the orange circle to the center of one of your white circles. I wanted mine to look like a sun so I then made 10 lazy daisy stitches around my orange felt circle. I then attached a flat white bead to the center of that using the orange floss. Using 2 strands of orange floss, blanket stitch the orange felt strip around the sides of your white circle and then attached the bottom white circle to the other edge of your orange strip. Right before finishing your stitching, insert some stuffing inside so that it holds it shape.

As you can see...these work up pretty quickly and are very easy to make. They are the perfect size to fit on child-size play dishes and a great size for little hands to handle. However, because they are on the smaller size, I would only let children ages 3 and up play with them.

You can make them plain or fancy but just adding more seed beads, sequins, doing more embroidery stitches, whatever!

You can find additional free patterns for felt food ---> HERE


Tuesday, May 11, 2010

Felt Food - Mushroom Slices - Play Food Pattern


I just love to eat mushrooms...love them cooked or fresh on a salad. Any way, I decided to make some felt mushrooms for my grand daughters felt food play set that I have been working on. They aren't fancy but will work! Here is how I made them.

Felt Food - Sliced Mushrooms

dark brown, light brown and tan felt scraps
matching colored embroidery floss + embroidery needle
Scissors
Paper and pencil

Pattern: I just free handed my pattern onto a piece of paper. Mine measures 2 1/4" tall by 1 3/4" wide but you can make them any size that you would like.

Once I had my pattern made, I used it for the base of my mushrooms and because I didn't want them to all look exactly alike, I varied the colors. I cut one base piece from each of my 3 colors of felt. Then from dark brown felt, I cut 3 more. Once I had the 3 dark brown pieces cut, I cut those apart into a design that I liked so that they would fit on top of my base pieces (see photo to see what I mean). I then hand stitched the dark brown pieces onto the top of my medium brown and tan felt mushroom pieces so that my mushrooms were two-toned in color. Once I had that done, I cut from felt again (any of the colors will work) a full mushroom piece. Place your front piece wrong-sides together with the backing piece and hand stitch together. I found it best to use regular straight stitched and little whip stitches with these as I didn't like the appearance of the blanket stitch.

They actually sound much harder to make than what they really were so use my photo as an example.

You can find additional free patterns for felt food ---> HERE

Happy Crafting,


Monday, May 3, 2010

Felt Food - Chocolate Pie With Whipped Cream - Play Food


I wanted to make a few different sliced pie pieces for my grand daughters felt food play set that I have been making and today I decided to try to make a slice of chocolate pie with whipped topping with a little cherry on top. This was my third attempt at making a slice of pie and over-all, it came out pretty good. Its not fancy and elaborate, just simply thrown together.

I did not use a pattern to make it so I will tell you how I did it so you can make one yourself.

Felt Sliced Chocolate Pie - Supplies Used:

Dark Brown, White and Red Craft Felt
Dark Brown, White and Red Embroidery Floss
2 1/2 hand fulls of stuffing
Embroidery Needle, Scissors

I started off by drawing a triangle on a piece of paper. Mine measures approx. 4 1/2" long by 3" wide at its widest point. However, you can make yours as small or as large as you would like.

I used this triangle to cut out 2 triangles from my dark brown colored felt to represent the top and bottom crusts of my pie slice. I wanted my pie slice to be 2 3/4" high so I cut out of dark brown felt 2 pieces that each measure 2 3/4" high by 4 1/2" long. These serve as my 2 long sides of my pie slice. Next, I cut out of dark brown felt a piece that measures 2 3/4" by 3" for my back piece. Out of white felt, I cut out 5 strips that measure the length of my felt sheet by 1/4" wide that will be used to make the whipped cream. Finally out of a scrap piece of red felt, I cut a circle that measures 2 1/2" in diameter to be used for my cherry.

You will first assemble all of your dark brown felt pieces. Simple sew them all together into a wedge shape by hand stitching them together (I used a blanket stitch) or by machine sewing them and inserting some fiber fill stuffing inside so it holds it shape.

Next, hand or machine gather the white felt strips. I tightly gathered mine and then I hand sewn them to the top of my pie slice which took about 15 minutes. Once I had them on, I took 2 strands of red embroidery floss and did a running stitch around the edge of my red felt circle and gathered it up with a little stuffing inside it. I then sewed that to the top of my pie. (see photo)

Simple, Quick and Effective. Its not fancy and elaborate but it serves its purpose!

You can find additional free patterns for felt food ---> HERE

Happy Crafting!


Thursday, April 29, 2010

Easy To Make Felt Easter Cookies For Girls Playfood Sets

Last week I decided to make some felt Easter Theme'd play food cookies for my grand daughters kitchen play food set and this is what I came up with. They were really easy to make and worked up quickly. Yes...I know Easter has come and gone but I was sick at Easter time so I am just now posting this!

Felt Easter Egg Sugar Cookie

Vanilla colored felt
Striped piece of fleece
Vanilla colored embroidery floss
Sewing Needle and Scissors
Oval Paper Pattern Measuring 4 3/4" long by 3 1/4" wide

Using your paper pattern, cut out 2 ovals from vanilla colored felt. Using the same pattern, cut out an oval shape from striped fleece. Once you have the fleece oval cut out, trim off a 1/4" from all sides so that its now smaller than your vanilla colored felt ovals. Using 2 strands of vanilla colored floss, whip stitch the fleece oval to one of your vanilla colored ovals. Next, whip stitch the 2 vanilla colored ovals together. Optional: You can insert a tad of stuffing if you would like, I chose not to do that as I wanted flat cookies.

Felt Easter Cross Cookie

Dark brown and vanilla colored felt
Tiny dark brown seed beads
Vanilla & Dark Brown embroidery floss
Paper Cross Patter that measures 4" tall by 3" wide
Scissors and sewing needle

Use your paper pattern to cut out 2 dark brown crosses and then cut out 1 cross from vanilla colored felt. Once you have the vanilla one cut out, trim off 1/4" from all sides so that it is now smaller than your dark brown crosses. Using 2 strands of vanilla colored floss, hand sew the seed beads onto the vanilla colored cross. Then hand sew the vanilla cross onto the top of one of your dark brown crosses. Using 2 strands of dark brown floss, sew both of your dark brown crosses together by using a whip stitch or a blanket stitch.

Felt Easter Carrot Cookie

Orange and green felt
Orange and green embroidery floss
Scissors and sewing needle
Hand-drawn carrot paper pattern

Note: I just free-handed a carrot shape onto paper and then used that as a pattern. My measures 5 1/4" long and then my green stem measures 1 3/4" tall.

Cut out your pattern from the appropriate colored felts (see photo). Using 2 strands of green floss, I stitched my leafy top together. I then placed my 2 orange carrot pieces together and used 2 strands of orange floss to stitch them together by starting at the left top corner, working down and back up the other side. Before I stitched the top shut, I inserted my leafy top and then stitched the top shut so that it would hold the leafy stem in place.

Felt Easter Pink Peep Cookie

Pink Felt
Pink and dark brown embroidery floss
Scissors and sewing needle
Pattern: Buy some Peeps (tm) and trace one for your pattern onto paper.

Cut your bunny PEEP (tm) pattern out of pink felt, you will need 2 of them...a front and a back. Using 3 strands of dark brown embroidery floss, make 2 french knots for his eyes and his nose, then fasten off. Using 2 strands of pink embroidery floss, hand stitch the front to the back using whip or blanket stitches. Super Easy!