Showing posts with label Snowmen. Show all posts

Tuesday, December 4, 2018

Preschool Crafts: Easy Snowman Refrigerator Magnets

Working with a preschool group of children and looking for an easy-to-make holiday craft project? If so, we've got one for you today! This project utilizes just a handful of general craft supplies that can be picked up at your local craft store. If you want to save time, you could paint the wood circles ahead of time with white craft paint and then let the kids add the facial features. If you didn't want to mess with paint, you could have the children use black and orange markers.
Preschool Crafts: Easy Snowman Refrigerator Magnets

Preschool Crafts: Easy Snowman Refrigerator Magnets

2" or 3" Round Unfinished Wood Circles
White Acrylic Craft Paint
Black Acrylic Craft Paint
Orange Acrylic Craft Paint
Paint Brush, Water Dish, Paper Towels
Peel & Stick Magnet
Cotton Swab
Round Wood Toothpick

Paint the unfinished round wood circles with 2 coats of white acrylic craft paint. Let dry. Dip the cotton swab into black acrylic craft paint and dot on the snowman's 2 eyes. Dip the end of a round wooden toothpick into black paint and dot on his mouth. Have the kids use a fine-tip paint brush to paint on a triangular shaped carrot nose using orange acrylic craft paint. Let dry.

Once all of the paint has dried, flip them over and add the peel-n-stick magnet on the back. You'll want to use heavy-duty magnets. Make sure they're strong enough to hold the wooden snowman to the refrigerator without sliding down. That's it, you're done!

Saturday, December 10, 2016

DIY Rock Painting - Christmas Snowman

DIY Rock Painting - Christmas Snowman
I am the first one to admit...I'm not great at decorative painting although I enjoy doing it. I find decorative painting to be a great way to de-stress, relax and a way to be creative. When it comes to painting, I'm all about the quick and easy projects that anyone can do...regardless of talent.

With the Christmas holiday coming, I wanted to share a quick & easy painting project with all of you today. You can do any holiday design that you want...I chose to paint snowmen as they're easy to do. Here is what you'll need to make your own DIY Handpainted Snowmen on Rocks.

DIY Rock Painting - Christmas Snowman 

Square-Shaped Rocks 2 1/2 to 3 1/2" in Size
Acrylic Paints
Fine Line Paint Brush
Medium Paint Brush
Clear Acrylic Sealer (comes in a spray can)
Old Plastic Place Mat
Paper Towels
Plastic Lid
Water Bowl
DIY Rock Painting - Christmas Snowman

Find some square-shaped or rectangular-shaped rocks. Wash and dry them. Once dry you'll want to paint them a solid black color for your background. Let it dry completely. Next, you'll want to paint your design. I chose to do an easy snowman design. Once my snowman was dry, I added his facial features, scarf, hat and twig arms. I left him dry for a few more hours. I then took my rocks outside and placed them onto an old plastic place mat. Spray one side of the rock with clear acrylic sealer. Let dry for several hours. Flip your rocks over and spray the other side with the sealer and let dry overnight. By spraying them with the sealer, you're protecting your newly painted design.

Once they're done drying you can place them on a shelf, your mantle or any little place that needs a little decoration. I like seeing several of them grouped together on a shelf in different holiday designs. The one I'm featuring today reminds me of a piece of black coal with a snowman design on it since I sprayed the rock with a glossy finish to make it shiny. I think it turned out really cute and super simple to do!

Wednesday, December 23, 2015

Craft Project - Snowman Made from Kid's Socks

Christmas is only 2 days away but one of the things I love about our next Christmas craft project is that you can make these adorable sock snowman in a variety of colors and leave them sitting out all winter long. The one I'm featuring today is decorated in red & green for the Christmas holiday, but you could change the colors to blue and silver for a wintertime theme.

I whipped up this snowman yesterday afternoon and really didn't keep any measurements. With that said, with my basic directions you'll be able to whip one up too!

Craft Project - Holiday Snowman

1 single baby sock (in a color)
1 child's sock
ribbon or homespun fabric scraps
4 round black beads
1 wooden heart, painted (we painted it dark red)
wooden toothpick (painted orange)
rice, dried beans or tiny pellets
fiberfill stuffing
sewing needle and thread
teabag and water
all-purpose glue or glue gun
cosmetic pink blush

The first thing you'll want to do is take a child' white sock and tea-dye it. We soaked our's in a solution of one brewed tea bag in 1 cup of hot water. We left it soak for about 2 hours. We then squeeze the water out and tossed it into the dryer to dry for a few minutes. We did this to make our snowman look antiqued & primitive. You could leave them white if you wanted to.

Place rice, beans or pellets into the toe portion of the sock which will add weight to him so that he stands upright. I didn't measure this out and then I added some stuffing on top. I cut the cuff off of the sock and used a sewing needle and thread to sew the opening shut. I cute a piece of green homespun fabric into a strip and tied that around the neck area (or the area that I wanted to be the neck).

I took a pair of sage green baby socks and cut the foot portion off of the sock and used just the cuff to form the snowman's hat. I did fold back the sock opening by about a 1/2" to form the rim of the hat and used a needle & sewing thread to gather up the top opening of the hat and tied it shut. I cut another smaller strip of homespun fabric and tied it into a bow...used my glue gun and glued it to the top of the snowman's hat.

To finish him up...I glued on two black beads for his eyes and I painted a wooden toothpick orange, cut it down to size and then glued that onto his face to serve as his nose. I got into my cosmetic bag and used a Q-tip dipped into my blusher to make his rosy cheeks. Finally, I painted a small wooden heart a dark red color and once it was dry...I glued that onto his chest along with two additional black beads to serve as his buttons.

I think my snowman turned out adorable and I had all of the craft supplies on hand and my daughter donated the grandchildren's socks to me to use in my various craft projects.

Saturday, December 21, 2013

Handpainted Glass Snowman Snowball Ornaments

A friend of mine knows I love decorating for the holidays in a snowman theme and every year one of my small Christmas trees is decorated in a snowman theme. For that particular theme tree, I hang all of my various snowmen ornaments onto it.

Last week she brought over these 2" diameter glass ball ornaments that she had made for me in the cutest snowman design. I am NOT a decorative painter but the design is simple enough I think I could make some of these too!

She purchased 2" diameter white glass Christmas ornament balls and then painted them by hand. She simply painted on a red hat, black eyes, black coal mouth and an orange carrot nose. She used some of that white textured snow paint to paint the faux fur trim around the snowman's hat.

After they dried, she sprayed each ornament with a thin coating of clear acrylic spray sealer to seal in the paint which helps it to resist fading, cracking and chipping. She then left them dry a second time for a full 24 hours before bringing them over to me.

I think they are the cutest little things and now I got an entire dozen of them hanging on my snowman theme Christmas tree! A cute, simple & quick Christmas tree ornament project!

Thursday, November 15, 2012

Crafts - Hand Painted Snowman Terra Cotta Flower Pots

A friend of mine loves to dabble in crafts, especially hand painted crafts and last week she made me this adorable hand painted snowman terra cotta flower pot! I think it is absolutely adorable!

She took a 6" terra cotta pot and painted the outside of it with navy blue acrylic paint. Once dry, she took some white textured snow paint and painted the rim with that. That textured paint really looks like snow!

She drew her snowman design onto scrap paper first and then used acrylic paints to paint her design around the sides of the flower pot. Once it was dry, she sprayed clear coat acrylic sealer around the outside of the pot and left it dry overnight.

I am going to use my new flower pot to hold some wrapped Christmas candies and some festive candy canes! I love my new pot and she said they are really easy-to-make. You could paint several of them up in one day and give them as gifts or use them to decorate your home. You could seriously paint all kinds of festive holiday designs on these pots like: peppermint candy swirls, santa, elves, Christmas flowers, reindeer or whatever holiday design that you like! Happy Holidays!

Tuesday, January 25, 2011

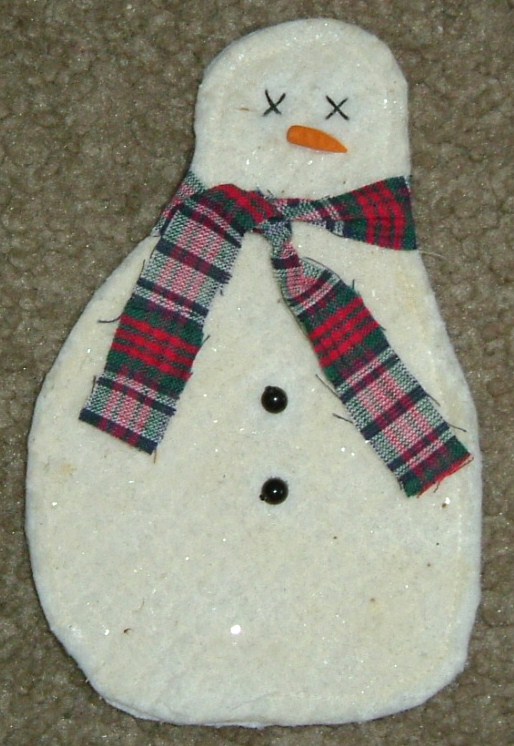
How To Make A Primitive Snowman Holiday Ornament or Refrigerator Magnet Pattern

Love snowmen? Like to decorate your home with snowmen during the entire winter season? If so, I have a really easy snowman project to share with you today. This project is easy enough that even a beginner crafter can master making one...or several of them in just one afternoon.

You will need just a handful of basic sewing and craft supplies that can be purchased at your general craft supply store. I used a sewing machine to make mine but you can certainly hand stich him together too!

Here are the supplies you will need to make one.

Warm 'n Natural Cotton Batting (natural off-white color)
Black Embroidery Floss
Orange Fimo Clay (just a tiny pea sized amount)
2 Plastic 4 MM Round Beads
Scrap of Homespun Cotton Fabric (measuring 1/2" by 7" in length for scarf)
Sharp Fabric Scissors
Sewing Machine and Basic Sewing Supplies
Clear Drying Modge Podge (decopauge medium)
Clear Crystal Glitter (fine grade)
Foam Stenciling Brush
Pattern

To Make Your Pattern: Hand draw a snowman shape onto paper that measures approximately 6" tall by 4 1/2" wide at his widest point. Cut out your shape and use as your pattern template.

Use your paper pattern and trace around it onto two pieces of cotton batting. Cut out the pieces. In a plastic cup or throw away bowl, pour 5 tablespoons of Modge Podges into the bowl along with 5 tablespoons of water. Stir until combined. Sprinkle in 1 to to 2 teaspoons of the glitter and stir again. Using your foam stenciling brush, brush the mixture across both pieces of your batting. Let air dry. (takes about 1 hour to completely dry).

Using six strands of black embroidery floss, stitch two X's onto his face to resemble his eyes, fasten off in the back so your ends and knots don't show on the front. Using a pea sized piece of orange Fimo clay, roll it out in the shape of a carrot for his nose. Bake the nose in the oven according to the package directions on your clay pack. Using three strands of black embroidery floss, attach your two round plastic beads onto the snowman's belly to resemble is black coat buttons, fasten floss off in the back so knots don't show on the front.

Using your sewing machine, place wrong sides together and straight stitch 1/8" in from the edges, leaving the bottom of the snowman open for turning. Once done, turn him right side out and finish the bottom edge stitching by hand. Cut a piece of homespun cotton fabric into a strip that measures 1/2" by 7" in length and tie it around his neck to resemble his scarf.

Variations: If you want to turn it into an ornament, thread a piece of white floss through the top to hang him on your tree or packages. If you want to turn him into a refrigerator magnet, glue 2-3 magnet disks onto his back side with hot glue or craft glue.

Sunday, October 31, 2010

Easy Snowball Snowman Holiday Ornaments Pattern

Check out this darling Christmas Ornament that my friend Darlene made for me! It is really easy to make and you only need a few supplies to make them. If you are an adult, you could use a glue gun to save time...if a child is making them, then you will want to use craft glue.

Snowball Snowman Ornaments

1 1/2" diameter styrofoam white ball
(2) 1" diameter pom-poms (for ear muffs)
2 1/2" long piece of a pipecleaner (for headband)
(2) 1/4" diameter wiggle eyes
1/2" long piece of orange pipecleaner (nose)
1/2" wide by 5" long piece of red fleece or red ribbon (for scarf)
String for hanging
Black Marker
Scissors
Glue (see note above)

Use the photo for placement of all items. Start by gluding the pipecleaner headband and the pom-pom ear muffs. Then glue on the eys and nose and use the marker to make 'coal' dots for his mouth. Finally, glue on your ribbon for his scarf. Finish up by attaching a hanging string to the top of the ball.

These can be used as Christmas Tree Ornaments, Package Toppers or hang off a knob or peg.

Happy Crafting!

Monday, September 13, 2010

FREE Crochet Plarn Snowman Refrigerator Magnets Pattern

Here is another great Trash To Treasure crafting project! This project utilizes plarn (plastic yarn made from plastic shopping bags) but you could also use 4ply acrylic yarn too. These darling little snowman refrigerator magnets work up quickly! If desired, you could omit the magnet on the back and add a hanging string and turn them into Christmas Tree Ornaments.

Click Here for a you tube video on how to make plarn.
Click Here for a web site that will teach you how to make plarn.

Here is what you will need:

1 plastic shopping bag, turned into plarn
1 round magnet
scraps of black, red & orange felt (for hat, hat ribbon, eyes & carrot nose)
all-purpose craft glue
size F or G crochet hook
scissors


To Make The Snowman Head:

With your plarn or yarn, chain 5, slant stitch into first chain to form a ring. Chain 1, then make 10 single crochets in the ring, slant stitch to first SC that you made, chain 1, then make 2 single crochets in each single crochet, slant stitch in first single crochet, fasten off and weave in your ends. (note: I made mine with plarn which is much bulkier than regular yarn).

To Make The Trims:

From black felt, cut a top hat shape and glue it onto the top of your snowman's head. I trimmed mine with a scrap of red felt on one and on the other with a scrap of ribbon. Cut a small triangle from orange felt for his nose and 2 small circles from black felt for his eyes. Glue these onto his head. You can decide if you want to add a mouth or not...either way he looks cute! Finish up by gluing a magnet disc on the back and let them dry for 2 hours.

Monday, January 25, 2010

Easy Felt Pieced Snowman Holiday Ornaments


Even though the holidays for 2009 are officially over, I still like to spend some of my crafting time making holiday ornaments for next years packages. Yes that is right folks...I love to craft for the holidays all year long. I have a habit of attaching handcrafted ornaments to every holiday package that I wrap, so I need to work on ornaments often.

During the summer, I found a vintage craft magazine at my local thrift store for .10 cents and purchased it...it features 18 snowmen craft projects inside. The name of the magazine is CRAFTS and it's the November 2003 issue. (hopefully you can find one on the secondary market). If not, I think you can look at the photo's of my completed projects and perhaps create your own pattern.

On page 70 of the magazine is a project on how to make felt applique snowmen and then attach them to your homemade holiday card fronts. I decided to use their felt applque snowman pattern and turn them into tree ornaments/package toppers. I think they are sooo cute that I am now going to make a few for my holiday cards and scrapbook layouts. The pattern shows 3 different ways to decorate them...one with a stocking cap, one with a top hat and one with no jacket.

Each one is completely handsewn and pieced together and made from craft felt. It took me about an hour to make each one...so far I have made 9 of them.


~ Happy Crafting ~

Tuesday, January 19, 2010

Primitive Wax Chunky Snowman Basket or Bowl Filler


During the summer months, I was fortunate to find some old metal soap and candy molds at my local flea market. One of the molds was of a snowman and I just new I had to make some wax chunky snowman's using that mold. I finally dug out my mold and got busy with it a few days ago.

I had purchased a candle making wax kit a few weeks ago at my local craft store. I melted down my wax according to the box directions and added some vanilla candle scent. While my wax was melting, I placed some whole cloves in the metal mold where the snowman's eyes and buttons would be. When my wax was ready for pouring, I gently poured my wax into the mold. I left it harden for 2 hours (wanted to make sure it was good and hard) and then removed my snowman chunky from the mold.

I then cut down some of my homespun fabric scraps into 1/2" wide strips and tied them around my wax snowmen.

I now have my wax snowman shapes sitting in a primitive basket in my living room that is filled with waxed stars, dried pods and some pine cones.

Pretty easy project...took me about 20 minutes to melt and pour my wax and another 2 hours for hardening time.

~ Shelly ~

Sunday, January 17, 2010

Country Homespun Snowman Applique Kitchen Towel


During the winter season, I love decorating my home in a snowman theme...I leave my snowmen out until the middle of February before I finally put them away for the season.

A few weeks ago, I saw some cute homespun towels out in a retail store that had snowman appliques on them...however, they were blue towels and my country kitchen is in red. I decided to not purchase them and to go home and make my own...that way, they would match my red kitchen.

Here is how I made my own snowman applique kitchen towels:

17" by 26" piece of homespun cotton fabric
Sewing machine with coordinating thread

I ironed my homespun to remove wrinkles. I then ironed a 1/4" back around all four of my edges (to the wrong side of fabric) and then folded it over again by a 1/4" so that it will hide the raw edges of my fabric. I then used a 1/4" seam allowance and sewed around all four edges of my fabric using a straight stitch.

Snowman Applique

You can find free printable snowman designs online by doing a search for free coloring pages or head to your local dollar store and purchase a holiday coloring book. Cut out the design. Scan the design into your computer and print off a few copies. I then cut apart my copies...one piece for the body, one for each piece of his clothing and so forth...until I have a pattern piece for each piece that I will need to make my snowman applique.

You will then trace each piece onto your desired color of wool felt with a disappearing ink pen. Cut out your felt shapes. Start building your snowman by hand sewing on his clothing and accents. I chose to use tiny little stitches for attaching all of his pieces to his felt body. Once I had him completed, I attached him to my towel by doing a blanket stitch around him. I used two strands of black embroidery floss for my blanket stitching.

It sounds a lot harder than what it really is...fun and relaxing. I like to sew up my towels one day...then during the evening while I am watching TV, I will hand sew up my appliques.

~ Happy Crafting ~

Tuesday, January 12, 2010

FREE Primitive Snowman Ornies Bowl Fillers By Barefoot Primitives


A few weeks ago, I was browsing around online for some free primitive snowman sewing patterns and came across a beautiful pattern by: Barefoot Primitives
and decided to download, print and make the project.

Her pattern is really easy to use and follow. These snowman ornaments and bowl fillers work up really quickly.

When I made mine (using her pattern) I decided to omit the twig arms...and leave mine arm-less as I liked the look of it better. In addition, I added mica (glitter) to mine after they were completed as I like the 'twinkle' on them. Some of the ones I made...I did hand stitched eyes and buttons and on other ones I used black round beads that I picked up at the craft store.

You can grubby them up with coffee stain or leave your Warm and Natural cotton batting plain...I did them both ways although my photo shows a prim one.

While you are visiting the Barefoot Primitives Web Site, take a look at her other goodies. She has completed products and also patterns available for you to purchase.

I really enjoyed making the snowman bowl fillers/ornies!


Friday, December 18, 2009

Primitive Country Wooden Snowman Door Greeter


One of my friends who is also a big time crafter...made me this adoreable wooden snowman to hang on my front door. She made hundreds of them over the summer and they were a big seller at her fall and holiday craft shows.

These wooden door hangers are really easy to make and I helped her many of times with the construction of them...so hence, she gave me one :)

Her snowman measures about 12" long by 7" wide at his widest point and is cut from 1/2" thick pine wood. He is painted a creamy vanilla color and once the paint is dry, he is lightly sanded along his edges (so that the wood shows through along the edges).

The wooden heart measures approximately 4 1/4" tall by 3" wide and is cut from 1/8" thick pine wood. It is painted a dark barn red color and then lightly sanded to give it an aged appearance. It is simply attached on the front with some wood glue.

The eyes are simply dotted on with some black paint using the back end of your paint brush. A tiny hold is drilled slightly into his face for the nose and a rusty square head nail is hammered (along with a tiny dab of wood glue) into place. His cheeks are dry brushed a rosey color.

Using a fine tip black paint marker, she writes messages on them, this one says "Let It Snow." He is then sealed with a clear matt sealer and left to dry.

She cut some dark red homespun fabric and purposely frayed the edges of it and use that for his bow.

On the backside is a little metal wire hanger so that you can hang him up.

Thursday, December 17, 2009

Easy Baby Sock Snowman Ornament Pattern


I recently became a first time grandma to a little baby girl back in May 2009. Since that time, I have enjoyed making a slew of things for our grand daughter. My daughter was kind enough to give me some of Baby G's outgrown newborn knit socks to use in some craft projects. I quickly decided to make a cute and simple snowman sock ornament.

Ages: 8 and up with adult supervision.

Supplies Needed:

1 white infant sized knit sock
Scrap of red fleece fabric (hat and scarf)
2 small black buttons
Orange Sculpey Clay carrot shaped nose
White Craft Glue
Scissors
Sewing Thread (white, red and black)
Small amount of poly-fiber fill

I chose to turn the sock inside out as I liked the loopy texture of the sock. I then decided where I wanted to hand sew on the black button eyes and used black thread to sew them on. I firmly stuffed the sock with some poly fiber fill and then hand sewed the opening of the sock shut.

You can machine sew or hand sew a fleece hat...mine measures approximately 4" tall by the circumference of my snowman's head (plus a 1/2" for the seam allowance). I then sewed it into a tube shape. Using red thread, I gathered the hat and fastened it tightly. I then used scissors and cut some fringe. I glued the hat on top of my snowman's head.

To make his scarf, I simply cut a piece of red fleece measuring a 1/2" wide by 7" long and tied it around his neck. Finish up by gluing your Sculpey Clay carrot shaped nose to his face. You can decide if you want to sew on some tiny black seed beads for his mouth or leave it plain like I did.

I was going for a simple, easy and quick project. He is big enough to tuck into a basket, on a shelf or add a hanging string to be hung onto your holiday tree. I also made a little hang tag for mine that dates my ornament and states that it was made with Baby G's baby sock! I am hoping my daughter will pass it on to Baby G once she becomes an adult.


Tuesday, December 15, 2009

Kids Craft Project - Recycling Can Lids Snowman Ornament


Last weekend while my nephews were visiting me...we had to come up with an easy holiday ornament project that used a throw-away item for one of their school projects. After much thinking, we decided to recycle aka re-purpose metal soup can lids and tuna can lids to make some hand painted snowman ornaments.

We used a can opener that unseals the tin can lids, so the edges of our lids are smooth.

Ages: 8 and up with adult supervision

Supplies Needed Per Ornament:

1 clean soup can lid
1 clean tuna can lid
acrylic paints - white, orange, navy blue and black
paint brush
foam paint brush
quick drying all-purpose craft glue
scrap of fabric or ribbon (for hanging loop)
Scissors
water dish and paper towels (for cleaning your paint brush)
(optional) clear acrylic paint sealer

Since painting is involved, lay several sheets of newspaper down onto your work surface.

Step 1: Paint the one side (the outside) tuna can lid a dark navy blue. We had to apply two coats of paint, letting each coat dry for 20 minutes. Paint both sides of the soup can lid with white acrylic paint. We had to apply two to three coats of paint. Let lids thoroughly dry.

Step 2: While your lids are drying, cut a piece of ribbon or scrap fabric to measure 6" long by 1" wide to use as your hanging loop. Wash your paint brushes and let dry.

Step 3: Squirt some all-purpose craft glue on the wrong side of your white soup can lid and use your foam paint brush to spread it around so its an even coat. Fold your fabric strap or ribbon piece in half and form into a hanging loop. Sandwich the strap between your tuna can lid and your soup can lid and press them firmly into place. Let dry for 10 minutes or until the lids no longer slide around.

Step 4: Let the child paint on black eyes, an orange carrot shaped nose and black mouth dots. (My nephews used the end of their paint brushes just dipped in black paint to do their mouth dots).

Set your ornament aside for a few hours to completely dry. If desired, you can spray it lightly with some clear acrylic paint sealer.

I had a great time making these with my 8 and 11 year old nephews.


Sunday, December 13, 2009

Paper Pulp Snowball Snowman Head Ornaments


This is a great project that utilizes some recycling...you will need a fast-food drink carrier or cardboard egg box to make your own paper pulp. You can make these snowball ornaments fancy or simple and plain like we did.

Ages: 8 and up with adult supervision.

Supplies Needed:

Cardboard Fast-Food Drink Carrier or Cardboard Egg Box
White Crafting Glue
Styrofoam Ornament Balls
Blender with tap water
Old Plastic Bowl
Foam Sponge Paint Brush
Strainer/Colander
Wooden Clothespin
White, Black and Orange Acrylic Paint
Paint Brush
(optional) scrap piece of fleece fabric

Making The Paper Pulp - Rip your empty paper drink carrier or empty egg box into small pieces. Place the pieces into an old plastic bowl. Pour in just a little bit of tap water and let the pieces soak for 60 minutes. Once they are good and wet, Pour paper mixture into a strainer. Using your hands, squeeze out excess water. Place paper pulp into your blender container and blend on low speed so that it gets mushy. Pour the pulp back into your empty plastic bowl. Stir in some white craft glue so that you are forming sticky paper pulp. Mine is the consistency of lumpy dough.

Making The Snowball - Using a foam-style paint brush, lightly spread white craft glue on 1/2 of your Styrofoam ball. Using your hands...pat on the paper pulp dough so that you are covering the top half of your ornament ball. Repeat this process on the bottom half of your ball. Once done, hang the ball up via the clothespin so that it can dry and harden. (mine take approximately 16 to 24 hours).

Note: I got a package of sparkly foam balls at our local dollar store...6 balls for $1.00 and those are cheaper than the craft store. You can recycle old ornament balls too...after all, you are covering them with the homemade paper pulp.


Adding The Facial Features - Once your ball is dry, paint with two coats of white acrylic paint. Once that is dry, paint on black eyes, black dots for his mouth and finally, an orange triangular shaped nose.

Optional Scarf - We cut a piece of fleece measuring 1 1/2" wide by approximately 10" long and tied that into a loop and then glued it to the bottom of our ball to resemble a fleece scarf.


Primitive Snowman Theme Muslin Fabric Tags


One of my favorite web sites to purchase Primitive Stitchery Patterns from is called Primitive Stitches. I love Rhonda's patterns because they are super affordable, easy to understand and they are delivered within hours to my email box so that I can print them out and get busy working on them.

This year I decided to make handmade ornaments to attach to all of our holiday packages and these cute primitive snowman tags is one that I purchased from the Primitive Stitches Site. I stitched them up onto tea-stained muslin using DMC floss. I used Warm & Natural batting in between my 2 layers of muslin fabric. I think they are just too cute since I am a snowman fan!

You could use these tags on your holiday packages, hang them on your tree, off of peg shelf hooks, cabinet knobs, etc.

Hop on over to Rhonda's web site and check out all of her fantastic primitive stitchery patterns today.

NOTE: No compensation was involved in this product/pattern review. I personally purchased the pattern from Primitive Stitches, it was not given to me so my review is honest and unbiased.

Friday, December 11, 2009

FREE Primitive Muslin Snowman Ornament Pattern


If you are looking for some free primitive patterns to make raggedy annie dolls and some holiday Christmas ornaments, you need to check out the free patterns offered by Sherry over on the Annies Cupboards Web Site ---> HERE

I recently downloaded and printed out the Christmas Snowman and Elf Ornie Pattern designed by Sherry and used her pattern and idea to make a snowman ornament for our Christmas Tree. However, Instead of stitching the facial features, I did a simple painting design.

I used acrylic paints and painted on his black top hat and then used 2 coats of white acrylic paint for his head. I hand painted on his black eyes and mouth using the end of my paint brush dipped into paint (just dotted them on) and handpainted a carrot shaped nose using orange acrylic paint. I finished up my ornie by tying a piece of jute around his hat. I think he turned out cute even though I decided to paint my features on instead of doing the handstitching like she shows in her pattern. I used muslin and a little poly-fill for my ornie.


Thursday, December 10, 2009

Kids Craft Project - Snowman Sewing Spool Ornaments


This easy to assemble Christmas ornament project will allow you to recycle empty sewing thread spools into nifty snowman holiday tree ornaments. You can use Styrofoam, wooden or plastic spools...however, you will need to use 2-3 coats of paint if using the plastic ones.

Recommend Ages: 5 and up with adult supervision.

Supplies Needed:

2" Tall Thread Spool
1 1/4" Tall Thread Spool
Acrylic Paint - White and Black
Paint Brush
Black and Orange Permanent Markers
White Craft Glue
Satin 1/4" Wide Ribbon
Scissors
Toothpick
Water Dish & Paper Towels for cleaning the paint brush

Lay several sheets of newspaper down onto your work surface. Remove any paper labels that might be on the thread spools. Paint the large spool with white paint and the small spool with black paint. You might need 2 coats depending on the type of spool you are painting. Set them aside and allow them to dry for 30 minutes.

Once the paint is dry, have the child use a black permanent marker to draw on 2 black eyes and 5 smaller black dots for the mouth onto the large spool. Using an orange marker, have them draw on a carrot shaped nose. Dip the end of a toothpick into white paint and dot on tiny white dot onto the black eye to add depth. (see photo). Set aside to allow the paint to dry for 30 minutes.

Once paint is done drying, use all-purpose craft glue to glue the bottom of the small black spool to the top of the large white spool. Cut a 5" piece from satin ribbon and tie it into a loop with a knot at the end. Squirt a glob of glue down into the spool hole and insert the knotted end down into it to serve as the ornament hanger. Finish up the ornament by cutting a 7" piece of satin ribbon and tying it around the snowman's neck to represent his scarf.

Saturday, November 28, 2009

Crochet Project - Snowman With Hat And Scarf Pattern


Here are the instructions on how you can make your very own crochet snowman for the holidays. This pattern was given to me by my aunt about 3 years ago. I am not sure of the original source since she photo-copied it for me. I lost the black crochet hat pattern over the years so you will have to make your own or buy one of those inexpensive felt ones at the craft supply store.

Crochet Snowman Pattern

Supplies Needed:

2 Wiggle Eyes
White 4-ply Acrylic Yarn
Red with Silver Sparkles (small amount) Acrylic Yarn
Sculpey Clay Orange Colored Carrot Shaped Nose
Poly-Fill Stuffing
Crochet Hook Size F
Tapestry Needle
Scissors

*Note* Work in continuous rounds.

Arms (Make 2)

Rnd 1: Chain 2, 6 SC in 2nd chain from the hook.
Rnd 2: 2 SC in each stitch (12 SC)
Rnds 3-6: SC in each stitch (12 SC)
Sl St in next st, fasten off.

Body (Make 1)

Rnd 1: Chain 2, 8 SC in 2nd chain from the hook.
Rnd 2: 2 SC in each sit (16 SC)
Rnd 3: (SC, 2 SC in next st) repeat around (24 SC)
Rnd 4: SC in each st (24 SC)
Rnd 5: (SC in each of next 2 st, 2 SC in next st) repeat around (32 SC)
Rnd 6: SC in eac st (32 SC)
Rnd 7: (SC in each of next 3 st, 2 SC in next st) repeat around (40 SC)
Rnd 8-13: SC in each st (40 SC)
Rnd 14: (SC in each of next 3 st, sc decrease) repeat around (32 SC)
Rnd 15: SC in each st (32 SC)
Rnd 16: (SC in each of next 2 st, SC decrease) repeat around (24 SC)
Rnd 17: SC in next 4 st, place arm next to body with right sides together, edges lined up. 4 SC through both arm and body (joining arm to the body), 8 SC across the front of the body (only in the body stitches), 4 SC to join 2nd arm, 4 SC in only the body stitches (24 SC)
Rnd 18: 4 SC, 8 SC around outside edge of arm, 8 SC across the front of the body, 8 SC around outside edge of the other arm, 4 SC (32 SC)
Rnd 19: SC decrease twice, 8 SC around arm, SC decrease 4 times across the front, 8 SC around the arm, SC decrease twice (24 SC)

Stuff the arms and body with poly-fill stuffing. I stuffed mine firmly.

Rnd 20: (SC, SC decrease) repeat around (16 SC)
Rnd 21: SC decrease around (8 SC)

Do not fasten off. Add a little bit more stuffing into the neck area.

Head (make 1)

Rnd 1: SC in each st (8 SC)
Rnd 2: 2 SC in each st (16 SC)
Rnd 3: (SC, 2 SC in next st) repeat around (24 SC)
Rnd 4-8: SC in each st (24 SC)
Rnd 9: (SC, SC decrease) repeat around (16 SC)
Rnd 10: SC decrease around (8 SC)
Rnd 11: SC decrease around (4 SC)

Slant stitch in next st, end off leaving a 8" long yarn tail. Using poly-fill, stuff the head firmly. Using the yarn tail and a tapestry needle, gather up the opening and sew shut using the yarn. Fasten off and thread in the yarn end so that it can't be seen.

How To Make The Scarf

Using a size F crochet hook, chain 50 stitches. SC in the second chain from the hook and in every chain across. Fasten off and thread in your end so it can't be seen. Tie your scarf around the snowman's neck. (I used red yarn with silver sparkles)

If anyone comes across the original pattern maker, please let me know so I can give them the proper credit for the pattern. Thanks!