Showing posts with label Valentine's Day Projects. Show all posts

Monday, February 25, 2019

Kid's Crafts: Mother's Day and Father's Day Painted Seashells

We visit the beach several times every year and often times we take our grandchildren down to the shore along with us. The kids enjoy playing on the beach and collecting seashells, especially large clam shells that they find along the shoreline.

Like most kids...my grandchildren enjoy easy-to-make craft projects and as a grandparent, I love that this project doesn't cost me a lot of money...basically just painting supplies. You can have the kids hand paint these large clam shells (seashells) to give as Valentine's Day, Mother's Day Gifts, Father's Day Gifts, etc. My granddaughter is working on one that she's going to give to her school teacher at the end of this school year.

For this project we used large clam shells that measure 4 1/2" to 6" in width. You want to wash them with a little bit of soapy water, rinse them and then let them thoroughly dry. Make sure all sand and debris has been removed.
Kid's Crafts: Mother's Day and Father's Day Painted Seashells

Cover your work surface with an old drop cloth, plastic table cloth, old newspaper, etc. Give the kids some acrylic craft paints, paint brushes, a water dish and some paper towels. Have the kids give each seashell 2 base coats of paint. Let them dry for 60-90 minutes or until the paint is no longer tacky.

Let the kids come up with their own artist designs and let them paint whatever they want on the top of the seashell. For this project they worked on Father's Day and Mother's Day designs. One seashell says "Mom" and one says "Dad". The smaller one has a heart design painted on it and my granddaughter gave that one to her Mom for Valentine's Day.

You will want to let the painted seashells dry overnight. Then take them outside and spray 1-2 coats of clear acrylic spray sealer on top. This will protect the painted finish from chipping, cracking or crazing. These painted seashells can be displayed inside or outside of your home. They look beautiful displayed in the garden, a flower bed, on the front porch or back deck!

Thursday, February 11, 2016

Kid's Craft Supplies from Yoobi

Two to three times every month I get together with my 6 1/2 year old grand daughter and whip up some quick & easy crafts. We've been holding our "crafting dates" for the past 2 years and she really loves spending that time with me.

We go through a LOT of kid's craft supplies and were pretty excited when Yoobi sent us a complimentary box of children's craft supplies to use with some of our Valentine's Day craft projects.

Yoobi is based on a bright yet simple idea: colorful, vibrant supplies for school, home or office that give to classrooms in need. For every Yoobi item purchased, Yoobi contributes a Yoobi item to a classroom in need, right here in the U.S. You can visit their site to learn more about the company and to see the products that they make.

Here is what we received in our box:

* Scissors
* Metallic Heart Shaped Glitter Confetti
* White School Glue
* Heart Shaped Erasers
* Washable Markers
* Crayons
* Dark Pink Folder
* Light Pink and Light Lavender Paper
* Animal Stickers & Temporary Tattoos
* Bright Pink Pen Cup (Pen/Pencil Holder)
* Self-Inking Roller Stamp (Cupcake Design)
* Pink Heart-Shaped Rubber Bands

The Princess has a Valentine's Day party at school and one at her next Girl Scout's meeting and needed a card box to collect all of her Valentine's Day cards in. You know what I'm talking about, kid's exchange all of those little greeting cards and need something to put them all in. We call them Valentine's Day Card Keepsake Boxes.

We sat down and decided to use our new craft supplies to decorate a pink and purple box for Valentine's Day. It's the perfect size to hold all of her little cards from both of her upcoming parties. She's 6 1/2 years old and I think she did a fabulous job at decorating the inside and outside of her new keepsake box!

After we were done with the box, she decided that she wanted to make a homemade Valentine's Day card for her mom (my daughter) and she made that entire card from the paper that they sent, used the markers, glue, self-inking roller stamp in the cupcake design and stickers. Again, I think she did a fabulous job and I love watching her get creative!

We still have a lot of craft supplies left that Yoobi sent to us for this review and we look forward to using them in future craft projects. Matter of fact, we will share some kid's craft projects with you right here on the blog in the coming weeks!

Disclosure: Shelly received complimentary kid's crafting supplies from Yoobi for this blog post. No monetary compensation was received.

Friday, January 24, 2014

Quick and Easy Valentine's Day Paper Window Hearts - Craft Project

Last weekend my little 4 1/2 year old grand daughter came over to my house for a visit. She loves to sit down with me and do little crafts, so we decided to work on some Valentine's Day paper hearts to hang in our front windows.

What is really nice about this craft project is that we used only scraps from my scrap craft box. I toss in a box all of my leftover crafting supplies and then we use them up when she comes to visit.
Valentine's Day Paper Hearts Window Decorations

suction cups
red paper heart doilies
white cardstock
pink cardstock
glue stick (kind used in scrapbooking)
liquid Elmer's glue pen
alphabet stickers
satin cord or yarn
1/4" wide satin or sheer ribbon (for hanging)
markers
valentine's day stickers
scissors
We took the red paper heart shaped doilies and used a glue stick to glue them onto white cardstock. We then used scissors to cut around them. This made them sturdy as the paper doilies themselves were really flimsy and we like the white showing through the lace of the paper doily. We made our own heart pattern and cut out hearts from pink cardstock and glued them in the center of our red heart doily. We then used a liquid glue pen and glued satin cord or yarn around the edge of the cardstock heart to finish off the edges.

On the pink cardstock heart we used alphabet letters to spell out common Valentine's Day phrases and words. On a few of the hearts my grand daughter glued stickers to the center as she prefers stickers over lettering! I cut a 5" piece of satin ribbon or sheer ribbon and folded them into a hanging loop and stapled them to the heart. You can also use glue to do that, but we used hot pink staples.
After our paper hearts dried overnight, we hung them up in the windows on the front of the house using small 1 1/2" diameter suction cups. They look a lot cuter hanging in the windows than what my photos show but we love them!

A great little paper craft project to do with the kids that doesn't cost a lot of money and you probably have most if not all of the supplies around your house. Happy Valentine's Day!

Tuesday, April 30, 2013

Craft Project - Scrabble Tile Framed Wall Hanging


My future son-in-law is turning into a really crafty guy and today, I just had to show you all what he made for my daughter as a Christmas present this past year. Even though he gave it to her for Christmas, it would make a great Valentine's Day, Mother's Day, Easter, Wedding or Birthday gift too!

Scrabble Tile Framed Wall Hanging

Supplies List:

Wooden Frame (your choice of size, his is very large)
White Photo Mat (or color of your choice)
Piece of Heavy Duty Cardstock (color of choice to fit inside the photo opening of the mat)
Lots of Wooden Scrabble Tiles
Glue Dots ( adhesive used in scrapbooking & cardmaking)

Directions: For the project, he spelled out their names, daughter's name and words that are related to love, trust, friendship, etc. (sorry for the flash in my photo). He spelled out the words he wanted and then arranged them onto the black piece of heavy duty cardstock using the glue dots on the back of each wooden tile to hold them in place. He then took the left-over wooden Scrabble tiles and just randomly placed those letters onto the white photo mat as shown in the photograph above. He then assembled everything and slipped it all into a black wooden picture frame. On the backside of the frame, he wrote a love letter to my daughter directly onto the back of the frame which is super sweet!

My daughter has her new piece of handmade "art work" hanging up in their family room and I think it's absolutely GORGEOUS! My photo doesn't do it any justice thanks to my flash on the camera bouncing off of the glass. I will try to get a better photo of it and update this blog post when I do.

Friday, February 1, 2013

DIY Valentine's Day Cards from Martha Stewart's Crafts


Looking for some quick & easy Valentine's Day homemade greeting card ideas? Well, check out these ideas that were sent over to us from Martha Stewart Crafts! I love that these are quick, simple and easy ideas, you could whip up several of them in just one afternoon! Thanks Martha! (see below for the ideas).

When it comes to Valentine’s Day, a homemade card is sweeter than fancy chocolates and more personal than blooming roses. And with Martha Stewart Crafts, unleashing your inner cupid is as easy as 1-2-3:

1. To express your heart’s desire, start with the utterly charming Martha Stewart Crafts “Stamp Card and Envelope Set” – it includes 18 scalloped edge note cards and matching envelopes with heart-accented labels so you can share your love with everyone you wish.

2. Add your personal stamp with the “Wood Stamp Valentine’s Day Hearts” set of 12 mini stamps nestled in a reusable wood crate.

3. Seal with a kiss…and with “Valentine Cupid” and “Valentine Cupcake” stickers. Yummy confections, cherub silhouettes, hearts and more Valentine icons shine with glitter and foil accents.

To make things even sweeter, you can save 20% at MarthaStewartCrafts.com now through Valentine’s Day (February 14th, 2013). Just enter coupon code BLOG20 at checkout.

Thursday, February 3, 2011

Four Homemade Valentine's Day Cards to Make

Four Homemade Valentine's Day Cards to Make by Rachel Paxton

There is nothing as special or personal as a homemade Valentine's Day card. Surprise your friends and family with your handmade creations. Here are some ideas to get you started.

Materials:

Four blank greeting cards (available at craft stores), dark red piece of scrapbooking paper, white piece of cardstock, cream colored piece of cardstock, red and white gingham piece of scrapbooking paper, paper cutter, scissors, glue stick, computer, printer, sewing machine.

Card #1:

For this card you will need a dark red piece of scrapbooking paper, a red and white gingham piece of scrapbooking paper (or other coordinating piece of paper), and a piece of white cardstock. Cut a piece of the dark red paper to fit the front of the greeting card and glue it in place. The dark red is the background of the card. Cut two strips of the gingham paper, approximately an inch and a half wide. Cut them to the width of the card (this card will open horizontally). Tear a freehand heart from the gingham paper, large enough to fill up approximately three quarters of the entire card. Next glue the strips of gingham paper to the front of the card with space in between them. The idea is that there is a "strip" of gingham, a strip of red, a strip of gingham, and then a strip of red. Use your sewing machine to stitch* along the edges of the strips of gingham paper, and then stitch around the edge of the card. Glue the heart in the middle of the card. Type "Happy Valentine's Day" on your computer and print out on white cardstock. Cut out the phrase (narrow strip) and glue to the center of the heart.

* Stitching tips: If you have never used your sewing machine to make cards, it is easy! Just sew on the paper like you would on fabric. You might want to reserve a needle just for paper so you don't dull the needle for your fabric projects. There are two ways you can include stitching in your card making projects. You can either stitch directly on the card, or you can stitch on a separate piece of paper and then glue that piece to the card (then the stitching won't show through the card).

Card #2:

This Valentine's Day card is quick and easy. Cut a piece of dark red paper to fit the front of your blank card and glue it in place. Type "Happy Valentine's Day" on your computer and print it on the cream colored paper. Mat the cut-out phrase first on a dark red piece of paper, and then mat that piece on another piece of cream colored cardstock to create a layered look. This card will open horizontally, so turn it in that direction and glue the Valentine's sentiment to the top third of the card. For the bottom portion of the card cut three small freehand hearts from the dark red paper. Glue these hearts to three torn scraps (in the shapes of squares) of cream colored paper. Space these pieces across the bottom of the card and glue in place. Stitch around the outside of the card and around the "Happy Valentine's Day" if you wish, but it isn't necessary.

Card #3:

This card is made from a dark red piece of paper and a cream colored piece of paper. Cut a piece of the dark red paper to fit the front of your blank card and glue it in place. Cut a large square from the cream colored paper and glue it just above the center of the card. Glue the piece of paper in place. Tear a large heart from the dark red paper and glue it in the center of the cream colored square. Type "Happy Valentine's Day" on your computer. Print on cream colored paper and glue in the center of the heart. Stitch around the cream colored square and the edge of the card, if you wish.

Card #4:

This card is made from a dark red piece of paper, the gingham paper, and white card stock. This card will open horizontally. Cut a piece of the dark red paper to fit the front of your blank card and glue it in place. Cut two strips of gingham paper and glue them to the top and bottom of the card so that there is a red strip in between. Cut three freehand hearts from the gingham paper and space them out in the red portion of the card. Glue them in place. Type "Happy Valentine's Day" on your computer and print on white paper. Cut out into a narrow strip (narrower than hearts) and glue in the center of the card on top of the hearts.

Notes: - The terms "card stock" and "paper" are used interchangably here, but it is up to you which kind of paper you use, depending on the look you are trying to achieve - A sewing machine isn't necessary for this project, it is just a nice added touch - You don't have to use your computer for this project, you can handwrite the words if you wish.

Photos of finished Valentine's Day cards: http://www.crafty-moms.com/valentines-day-cards.shtml

Rachel Paxton is a freelance writer and mom of four. For scrapbooking, card making, gift-giving ideas, and more family memory-making activities, visit http://www.crafty-moms.com/.

Sunday, January 30, 2011

Cardmaking - How To Make 3 Pretty Valentine's Day Note Cards

Are you looking to make your own greeting cards for Valentine's Day? If so, I have 3 great handmade greeting card ideas to share with you. To make each of these note cards you will need just a few basic craft supplies that you can purchase at any local craft supply store. Each of these design's were made on a blank 5 1/2" by 4" card stock note card and take less than 20 minutes each to make.

Materials Needed:

5 1/2" wide by 4" high blank note cards with envelopes
2 sheets of 8 1/2" by 11" scrapbooking paper in Valentine's Day designs
1/2 sheet solid pink scrapbooking paper
1/4" by 12" long piece of pink & red print ribbon
1/2" by 5 1/2" piece of purple & pink ribbon
4 foam glue dots
sentiment rubber stamps and black or red ink pad
scalloped edge scissors and straight edge scissors
stickers and 3-d embellishments to decorate your cards
glue stick and liquid glue pen (adhesives)
cutting mat and knife

Design #1: My Heart Belongs To You (shown above)

Using a piece of patterned paper (in this case, it's a heart pattern) cut it down to measure 5 1/2" by 3 1/4" in size. Use your scalloped edge scissors to cut one long edge on the paper to make it scalloped. Cut a piece of solid pink paper to measure 5 1/2" by 1" in size. Use your scalloped edge scissors and cut on long edge on the paper to make it scalloped. Using those same scissors, cut the front long edge of your note card to make the edge scalloped. Using your glue stick, glue down the solid pink strip onto your card leaving 1/4" of the white card front showing. Use the glue stick to glue the large printed piece of paper on top, leaving 1/2" of the solid pink piece of paper showing. For this card I applied a 3-D embellishment that says Forever to the lower 2/3 of my card front. Above that I used a clear backing sticker that says "My Heart Belongs To You". I cut a piece of solid light red paper that measures 5 1/2" by 4" in size and glued that inside. I then had a rubber stamp that has a romantic saying on it and hand stamped that inside on the red paper.
Design #2: I Love You

From my patterned heart paper I cut a block that measures 5 1/2" wide by 3 3/4" high. I trimmed one long edge with the scalloped scissors and attached it to the front of the card with a glue stick. Using a liquid glue pen or glue dots, attach your choice of ribbon 1/2 way down the card running horizontally across the front. I made my own 3-D embellishment from a heart shaped I Love You sticker that I attached to red card stock and trimmed it down leaving a very tiny red edge surrounding it. I then used 4 foam dots to attach it to the front, centering it on the ribbon. I left the inside blank on this one so that I could write my own message.
Design #3: Love Hearts

From my patterned heart paper that has the printed words of LOVE and XOXO on it...I cut a block that measures 5 1/2" by 4" to completely cover my card front. I then attached the paper to the front with a glue stick. I cut my ribbon to measure 1/4" by 5 1/2" and tacked that down near the bottom edge with my liquid glue pen. I cut another piece of ribbon measuring 5" long and tied it into a bow and tacked that onto the center of the ribbon trim with a glue dot. I had 2 heart shaped 3-D embellishments made out of red and white felt that I attached to the upper right and bottom left of the card front to add accent. Using a rubber stamp and red ink, I hand stamped my sentiment inside.

This craft project, instructions, article, etc. is written by Shelly Hill, copyright 2011, All Rights Reserved. You can not reprint this information or use my photo's without my permission nor without my official author's bio. You can obtain my permission and bio by emailing me. Please see my Terms of Service Policy for email address. Thanks!

Saturday, January 22, 2011

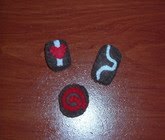
Craft Project ~ Cute Felt Faux Candy In Valentine's Day Heart Box

Love to decorate your home for Valentine's Day? Are you looking for a super easy Valentine's Day craft project? If so, I got a cute one to share with you today! This craft project consists of hand sewn faux chocolate candies that are made out of your traditional craft felt. In addition to a few standard craft and sewing supplies, you will need a small heart shaped candy box that is empty and clean. This is a really cool item to use in your holiday decorating.

* note: You are basically forming boxes out of felt to make these candies.

Supplies Needed To Make The Project:

Felt: 1 sheet of dark brown, chocolate brown, white and red
Embroidery floss to match the colors of your felt
Embroidery Needle and Scissors
Small amount of fiber-fill stuffing
1 clean and empty heart shaped candy box

Paper Patterns to use as templates: On a piece of paper, draw out a 1 3/4" diameter circle, 2" square and a rectangle that measures 1 1/2" by 2" in size. Cut out these shapes and use them as patterns.

Round Chocolate Candy: Cut two round shapes out of chocolate brown colored felt, cut one strip that measures 1/4" wide by 5 3/4" long. From red felt, cut out a swirl shape that is the diameter of your circle temple by about 1/8" wide. Using two strands of embroidery floss and your sewing needle, blanket stitch the thin strip around the edges of one circle and fasten off. Using two strands of red embroidery floss, hand stitch the red swirl to one of the chocolate brown circles using tiny whip stitches, fasten off. Using two strands of brown floss, blanket stitch the remaining circle onto the other side of the skinny strip. Right before you have it completely sewn shut, insert in a little bit of stuffing inside and then finish stitching it shut.

Square Chocolate Candy: Cut two square shapes out of white colored felt, cut one strip that measures 1/4" wide by the 8 1/4" long. From chocolate brown colored felt, cut four strips that each measure 1/8" by 2" long. From red felt, cut a heart that measures approximately 1/2" in diameter. Using two strands of brown embroidery floss, sew the tiny brown strips across one of the white squares. Using two strands of red embroidery floss, sew the heart on top of the brown strips in the center of the white square. Use two strands of white embroidery floss and hand stitch the white strip around all four edges of the square. Using hand stitches, sew the other square onto the other edge of the strip. Right before you have it completely sewn shut, insert a little bit of stuffing inside and then finish stitching it shut.

Rectangle Chocolate Candy: Cut two rectangle shapes out of dark brown felt, cut one strip from dark brown felt that measures 1/4" wide by 7" long. Hand cut out of white felt a swirl shape that measures 1/8" wide by 2" long and hand sew this swirl to the top of one your rectangles. Using two strands of dark brown embroidery floss, hand sew the strip to all four edges of one of your rectangles. Sew the other rectangle onto the other side of the strip. Right before you have it completely sewn shut, insert a little bit of stuffing inside and then finish stitching it shut.

This project was designed by Shelly Hill, copyright 2011, All Rights Reserved.

Sunday, January 16, 2011

How To Make Valentine's Day Chocolate Candy Magnets Out Of Craft Felt


How To Make Valentine's Day Chocolate Candy Magnets Out Of Craft Felt
Do you enjoy making handmade craft items to decorate your home with for Valentine's Day? If so, I've got a really easy craft project to share with you today. These little chocolate candies are completely hand sewn and crafted together out of your classic crafter's felt.

Once you complete them, you can add magnets onto the back side of them and place them on your refrigerator or file cabinet. If you have a little girl in your family, you can place them inside an empty clean Valentine's Day candy box so that she can use them as pretend food with her little toy dishes. No matter how you decide to use them, they are super easy to make and work up quickly.

Here is what you will need to make them:

1 sheet of craft felt in each of these colors: pink, red, chocolate brown, dark brown, white and vanilla.
Embroidery floss (to make all colors of your felt)
Small amount of poly fiber fill stuffing
Sharp Scissors, Embroidery Needle, Measuring Tape
Paper Shape Templates (use as patterns)
Round Magnets
All Purpose Liquid Quick Drying Craft Glue

To Make Paper Pattern: On a piece of paper, draw out a 1 3/4" diameter circle, 2" square and a rectangle that measures 1 1/2" by 2" in size. Cut out these shapes and use them as patterns.

Round Chocolate Candy: Cut two round shapes out of chocolate brown colored felt, cut one strip that measures 1/4" wide by 5 3/4" long. From red felt, cut out a swirl shape that is the diameter of your circle temple by about 1/8" wide. Using two strands of embroidery floss and your sewing needle, blanket stitch the thin strip around the edges of one circle and fasten off. Using two strands of red embroidery floss, hand stitch the red swirl to one of the chocolate brown circles using tiny whip stitches, fasten off. Using two strands of brown floss, blanket stitch the remaining circle onto the other side of the skinny strip. Right before you have it completely sewn shut, insert in a little bit of stuffing and then finish stitching it shut.

Square Chocolate Candy: Use your square paper pattern and cut two squares from dark brown felt. Cut a strip that measures 1/2" wide by 4 3/4" long. From white felt cut a strip that measures 1/8" by 2" and from red felt cut a heart shape that measures approximately 1/2" in diameter. Using two strands of white embroidery floss, hand stitch the white strip to one of the brown squares using tiny whip stitches. Using two strands of red floss, hand stitch the heart on top of the white strip using whip stitches. Using two strands of brown floss and a blanket stitch, attach the dark brown strip around the sides of the square you just decorated. Pick up your blank square and attach that to the other side of the strip using a blanket stitch. Right before closing, insert some stuffing inside and finish your stitching. Fasten off and hide your ends inside the square.

Rectangular Chocolate Candy: This is made just like the square but decorated a little bit differently. For this piece of candy, I used vanilla colored felt for my base. I then cut four tiny strips from brown felt and hand sewn them on top to resemble lines of icing. On top of that, I sewed on a red heart to decorate it. You will assemble this piece just like the other pieces.

Variations: You can change up the colors of your felt and make various theme'd shapes to decorate them...like little flowers, hearts, cupid's arrow, etc.

Once you are all done stitching them, you can glue magnets on the back and use them as cute holiday refrigerator magnets.

This project, instructions and idea is written by Shelly Hill, copyright 2011, All Rights Reserved.

Tuesday, November 2, 2010

FREE Crochet Pattern - Hearts Refrigerator Magnets!

A few days ago my aunt asked me to crochet some new refrigerator magnets for her to give out to her lady friends and she wanted them heart shaped...so I got online and found a great free pattern that you can find ----> HERE

They used a size F crochet hook but I wanted them a little smaller so I used a size D and they came out just fine. These heart refrigerator magnets work up quickly, I was able to make 6 of them in less than 1 hour. The instructions have 2 ways that you can finish them...one is with a lacey border and one is for a flat edge border...I made them both!

I think they would be super adorable done in red, pink and white for Valentines Day too!

Happy Crocheting!

Friday, June 11, 2010

FREE Crochet Hearts Doily Pattern!


If you love quick and easy crochet projects, I think you will love this Hearts Around Doily Pattern designed by Terri Kroupa.

You can find the FREE printable pattern on the Around The Crochet Table Site.

I decided to make one for my auntie as she loves to decorate during each and every holiday so I made mine in red and white so she could put it out during Valentine's Day but you can make it any color combination that you desire. The original designer made hers in rose and white colored sport weight yarn.

I was able to quickly make it, less than 40 minutes from start to finish and I think its cute...now I need to make one for myself in blue :)

So head on over to the Around The Crochet Table Site and print out the instructions so that you can crochet one too!


Happy Crocheting!


Thursday, January 28, 2010

Decoupage - How To Make A Valentine's Day Flower Vase


I just love crafting up new items for Valentine's Day and a few days ago I decided to decorate a new vase for myself...after all, hubby will be getting me some Valentine's Day flowers to put inside it (usually white roses).

Decoupage Valentine's Day Glass Vase

This is a very easy project. Here is how I made my vase:

Tissue Paper- Dark Pink, Light Pink, White and Red
Decoupage Medium - Glossy Finish
Clear Mica Glitter
Foam Brush
Newspaper (cover your work surface)
Glass Vase

I first started by washing and drying my vase. I then took some rubbing alcohol over it and left it air dry for several minutes. While it was drying, I ripped up my tissue paper into a variety of shapes and sizes.

In a small glass bowl, I added 4 tablespoons of decoupage and 1/2 teaspoon of water. I like to add just a tad of water so its not as thick. Using my foam brush, I layered on a thin coat of decoupage medium onto one side of my vase. I then used my ripped up tissue paper and just layered it on in a pattern that I liked. You will repeat this process for all sides and the bottom of your vase. You will want to let it dry for 1-2 hours. Once dry, use your foam brush to layer a top coat onto the tissue paper and let it dry for an additional 1-2 hours.

Optional: After I coated my vase with the top coat layer, I chose to sprinkle on some mica glitter. If you want to add the glitter, make sure you sprinkle it on while the decoupage medium is still wet.

Now you have a beautiful vase for Valentine's Day!

~ Happy Crafting ~


Friday, January 22, 2010

Easy To Make Felt Valentine's Day Candy Box


Last week I had to come up with an easy to make Valentine's Day project to do with 11 to 13 year old girls. This project also needed to be made from felt and be handsewn. After pondering this for a day or two...I decided that our project would be this easy to make Valentine's Day candy box (cube) made from 3 different colors of craft felt.

Here is what you will need:

Red, White and Pink Craft Felt
Red, White and Pink Embroidery Floss
Blunt Tip Embroidery Needle and Scissors
4" square template

The first thing you need to do is make your 4" square template. Once you have your paper template...cut 5 squares from your red craft felt. Next, make another paper template that measures 3 1/2" square, you will use this smaller square to make your heart template. Fold the square in half and cut out a heart shape. Trace this shape onto white felt and cut out. Now, trim off a 1/4" from all sides of your paper heart shaped template so that its a little smaller than what it was before. Trace it onto red felt and cut out. Cut off another 1/4" from your paper heart template and trace your final heart shape out of pink felt.

Using 2 strands of red embroidery floss, hand stitch the word LOVE onto the center of the pink heart. Using 2 strands of pink floss, blanket stitch around the edges of the pink heart to attach it to the front of your red heart. Using 2 strands of white floss, blanket stitch your red heart to your large white heart. Finally...using 2 strands of red floss, blanket stitch your white heart to one of your red square felt blocks.

Using 2 strands of white embroidery floss, connect 4 of your square blocks to the 5th block to form a cube. Once they are attached blanket stitch up the sides and across the top edges. You should now have a cube (box) shape.

If you are not familiar with how to do a blanket stitch, you can certainly just whip stitch all of your pieces together.

Your new Valentine's Day Candy Box is now ready to be filled up with candy...but I do recommend that you fill it with wrapped candies so that it doesn't get soiled.


Sunday, January 3, 2010

Easy Felt Valentine's Day Beverage Coasters Pattern


If you are looking for a fast and easy craft project that you can make for Valentine's Day, consider making some felt beverage coasters. These coasters only take a handful of crafting supplies and are completely hand sewn.

Here are the supplies that you will need:

Red and Pink Craft Felt
Red, White and Pink Cotton Embroidery Floss
Scissors
Blunt Tip Sewing Needle
Ruler
Hand Drawn Heart Pattern (our pattern measures 3 1/2" tall by 3 1/2" wide).

Step 1: Cut your pink felt into 4 1/2" squares. You will need two squares for each coaster that you make. From red felt, cut one heart shape for each coaster.

Step 2: Using two strands of pink or white embroidery floss, hand stitch the word hugs, love or xoxo onto your red felt heart. Once that has been completed, use two strands of pink embroidery floss and blanket stitch the red heart to the center of one pink square. You will do a blanket stitch around the entire circumference of the heart which will attach it to the pink square.

Step 3: Place your heart square (right side up) against a solid pink square and use two strands of red embroidery floss and blanket stitch both of your squares together. Once finish, fasten off the ends of your floss by hiding them inside the coaster.


This pattern, photograph and instructions are copyright 2009 by Shelly Hill, All Rights Reserved. If you would like to use this pattern on your web site, please contact Shelly for permission.