Showing posts with label Thanksgiving Projects. Show all posts

Friday, April 18, 2014

Visit to the Pumpkin Patch - Scrapbook Layout Idea

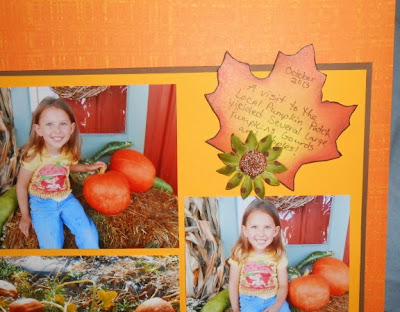
Last weekend I finally had some time to tackle some scrapbooking projects. First up was making a scrapbook page that features my little grand daughter at the local Pumpkin Patch when we took her there back in October to pick some pumpkins.

I did this layout in the traditional 12x12 size and wanted a quick, easy and very uncluttered looking page. I think I accomplished all three of those requirements!

The background is a 12x12 sheet of textured & weathered orange cardstock with a slight yellow weathered pattern on it. I made my own border strip from patterned paper that measures 1" by 12" in size and matted that onto cocoa brown cardstock. Down the center of my border strip I used a rub-on strip that features acorns, acorn leaves and maple leafs. I love using rub-ons when I can find them at a great deal and that particular one only cost me .10 cents...a bargain!
I slightly cropped down my 3 photos but wanted them to be large since they are really nice photographs from our day at the Pumpkin Patch. I matted them onto a solid yellow piece of cardstock, left a 3/16" border and then matted the entire thing onto cocoa brown cardstock, trimmed and left an 1/8" border mat around that.

I placed the entire photo mat in the center of the layout as you can see in my photograph above. I cut a maple leave shape out of some scrapbooking paper that measures about 3 1/2" by 4 1/2" in size. I inked around the edge of the leaf using black ink, left it dry. I then did my journaling onto the leaf in my own handwriting.

I still felt that the layout needed a little bit more so I added a olive green with brown accents artificial daisy to the bottom of the maple leaf. I wanted all of my photos, journaling and accents to stay compact and in the center of the layout...which worked out pretty nicely.

A quick, easy, inexpensive and cute layout that won't take you a lot of time or money! Just the way I like my scrapbooking to be!

Sunday, January 5, 2014

Thanksgiving Scrapbooking Layout Ideas

We are now into the new year and things are finally settling down after the holidays. I ventured into my craft room a few days ago and decided to scrapbook some of my Thanksgiving photos of my little grand daughter.

I am a traditional scrapbooker and not into digital scrapbooking at all. I like playing with paper, chalks, ink, stamps and all kinds of other things. Digital scrapbooking doesn't bring me any type of crafting enjoyment at all.

The following layout is a 2-page layout done in a Thanksgiving or Fall Harvest theme. They are done in the 12x12 size and feature many different types of embellishments. There is a paper pieced Thanksgiving turkey, chipboard leaves, paper layering, artificial fall flowers, a chipboard pumpkin and a whole lot more.
I could of added more photos but decided to use just two 4x6 photos on the one page and one 4x6 photo on the other. I then used up the rest of the space with all of my fall and Thanksgiving embellishments. Some elements were purchased and others were made by me.

The color scheme is brown, orange, deep yellow, mustard yellow, dark berry, green and some ivory for the title block. I think all of these colors work very well together, especially for a Thanksgiving Scrapbook Layout.

I am just about done with my Fall photos and then I need to get busy on vacation photos and Christmas photos next. Now that the holidays are over with, hopefully I can spend a lot more time in my craft room over the next several weeks. Enjoy!

Tuesday, November 26, 2013

Color Your Thanksgiving with Crayola + Thanksgiving Craft Project Ideas

This Thanksgiving, get inspired and create new traditions and memories with a little creativity and a lot of color! Just in time for the holiday, Crayola is encouraging families to spend time together making festive decorations for the home and Thanksgiving table.

From one-of-a-kind centerpieces to handmade turkeys, parents and children can select from a number of craft activities to celebrate the Thanksgiving holiday.

Here are some ideas to get you started:

* Use Crayola's proprietary Model Magic modeling compound to make festive Model Magic turkeys that will add originality to the Thanksgiving table.

* Get nostalgic by creating a "talking turkey" centerpiece that includes each family member writing a message of gratitude on paper feathers.

* Check out these videos to get your creative juices flowing!

 http://www.youtube.com/watch?v=bwmrT7uPC14
 http://www.youtube.com/watch?v=nHxP2gZBJko

* For a complete listing of Crayola's Thanksgiving craft ideas, visit www.crayola.com/colorfulthanks for inspiration or vote for your favorite crafts! Additionally, people are encouraged to share their festive creations with Crayola by using the hashtag #ColorfulThanks when sharing on social media (Twitter, Facebook, Instagram and Pinterest).

Friday, October 25, 2013

Craft Project - Quick & Easy No-Sew Pumpkin for Fall


Last Fall we made several of these Quick and Easy No-Sew fabric pumpkins and used them in our Fall & Halloween decorating here around our home. You can basically make these fabric pumpkins any size that you would like...which is how I made them!

You can use your new pumpkins to decorate for Fall, Halloween and Thanksgiving!

No-Sew Fabric Pumpkins for Fall

orange cotton fabric
poly-fiberfill stuffing
3 to 4 artificial green leaves
raffia (looks like straw)
1/4" diameter by 2" long twig
hot glue and hot glue gun
dinner & dessert plates (for circle templates)
sharp fabric scissors

I used various sized dinner and dessert plates to make my circle templates. I simply traced around them directly onto my orange cotton fabric and then cut the circles out using sharp fabric scissors. Take one circle and place a handful or two of stuffing into the center of it. Using your hands, gather up the edges to close it up and tack it down with hot glue. (You may want to use a needle and thread and just hand-gather it up if you find it too difficult to do it the way I explained above). Before the glue is dry, shove your twig down the center and add more hot glue to secure it. Once you have it glued shut, use your hands to move the stuffing around until it resembles a pumpkin with a semi-flat bottom. Use your hot glue gun to glue on 3 or 4 artificial green leaves (around the twig stem) and let dry. Cut the raffia into 6" and 8" long pieces and tie a few of them around the twig stem to resemble straw.

Monday, September 30, 2013

Clay Pot Scarecrow Craft Project for Fall and Halloween


I love decorating the inside and outside of my home for the Fall holidays, don't you? Well today, we got a great craft project for all of you! Even if you are not a big crafter, you can make this adorable Clay Pot Scarecrow in just one afternoon or weekend!

You can use hot glue and a glue gun to glue them together but if you find they are not staying put, try using some E6000 glue/adhesive.

Clay Pot Scarecrow

Four 2" clay pots
Two 1 1/2" clay pots
Two 1" diameter wood balls
One 4" clay pot
One 3" clay pot
One straw hat
Raffia
Acrylic Paint: Royal Blue, Black, Red, Yellow, Silver, Flesh (peach), Gold and Brown
Paint Brush
Clear Acrylic Sealer (comes in spray can)
Hot Glue and Glue Gun

You can paint your clay pots any way that you would like or follow my photo for some guidance. Once they are done drying, spray them with the acrylic sealer, it dries clear and will protect the paint. Let dry.

Glue together two 2" pots for each leg. Glue the wooden balls inside the clay pot for each arm (they form the hands). Glue the arms to the side of the 4" clay pot to form his body, arms and hands. Once dry, glue this pot onto the top of his legs. Glue his head onto the top of his body and then glue his straw hat on top. Make sure everything is glued solidly and is nice and firm. Tie a bow around his neckline using the raffia (resembles straw). Let him completely dry before using him. Enjoy!

Sunday, November 20, 2011

Super Quick and Easy 12x12 Thanksgiving Scrapbook Layout

I wanted to share with all of you today a super quick and easy page that my daughter made. Last year we all went to her house for Thanksgiving dinner so these pictures are from that holiday. My daughter likes simple and quick scrapbooking pages and this page is no exception...super easy! Plus, it is extremely frugal because it cost her less than $1.00 to make!

She used a piece of 12x12 white cardstock for her background. She had a cardstock sticker with a Thanksgiving design on it and mounted that near the top right. She used the colors on that sticker as her inspiration and decided to tear a piece of striped paper (same color hues) and mount that toward the bottom of the page. It takes up 1/3 of her page space. She also trimmed it out with some dark purple cardstock near the top torn edge. She mounted both photo's onto matching striped paper and rounded the corners leaving a 1/8" edge border. She made her own title block near the bottom right that simply says Thanksgiving Day. She made her own orange frame for the smaller picture of her daughter and did a little journaling on the top and bottom of that frame.

This page took her less than 20 minutes to make...like I said, super quick!

Tuesday, November 15, 2011

Kids Crafts | How To Make A Fall Leaf Collage Craft Project

Fall Leaf Collage by Rachel Paxton

Fall is a great time for kids to do fall crafts. Leaf collages are easy to make and can provide hours of fall fun. Kids enjoy looking for the leaves as well as using the leaves to create their creative collages.

Here's what you need for this fun fall craft project:

Fall leaves
Ornamental grasses
Flower petals
Waxed paper
Old crayons
Old cheese grater
Newspaper
Iron

This project can be done on two different days. One afternoon can be spent outside looking for different colored leaves, pretty ornamental grasses, and interesting flower petals. After the kids have a good collection, have them lay everything out on some newspapers to dry.

On a rainy day when there's nothing else to do or maybe on Thanksgiving Day while you're waiting for dinner to be ready, bring out the dried leaves and grasses to create the leaf collage.

Start by choosing the size of the collage. Tear off two pieces of waxed paper to the desired size. You will be pressing the leaves between the sheets of waxed paper.

You will be using crayon shavings to get the sheets of waxed paper to stick together. This also adds some color to the collages. Choose some old crayons in a variety of fall colors and use the old cheese grater to get some shavings from the crayons.

Working on a piece of newspaper, lay one sheet of waxed paper down and arrange the leaves, grasses, and flowers as desired. Sprinkle crayon shavings all over the sheet of waxed paper, so that when you iron the sheets together, they will completely stick together.

Next use the iron to press the two sheets of waxed paper together. Unless you're using an old iron, you should use a thin cloth between the waxed paper and the iron, or you might get crayon shavings on your iron, which will transfer onto the next thing you iron...believe me, I know!

That's it! These leaf collages look great hanging in a window as a pretty fall decoration. You could also hang them on the refrigerator, frame them, or even use them as placemats.

Photo of fall leaf collage: http://www.crafty-moms.com/fall-leaf-collage.shtml

Rachel Paxton is a freelance writer and mom of four. For scrapbooking, card making, gift-giving ideas, and more family memory-making activities, visit http://www.crafty-moms.com/.

Saturday, November 12, 2011

Thanksgiving Theme'd Diaper Cakes and Table Centerpieces

Thanksgiving is just around the corner; can’t you just smell the crisp brisk air, pumpkin pies, apple cider and more? This holiday means turkey, stuffing, gravy and huge holiday feast. Football kicks off the winter season for me and the start of holiday baking. This holiday towel cake is perfect to give as a early housewarming gift, or prepping for the huge feast. From seasoned cooks to newbies it's a gift they will all enjoy.

This cake has all the right ingredients to help make a fabulous turkey feast...

Ingredients for this cake as follows:

- Fall kitchen hand towel set for the outside layers
- Six extra hand towels for inside cake
- Four napkins for inside top layer
- Four napkin rings
- Turkey baster
- Injector for adding you favorite spices, or flavoring
- A wire whip
- Gravy ladle
- Nut cracker
- Sliver spoon and fork for salad serving
- Measuring spoon and a spatula
- Raffia and fall floral sprays
- Fall silk leaves
- Fall plastic pumpkins and gourds
- Glue sticks and gun

To make, use my instructions on making the towel template here http://www.youtube.com/watch?v=BXPeJaRraog Fill bottom layers inside with the six hand towels. For second layer fill top template with the four napkins.. Leaving a hole to put baster through. Fold dish rag lengthwise and insert into top layer with the other end hanging down to second layer.

Take the rest of items and insert around cake placing wire whip into top layer and place fall flowers with fall spray behind wire whip. Fill in holes with raffia. Place cake on a square cake board .Glue silk leaves on to bottom layer and top. Take fake fall pumpkins and gourds and glue onto cake board around cake place some raffia there as well. Another idea for someone who loves to bake for turkey day; fill cake with either apple or pumpkin pie supplies. Or fill cake with baking supplies for the go-getter that starts their holiday cookie baking right after Thanksgiving day.

That’s it. A perfect Turkey Day cake can now be made for your family and friends
Barb Ireland is the founder of Make A Diaper Cake Biz, http://www.makeadiapercake.biz Articles are free to be reprinted as long as author’s bio remains intact.
Barb Ireland

Saturday, November 5, 2011

Kids Crafts | Thanksgiving Hand Print Turkey Craft Project

Thanksgiving Hand Print Turkey Craft by Rachel Paxton

These hand print turkeys are an easy craft for your kids to make for Thanksgiving. They are easy enough for toddlers and preschoolers to help make, but even older children will enjoy tracing around their hands to make this fun turkey craft.

Supplies needed:

Brown felt
Colorful craft feathers
Google eye
Red pipe cleaner
Scissors
Black permanent marker
Rubber cement or craft glue

We chose to make our turkeys out of brown felt. This is just one of many options, you could also use brown craft foam or brown construction paper.

First, use the black permanent marker to trace around your child's hand on the brown felt. Next cut out the hand tracing. For younger children, you will have to do these steps for them.

Next turn over the piece of the felt so any permanent marker markings are on the backside of the felt.

The thumb of the handprint will be the turkey's neck and head, so have your child use a little glue to attach a google eye where the eye should go.

Cut a small piece of red pipe cleaner for the turkey's beak, approximately 1/2 inch long. Fold the cut piece in half and have your child glue it beneath the turkey's eye.

Next have your child brush some glue on each of the other fingers, and then have him press down one feather on each finger.

That's it! A quick, easy Thanksgiving craft that will be sure to please your child. It's also a great way to preserve your child's small, adorable hand that will be bigger next year.

Rachel Paxton is a freelance writer and mom who is the author of What's for Dinner?, an e-cookbook containing more than 250 quick easy dinner ideas. For more recipes, gardening, organizing tips, home decorating, holiday hints, and more, visit Creative Homemaking at http://www.creativehomemaking.com/.

Sunday, October 30, 2011

Kids Crafts | How To Make A Thanksgiving Garland

Kids' Craft: How to Make a Thanksgiving Garland by Rachel Paxton

If your kids get bored this Thanksgiving, put them to work making a colorful Thanksgiving garland to help decorate your home for the holidays. It is easy to make, and your kids will love tracing, cutting it out, and putting it together. You may even already have the supplies you need laying around the house!

This craft is suitable for ages approximately four and up. Your child will need to be able to trace and cut out shapes with scissors.

Supplies needed:

Orange, yellow, red, brown construction paper
Fall-themed cookie cutters
Pencil
Scissors
Hole punch
Yarn

Get out your baking supplies and see what you have for fall-themed cookie cutters. We had a pumpkin and a fall leaf. Craft stores usually have a good selection of holiday cookie cutters to choose from.

All your children need to do is use a pencil to trace the cookie cutter shapes onto the construction paper and then cut them out with the scissors. If your child wants to, he or she can layer several pieces of construction paper on top of each other and cut out more than one of the same shape at once.

Next have them use the hole punch to punch a hole into the top of each shape.

They will then cut a length of yarn, tie a knot on one end and then string the shapes onto the yarn. Their Thanksgiving garland is now ready to hang!

This craft project is suitable for any holiday! Use your cookie cutters to make holiday garlands for any occasion.

Rachel Paxton is a freelance writer and mom who is the author of What's for Dinner?, an e-cookbook containing more than 250 quick easy dinner ideas. For more recipes, gardening, organizing tips, home decorating, holiday hints, and more, visit Creative Homemaking at http://www.creativehomemaking.com/.

Thursday, October 20, 2011

Kids Crafts | How To Make Fall Leaf Placemats

Fall Leaf Placemats by Rachel Paxton

Making placemats from fall leaves is a fun activity for kids of all ages. Even toddlers will have fun collecting leaves and creating their own placemat. For this craft you will need:

Roll of contact paper
Fall leaves
Scissors

This activity is very inexpensive. The only item you will have to buy is the contact paper, and you can pick this up for about $5 a roll. One roll will make many placemats.

Have your kids go out in the yard and collect some fall leaves. Have them look for a variety of colors and shapes. If the leaves are dry you can use them right away. If they are wet, let them set on a piece of newspaper to dry before you start the craft project.

Before you sit the kids down cut some pieces of contact paper into the shape of placemats. I used the width of the contact paper for the width of the placemat so I would only have to make one cut for each placemat. You will need two pieces of contact paper for each placemat. You can make the placemats any size you choose.

After the contact paper is ready, sit your kids down at a table and have them spread out the leaves in the center of the table. Give them a piece of contact paper with the backing paper removed. Let them arrange their leaves on the sticky side of the paper. After they are happy with the arrangement of their leaves, take another piece of contact paper and carefully lay it on top of the leaves so that the sticky sides of both pieces of contact paper are together. Carefully use your hands to smooth out any bubbles or wrinkles. You won't be able to get them all out, but don't worry, a few wrinkles will not be noticeable when you are done.

When you are finished you can use the scissors to trim around the edges to make sure they are all even and straight. This is an easy project that can be completed in about an hour. Remember the younger the child, the shorter their attention span, so if you are making very many you may end up finishing them yourself! My toddler boys spent about 15 minutes on theirs and they had a great time.

Don't forget to proudly display your fall leaf placemats on your Thanksgiving table!

Photos of finished fall leaf placemats: http://www.crafty-moms.com/fall-leaf-placemat.shtml

Rachel Paxton is a freelance writer and mom of four. For scrapbooking, card making, gift-giving ideas, and more family memory-making activities, visit http://www.crafty-moms.com/.


Tuesday, October 12, 2010

FREE Crochet Thanksgiving Turkey Refrigerator Magnet Pattern


Can you believe that Thanksgiving is almost here? There is no better time than now to get busy with your Thanksgiving Holiday Crafting! A few weeks ago I found this easy and quick crochet pattern over on the Bevs Country Cottage Web Site to make this cute Turkey refrigerator magnet.

I was able to make 3 of them in less than 1 hour and then spent another 15 minutes hiding my yarn ends, gluing on the wiggle eyes and the magnet strip on the back. I then left them dry for 1 hour and they were ready to go onto the front of my refrigerator.

Bev used a size F crochet hook but you can use a smaller one to make him a little smaller as he measures about 5" wide by 4" high. I think next time when I make a few, I will use a smaller hook.

You can find additional free Thanksgiving Craft Patterns here on my blog!

Happy Crocheting!


Thursday, September 16, 2010

FREE Crochet Pattern - Turkey Butt Refrigerator Magnet


Last year (fall of 2009) I found this adoreable free crochet pattern online to make a Thanksgiving Turkey...but not your regular turkey head...a turkey butt! LOL I thought it was cute and funny all at the same time!

You can find the FREE crochet pattern to make the Turkey Butt Refrigerator Magnet by heading ----> HERE (sorry ~ The original pattern poster has removed their site which means the pattern is gone.)

You only need a little bit of chocolate brown yarn, some varigated yarn and a size G crochet hook...although I used a size F as I wanted them a little smaller. Then glue some magnet on the back of them with some tacky glue and your done.

It took me less than 15 minutes to crochet a Turkey Butt! (gosh, I love saying that!)

~ Shelly ~