Showing posts with label Kids Crafts. Show all posts

Wednesday, August 7, 2019

Kid's Crafts Painted Seashells Beach Vacation Memories

This past June we took both of our grandchildren down to the beach for summer vacation. The kids enjoy playing in the sand, jumping waves in the ocean and collecting seashells from the beach. Over the years I've taught them to ONLY collect the un-occupied shells and to put occupied shells back onto the beach.

Like most kids...they love collecting seashells and when we got home we had 3 bags of shells that we could use for crafting and home decorating. We decided to paint on a few of the larger clam shells that we collected that measure at least 5" in width. Before you paint on them you'll want to wash them really well with liquid dish soap and water. Let them dry for out in the sunshine until completely dry. It's important to remove the debris, sand, and the smell.
Kid's Crafts Painted Seashells Beach Vacation Memories

You can use acrylic craft paints and paint brushes or you can use acrylic paint pens or markers. My 10 year old granddaughter made the one shown in the photograph using ONLY acrylic paint pens that we purchased from Amazon. They're great if you want a no-mess craft project to do with the kids, plus they dry quickly.

The Princess painted a beach scene featuring glistening, golden, sandy beach, waves crashing onshore, the Atlantic Ocean in the background with sea gulls flying above. I think she did a really nice job! On the back of the shell she wrote her name and the date. To protect the painted design we sprayed them with 2 coats of clear acrylic spray sealer and left them dry overnight.

Painting on seashells that you collected while on vacation is a great way for children to preserve those beach vacation memories. Plus, it's a frugal craft and will cost you less than 50 cents to make (paint supplies), since the seashells are free!

Tuesday, May 21, 2019

Teacher's Gifts: Painted Seashell Paper Weights

The end of the school year is approaching and my grandchildren needed a few end of the year Teacher's gifts. Every year we buy their teacher a small gift and then have the kids handcraft one too. I feel its important to let kids be artistically creative and this project is fun for them to complete.

For our project we used large 4" and 5" wide clam seashells that we collected off of the beach. Wash them with a little bit of soapy water (to remove sand and debris) and let them thoroughly dry before painting on them. This size of a clam shell is weighty and makes great paper weights for the teacher's desk.
Teacher's Gifts: Painted Seashell Paper Weights

Teacher's Gifts: Painted Seashell Paper Weights

Large, Clean, Clam Shells (see note above)
Acrylic Craft Paints
Paper Towels, Water Dish, Paint Brush
Medium-Tip White Paint Pen
Clear Acrylic Spray Sealer, Glossy Finish

Have the child base coat their large clam shell with their desired color of paint. We wanted our seashells to resemble a blackboard, so we painted them with 2 coats of black acrylic craft paint. Leave them dry for 60-90 minutes or until the paint is no longer tacky.

Once the paint is dry...have the child hand-write the teacher's name using the medium-point white paint pen. Let them write out the name which shows off that child's penmanship. They can use additional paint colors to add polka dots or other fun little designs around the outer edge of the seashell if they want to add color and/or additional decoration. Let dry for 60-90 minutes or until paint is no longer tacky.

Tip: To make the perfect circular polka-dots have the child dip the end of their paint brush (non-bristle end) into wet paint and then place the wet end (tip) onto the seashell. Perfect polka dots every time! Have them re-dip the end into wet paint before "dotting" on a new polka dot each time.

After they're done drying have an adult take them outside. Lay them down onto a plastic placemat, old table cloth or drop cloth. Lightly spray them with 2 coats of clear acrylic spray sealer. We like the glossy finish, but you could certainly use matte finish if you prefer that look. Let them dry for 60-90 minutes. This will preserve the painted design and help to prevent cracking and crazing over the years. That's it, you're done!

Looking for more fun kid's craft projects? Adult DIY craft projects? You'll find over 400+ craft projects over on our "sister" blog called TwoClassyChics. All of our craft projects are inexpensive and easy to do!!!

Sunday, April 21, 2019

Kid's Crafts Painted Seashell Paperweights

Looking for a fun craft project to do with the kids that won't cost you a lot of money? All you need for this easy-to-make project are some large clam seashells and craft paints. Once completed they will have made a beautiful and unique seashell paperweight. A great end of the school year teacher's gift too!

If you enjoy crafting with seashells you'll want to check out the 100+ Seashell Craft Projects that we've published over on our TwoClassyChics blog. You'll find hundreds of fun and easy designs over there too!!!
Kid's Crafts Painted Seashell Paperweights

Kid's Crafts: Painted Seashell Paperweights

Large Clam Shell Seashell
Acrylic Craft Paints, Various Metallic and Glitter Colors
Acrylic Craft Paint Pen in White
Paint Brush, Water Dish, Paper Towels

Wash and thoroughly dry seashells. We used large clam shells that measure at least 4 1/2" in width. We recommend washing them in hot, soapy water and letting them air-dry out in the hot sun. Make sure all of the sand and debris has been removed.

Cover work surface with sheets of old newspaper or an old plastic drop cloth. Kids can get messy when they're using paints.

Have each child give their seashell two base coats of paint in their desired color. We used metallic paints and glitter paints that can be found in any craft supply store for about $1.00 per bottle. Using the metallic colors give your seashells a nice glossy finish. Using glitter paints give them sparkle. Once the base coating is done...let them dry for about an hour.
Kid's Crafts Painted Seashell Paperweights

Let the children come up with their own designs and color schemes! Its important that we let them be creative without a lot of input from us. Not every craft that a child makes needs to be "Pinterest Worthy" if you know what I mean. Plus, we can all tell when a craft was made by an adult and NOT by a child! Sigh, I wish people would just be honest!

For these designs my 10 year old granddaughter base coated both seashells with a bubblegum pink color. One was done with metallic paint and one was done with glitter paint. She then used a white colored paint pen to write the word MERMAID on one shell and her nick-name on the other shell. She dipped the end of her paint brush into royal blue and purple metallic paints and added a dotted border around the MERMAID seashell. Kids could use cotton swabs dipped into paint to get the perfect-sized polka dots too.

They can paint on nature-inspired designs, animals, just names and words, rainbow colors, etc. Whatever their little hearts desire. Once they're done decorating them you'll want to let them thoroughly dry for 2-3 hours. If they're giving them as a gift I recommend letting them take a Sharpie Marker and writing a message on the back side of the shell, along with their name and the date. In other words, autograph their artwork. Fun!

These type's of kid's craft projects don't cost a lot of money. If you live near the beach or will be visiting one on summer vacation...pick up some of those large clam shells you see lying around on the beach. Don't have access to seashells? You can do this same project using smooth river rocks too.

Thursday, March 21, 2019

Kid's Crafts: Painted Seashells for Spring and Easter

Looking for a fun craft project to do with the kids? To make these adorable painted seashells you'll need to collect a few large clam shells found lying around on the beach. If you don't have access to seashells, you can try adjusting the designs and using smooth river rocks or another type of found object from nature.

We completed this craft project with a group of kids ages 9 to 12 years of age. I will describe each design briefly, but they're pretty easy to figure out by just viewing the photographs. You can use these designs to inspire your own. Looking for more fun easy-to-make Seashell Craft Projects? You can find over 100+ different projects on our TwoClassyChics blog.
Kid's Crafts - Painted Easter Design Seashell

PAINTED EASTER DESIGN SEASHELL

We used purple metallic acrylic craft paint to give the shell 2 base coats of paint. We left it dry for about 40 minutes. Use a white medium-tip paint pen to write the word EASTER. Let dry for 30 minutes. Dip the end of your paint brush into medium pink paint and add your polka dots around the border. Dip the end of your paint brush into teal green paint and add polka dots around the border, between the pink dots. Let dry.

PAINTED SPRING FLOWER DESIGN SEASHELL

Base coat your shell in your desired color. We used 2 coats of lavender colored craft paint. Let dry. We decided to do a free-hand easy floral design by using white craft paint and making 4 tear drop shaped petals. Have the points of each tear drop over-lap in the center to form the flower. Use green acrylic craft paint to make the stem and leaves. Dip the end of your paint brush in pink paint to dot on the center of the flower. While that's drying you'll want to add your polka dots around the border of your seashell. Let dry.
Kid's Crafts Painted Easter Bunny and Spring Flowers Seashell Designs

PAINTED EASTER BUNNY DESIGN SEASHELL

This design will take longer to make and you'll need 1 large clam shell and 2 smaller slipper shells, along with craft paint and glue to make it. When gluing seashells together we recommend using E6000 Adhesive Glue and recommend that an adult to do that step. The adhesive is powerful, so avoid contact with your skin.

Give all three of your seashells 2 base coats of white paint. Let dry. Use pink paint to make an oval shaped nose. Use a black medium-tip paint pen to draw on the oval shaped eyes, outline the nose, add the whiskers and the mouth. Let dry. Use pink paint to add the color to the bunny's inner ears on the slipper shells. Set aside to dry. Dip the end of your paint brush into white paint and dot on the inner eyes. Let thoroughly dry. Once everything is dry you'll use the E6000 Adhesive Glue to attach the slipper shell ears to the top of the head. Glue them on the back side of the large clam shell and be generous with the amount of glue that you use. Let dry for 4-6 hours.

To Finish: Take all of your finished designs outside and lay them down onto an old plastic table cloth or placemat. Give each one a light coat of clear acrylic spray sealer. Wait 20 minutes and spray them with a second coat. You'll want to do this on both sides! Let thoroughly dry. You can now display them inside or outside your home. It's important to spray them which will help to protect the painted finish from chipping, cracking or crazing...and will prevent the colors from fading over time.

Monday, February 25, 2019

Kid's Crafts: Mother's Day and Father's Day Painted Seashells

We visit the beach several times every year and often times we take our grandchildren down to the shore along with us. The kids enjoy playing on the beach and collecting seashells, especially large clam shells that they find along the shoreline.

Like most kids...my grandchildren enjoy easy-to-make craft projects and as a grandparent, I love that this project doesn't cost me a lot of money...basically just painting supplies. You can have the kids hand paint these large clam shells (seashells) to give as Valentine's Day, Mother's Day Gifts, Father's Day Gifts, etc. My granddaughter is working on one that she's going to give to her school teacher at the end of this school year.

For this project we used large clam shells that measure 4 1/2" to 6" in width. You want to wash them with a little bit of soapy water, rinse them and then let them thoroughly dry. Make sure all sand and debris has been removed.
Kid's Crafts: Mother's Day and Father's Day Painted Seashells

Cover your work surface with an old drop cloth, plastic table cloth, old newspaper, etc. Give the kids some acrylic craft paints, paint brushes, a water dish and some paper towels. Have the kids give each seashell 2 base coats of paint. Let them dry for 60-90 minutes or until the paint is no longer tacky.

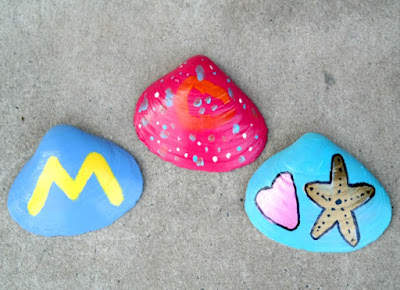
Let the kids come up with their own artist designs and let them paint whatever they want on the top of the seashell. For this project they worked on Father's Day and Mother's Day designs. One seashell says "Mom" and one says "Dad". The smaller one has a heart design painted on it and my granddaughter gave that one to her Mom for Valentine's Day.

You will want to let the painted seashells dry overnight. Then take them outside and spray 1-2 coats of clear acrylic spray sealer on top. This will protect the painted finish from chipping, cracking or crazing. These painted seashells can be displayed inside or outside of your home. They look beautiful displayed in the garden, a flower bed, on the front porch or back deck!

Saturday, January 19, 2019

Kid's Crafts: Painted and Glitter Seashell Christmas Ornaments

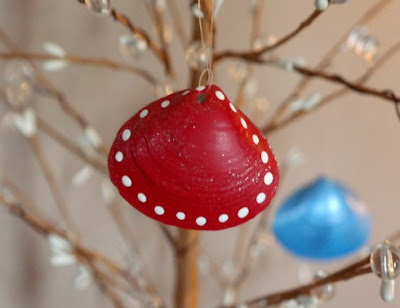
During our beach walks my grandchildren will collect hundreds of seashells that wash up onto the beach. We collect them in our mesh bags and then wash/dry them once we return from vacation. So, what do you do with all of those seashells the kids collected? Turn them into fun Christmas and holiday ornaments with just a few basic craft supplies! For this project we used small clam shells which worked perfectly for the project! 
Kid's Crafts: Painted and Glitter Seashell Christmas Ornaments

Kid's Crafts: Painted and Glitter Seashell Christmas Ornaments

Clean Seashells
Acrylic Craft Paints
Paint Brush, Water Dish, Paper Towels
Clear Fishing Line
Scissors
Clear Acrylic Spray Sealer with Glitter
All-Purpose Craft Glue
Sheets of Old Newspaper

Lay newspaper down on your work surface. Let the kids paint their seashells in solid or multi-colors. They can paint elaborate or really simple designs. We opted to paint our's in a solid color using 2 coats of acrylic paint. Left them dry for 30 minutes and then used acrylic paint to add a simple "polka dot" design. Let them dry for 45-60 minutes.

While the paint is drying you'll want to make hanging loops for all of your new ornaments. We used clear fishing line. Cut a piece that measures approximately 4 1/2" to 5" in length. Tie it into a loop and knot the ends together. Trim ends if needed. Set aside.

Take 2 sheets of newspaper outside. Lay them onto the newspaper. Lightly spray a coat of clear acrylic sealer with glitter onto the painted side of the shell. You don't need a lot! This sealer will protect the painted surface and add a shimmer to it thanks to the fine-grade glitter inside it. Let them dry for 1 hour.

Bring them back inside. If the clam shell has a tiny hole in the end (some do, some don't) you can add your hanging loop through the hole. If not, you can glue the hanging loop to the backside of the shell. Let dry for 2-3 hours. That's it, you're done!!!  

You can hang them on your Christmas tree or use them as holiday package toppers. A great way for kids to use up some of those seashells that they collected during summer vacation. 

Tuesday, December 4, 2018

Preschool Crafts: Easy Snowman Refrigerator Magnets

Working with a preschool group of children and looking for an easy-to-make holiday craft project? If so, we've got one for you today! This project utilizes just a handful of general craft supplies that can be picked up at your local craft store. If you want to save time, you could paint the wood circles ahead of time with white craft paint and then let the kids add the facial features. If you didn't want to mess with paint, you could have the children use black and orange markers.
Preschool Crafts: Easy Snowman Refrigerator Magnets

Preschool Crafts: Easy Snowman Refrigerator Magnets

2" or 3" Round Unfinished Wood Circles
White Acrylic Craft Paint
Black Acrylic Craft Paint
Orange Acrylic Craft Paint
Paint Brush, Water Dish, Paper Towels
Peel & Stick Magnet
Cotton Swab
Round Wood Toothpick

Paint the unfinished round wood circles with 2 coats of white acrylic craft paint. Let dry. Dip the cotton swab into black acrylic craft paint and dot on the snowman's 2 eyes. Dip the end of a round wooden toothpick into black paint and dot on his mouth. Have the kids use a fine-tip paint brush to paint on a triangular shaped carrot nose using orange acrylic craft paint. Let dry.

Once all of the paint has dried, flip them over and add the peel-n-stick magnet on the back. You'll want to use heavy-duty magnets. Make sure they're strong enough to hold the wooden snowman to the refrigerator without sliding down. That's it, you're done!

Sunday, November 4, 2018

Kid's Crafts: Penguin Popsicle Stick Christmas Ornaments

These cute Penguin Popsicle Stick Christmas Tree Ornaments are a big hit in our family and we've been making them for over 20+ years with the kids. I think every generation (at least for the past 4 generations have made them at one point or another). They're really easy to make and you only need a few general craft supplies to make them.
Kid's Crafts: Penguin Popsicle Stick Christmas Ornaments

Kid's Crafts: Penguin Popsicle Stick Christmas Ornaments

Wood Craft Stick
Wood Popsicle Stick
Black Acrylic Paint
White Acrylic Paint
Orange Acrylic Paint
Paint Brush, Water Dish, Paper Towels
2 Small Orange Pom-Poms
Red Satin Ribbon
Scissors
Quick-Drying Craft Glue
Clear Fishing Line

Paint the wood craft stick with 2 coats of black paint. Paint the wood popsicle stick with 2 coats of white paint. Let dry. Once they're dry, glue the white popsicle stick onto the black craft stick, leaving space above to form the penguin's head. Let dry for about 30 minutes.

Have the kids paint a white oval-shape on the black craft stick to form the penguin's face. While it's drying they can glue the 2 small orange pom-poms on the bottom of the craft stick to form his feet. Cut a 5" long piece of fishing line and tie it into a loop, knotting the 2 ends together.

Add 2 black dots onto his face to form the eyes and a triangular shaped orange beak. Dot white paint in the center of each eye to form the inner eye. Let dry. Tie a piece of satin ribbon around the penguin's neck to form the scarf. Glue the hanging loop onto the back of the craft stick. Let dry.

Your finished Penguin Popsicle Stick Christmas Ornaments are now ready to be hung onto the tree or used as holiday package toppers.

Note: You can double click on the photo in this post. It will automatically open up in a new browsing window and in an enlarged size.

Monday, October 1, 2018

Preschool Craft Project: Rainbow Painted Clam Seashells

Looking for a quick and easy craft project to do with the kids? Got a few clam shells that you've collected from a recent beach vacation? Some craft paints? If so, you've got everything you need to make these adorable rainbow painted clam seashells!

We made them with a group of preschoolers age 3 to 5 years of age to help teach them about their colors, to educate them a little bit about rainbows and of course...we incorporated some education about seashells into our learning session too!
Preschool Craft Project: Rainbow Painted Clam Seashells

Kid's Crafts: Rainbow Painted Clam Seashells

Medium to Large Clam Shells
Acrylic Craft Paints
Paint Brush, Water Dish, Paper Towels
Old Sheets of Newspaper
Black Sharpie Marker

Before beginning the project you'll want to wash and thoroughly dry all seashells. I suggest doing that a few days before you plan on beginning the project. They need to be completely dry before painting them.

Line the work surface with old sheets of newspaper. Kids can be messy painters! You can have the kids paint their seashells in traditional rainbow colors (red, orange, yellow, green, blue and purple) or in whatever colors that they would like. I recommend using acrylic craft paints which dry quickly and are easy-to-clean up.

Once the clam shells are completely dry you can have the kids flip them over and write their name, age and date on the other side or some type of message. I think it's always nice when kids sign and date their arts & craft projects. That's it...they're really easy-to-make and can be a great teaching tool in the preschool classroom.

Thursday, September 13, 2018

Kid's Crafts: Painting Memorial Marker Seashells

Kids have a hard time expressing their sadness and grief. Depending on their age, they might not even comprehend what is going on and how they should feel. This is the same with the loss of a family member, friend or even a beloved pet.

To help children learn to deal with their grief and to express their feelings, we've come up with an easy craft project for them to do. Once their seashell memorial markers are completed, they can place them on a grave of a loved one...including a lost pet. When making them, let the children paint whatever designs they want...including their choice of paint colors.
Kid's Crafts: Painting Memorial Marker Seashells

Kid's Crafts: Painting Memorial Marker Seashells

Large Clam Seashells
Acrylic Craft Paints, Variety of Colors
Paint Brush, Water Dish, Paper Towels
Disposable Foam Plate, Paint Palette
Old Sheets of Newspaper
Clear Acrylic Spray Sealer

Cover the work surface with a few sheets of old newspaper. Kids can be really messy when working with paint.

You'll want to fill a dish with water (we like to use old plastic disposable butter dishes), provide paper towels and use disposable plates for paint palettes. Squirt a few puddles of different colored paint onto the disposable plate. Show the kids how to wash out their paint brush when changing colors by dipping it into the water dish and drying it with the paper towel.
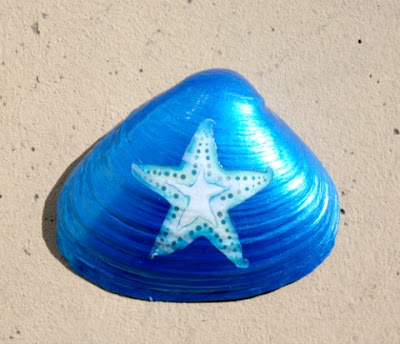
Painted Clam Seashells with Starfish Design

The kids can paint just the outside of the clam shell or both sides, entirely up to them. They can make a design that reminds them of the loved one that they lost and/or adding wording to the design. I feel it's important for the child to come up with their own unique & creative design which helps them to express their feelings.

Let the seashells thoroughly dry. If you're using acrylic craft paint, this can take up to 60-70 minutes. Take the shells outside and lay them down onto newspaper or an old plastic placemat. Have an adult spray 1-2 coats of the clear acrylic sealer on each seashell and let thoroughly dry. This will protect the painted surface from chipping, cracking and/or fading. It will allow the seashells to be displayed outside.

We do this project with the kids in our family every time a loved one passes on or with the loss of a beloved pet. They really look forward to it...from the preschoolers and on up. Some of the adults will get in on the action too! You can make them as fancy as you want, but I think basic designs look best. We hope you enjoy this crafting with kids project!

Tuesday, July 17, 2018

Kid's Craft Project: Hand Painted Seashells for Summer

Every time we travel down to the beach we always come home with a big bag of seashells. My grandchildren love to collect them while we're on vacation and then we use them in various craft projects throughout the year.

This project is a great way to use up some of those clam shells that you collected. All you need is a few bottles of acrylic paint and let the kids come up with their own painted designs. If you plan on displaying them outside you'll need to protect the painted finish with clear acrylic spray sealer. If you're displaying them indoors, you can skip that step.
Kid's Craft Project: Hand Painted Seashells for Summer

Kid's Craft Project: Hand Painted Seashells for Summer

Acrylic Craft Paints
Paint Brush and Water Dish
Medium & Large Clam Shells
Clear Acrylic Spray Sealer - Glossy Finish
Old Newspaper and Paper Towels

Lay newspaper down onto your work surface. Make sure your clam shells and seashells have been washed and thoroughly dried.

We use old plastic margarine bowls and their lids when painting. Use the bowl as your water dish and the plastic lid as your paint palette. Squirt a few colors of acrylic paint onto the paint palette and let the kids go to town painting their seashells. I feel that it's very important to let them come up with their own creative designs, not that fancy stuff that adults want to do just to have a Pinterest-worthy pin. Nope, let the kids be creative!!!

Once the shells have been painted you'll want to let them dry for 1-2 hours. Take them outside and lay them down onto newspaper and have an adult spray them with 1-2 coats of clear acrylic spray sealer. It comes in a matte, semi-gloss and glossy finish...we prefer the glossy. Let the shells dry for 3-4 hours (until they are no longer tacky). You can now use them to decorate inside your home or outside in your garden & flower beds.

Friday, July 28, 2017

Dollar Store Craft Ideas for Kids

My grandchildren love to craft! My little 8 year old granddaughter has been doing arts & craft projects since the age of three. Every month I plan a minimum of two crafting play dates with her and she just loves them! Over the past few months, my god son and grandson have joined us too!

When it comes to kid's crafts...I'm all about being frugal with it. Children don't need you to spend a lot of money on their craft supplies or projects. When I need cheap supplies, I always head to my local Dollar Store to find them! You would be surprised at what you find at the Dollar Store and here's a list of things I recently found.
Dollar Store Craft Ideas for Kids

Packages of Plastic Beads
Packages of Wooden Beads
Spools of Ribbon
Decorative Edge & Straight Edge Scissors
Self-Adhesive Foam Shapes
Glitter Glue, Craft Glue and Glue Sticks
Markers, Crayons, Glitter Ink Pens, Water Paints, etc.
Artificial Flowers and Greenery
Unpainted Wooden Ornament Shapes
Packages of Stickers and Coloring Books
Water Paint Books and Paint Brushes
Construction Paper, Sketch Pads and Poster Board
Self-Adhesive Magnet Backs
Pkgs. Plastic Buttons
Solid Color Gift Bags
and all kinds of other things!!!

I like to visit the Dollar Store often and I set myself a $10 to $15 budget. When I go in there, I look for craft supplies that can be used in various children's craft projects. I will pick up mostly items that will give us multiple uses. I keep all of these supplies store in four plastic bins (also purchased at their store) for when the kids are over and need projects to do to keep busy.
Dollar Store Craft Ideas for Kids

Some of our favorite projects to make with supplies that we get there:

Painted Holiday Ornaments
Refrigerator Magnets
Decorated Gift Bags
Handmade Greeting Cards
Refrigerator Artwork
Decopauge Glassware
Holiday Decorations
and more!

Check out their section on clear glassware for dessert plates, vases, mugs, bowls, etc. and buy tissue paper to let the kids do some decopauge projects! They can them give them as gifts! Just an idea!

The point is...crafting with kids doesn't have to be expensive! Walk into your local Dollar-type of store before hitting the retail chain craft store to buy your supplies. Stock up on various supplies, store them in a bin and get them out on rainy days or whenever you need to give the kids something to do!

Monday, February 20, 2017

Craft Project: Trolls Theme'd Refrigerator Magnets

Kid's Craft Project: Trolls Theme'd Refrigerator Magnets
My 8 year old granddaughter spends a LOT of time over at our home and 2-3 times every month, I sit down with her to work on various arts and crafts projects. Even at her age, she's quite capable of working on and completing various projects. Yup, she's caught the crafting bug and has caught it at a very young age!

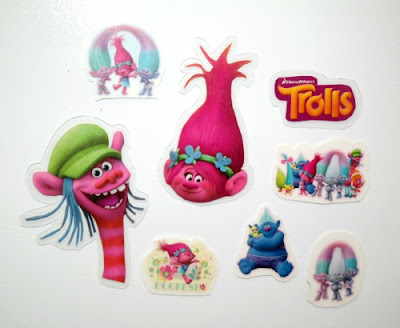
A few weeks ago we sat down and watched the new Dreamwork's Trolls movie and decided to whip up a little craft project in honor of the movie. She absolutely LOVES those adorable Trolls! This project is something the older kids can do, but I do recommend that ONLY the adults do the laminating process if you're using a laminating machine. If not, you can purchase 'cold' laminating sticky sheets at your local craft store.

Kid's Craft Project: Trolls Theme'd Refrigerator Magnets

Trolls stickers
Trolls Cut-Outs
Laminating Machine or Self-Stick Laminating Sheets
White Cardstock Sheets
Markers, Colored Pencils or Crayons
Scissors
Magnets

Some of the refrigerator magnets that we made were made from Trolls theme'd glitter stickers and some were made from cut-outs that my granddaughter colored. You can also make them by printing out Trolls designs from the internet.
Dreamwork's Trolls Stickers and Cut-Outs

To make them sturdy, you want to apply the stickers or cut-outs onto some white cardstock, using a glue stick in needed. Make sure they are smooth and flat. Use scissors and cut around the edge of each design.

If using a laminating machine, ONLY an adult should do this step. Place the cut-out items between two laminating sheets and run through your machine per manufacturer's instructions. Let cool. Once they're cool, have the child cut out each design around the edge, leaving a small space around each edge to keep the design sealed underneath the plastic. We left 1/16" of an inch edge.

If you're using self-stick "cold" laminating sheets, read the package directions. Usually, you just stick the cut-outs between the two sheets and then cut them out. The don't need to be ran through a machine and are readily available at most craft supply stores.

Flip them over and apply magnets on the back. We used self-adhesive magnets that we picked up at the craft store. You're done!

Monday, January 30, 2017

Kid's Craft Project: Easy Pipe Cleaner Characters

This past summer we took my 7 year old granddaughter to the Wednesday craft classes at A.C. Moore. I believe they officially call them kid's "Make & Take" days. Every week they made a variety of different craft projects and all of them were FREE!

If you visit the A.C. Moore website, you can learn more about these free craft classes for kids. They let you know ahead of time when they will be and what project that the kids will be making. Every time we took our grand daughter, there were about a dozen kids there, never overly crowded. Again, let me repeat this...FREE. Gotta love that!

A few weeks ago they made the Pipe Cleaner Characters and the project instructions with photo are right on A.C. Moore's website. You can find it by clicking ----> HERE.

I just wanted to give A.C. Moore a big shout-out and a huge Thank You for hosting these craft classes for the kids all summer long. Plus, the photo in my blog post shows the particular one that my 7 year old granddaughter made on that day. Super cute!

Head on over to their website and you can print out the instructions to make them at home with your own kids! You only need pipe cleaners and two buttons to make them! You could glue a magnet disc on the back and turn them into refrigerator magnets or add a thing string to the top and turn them into ornaments. She really enjoyed making them. Thanks A.C. Moore!

Sunday, December 18, 2016

Kid's Crafts: Christmas Candy Trains

Kid's Crafts: Christmas Candy Trains
Looking for a super-easy and quick Christmas craft to make with the kids? Got a church youth group, school classroom or Girl Scout Troop and looking for an easy project? If so, these adorable Christmas Candy Trains work up super quickly and are adorable!

To save money, we buy the majority of our supplies at our local dollar-type of discount store. You can find the glue dots that you need at your local craft store in the scrapbooking section.

Kid's Crafts: Christmas Candy Trains

Rolls of LifeSavers
Packs of Bubblegum (stick variety)
Bag of Hershey's Miniatures
Bag of Hershey's Kisses
Bag of ROLO Chocolate Candies
Bag of Mary Jane Candies
Bag of Peppermint Candies
Box of Large-Sized Glue Dots
Kid's Crafts: Christmas Candy Trains

When purchasing the candies, make sure that they are individually wrapped! You'll be adhering all of the wrapped candies together using the large glue dots.

Start by adhering the LifeSaves to the pack of gum using three to four large Glue Dots, as shown in the photos. Then use the Glue Dots to add on the train's wheels and then add the rest of the pieces to form the train. Some of the candies you'll need to use one Glue Dot and other's you'll need to use two, depending on the weight of the candy.

If you want to use them as edible Christmas tree ornaments or as package toppers, you'll need to purchase a roll of hanging metallic string or satin ribbon. Cut a piece 5 to 6" in length and tie it onto the train to form a hanging loop. That's it, you're done!

Thursday, November 10, 2016

DIY Duct Tape Cell Phone Cases

Got a cell phone or a child who does? If so, check out these in-expensive ways on how you can make a cellphone case by simply using duct tape and a few other supplies. This is a great craft project for the older children to try and I can totally see the teenagers getting into this too. What a great way to make your own DIY cellphone case and really give it a personalized look!

DIY Duct Tape Cell Phone Cases

Materials: fuchsia and multi-colored chevron duct tape, bubble wrap, cell phone

Tools: self-healing cutting mat, ruler, scissors, ball point pen, pencil

1. Cut 2 rectangles from the bubble wrap that are 1/2 wider than your phone.

2. Trim down the height of the bubble wrap rectangles to 1" shorter than height of your cell phone.

3. Fold strips of fuchsia duct tape over the top edges of the bubble wrap rectangles. Trim down the left and right edges.

4. Place one rectangle on top of the other and line up the edges. Starting from the top edge, horizontally place 10" strips of fuchsia duct tape on the bubble wrap rectangles, overlapping the strips along the long edges by approximately 1/8". Flip over the bubble wrap rectangles. Fold the left and right edges of the strips over the rectangles, creating a pocket.

5. Horizontally place a strip of fuchsia tape halfway along the bottom edge of the pocket. Fold the strip under the pocket to close up the bottom.

6. Draw 8 flower petals on the parchment paper.

7. Cover drawn petals with chevron duct tape.

8. Flip the parchment paper so the drawn petals are visible. Using a pair of well-oiled scissors, cut out the petals.

9. Move around the cut petals on the cell phone case until you find an acceptable position.

10. One by one, remove the parchment paper on the back of each petal and adhere it onto the cell phone case.

Richela Fabian Morgan began her duct tape odyssey 8 years ago with a simple bi-fold wallet, before writing the best-selling crafting books Tape It & Make It, Tape It & Make More, and Tape It & Wear It. She is an indie crafter specializing in paper, adhesives, and found materials. Her newest duct tape crafting book, Duct Tape Bags, is available nationwide. For more information, please visit, www.RichelaFabianMorgan.com.

Saturday, September 10, 2016

Craft Project: Duct Tape Notebook Covers

The kids are back to school and if they haven't decorated their school notebooks yet, now is the time do it. By decorating them, it personalizes their notebooks and binders with a customized look and second, it gives the kids something creative to do on the weekends.

Today's craft project is courtesy of the Duct Tape Queen, Richela Fabian Morgan, who is the author of the Duct Tape Series Books: Tape It & Make It, Tape It & Make More, Tape It & Wear It and her newly released book, Duct Tape Bags.

Craft Project: Duct Tape Notebook Covers

Material: duct tape, notebook

Tools: parchment paper, pencil, scissors

Additional tool: bubble letter stencil (the one used in photo is a free printable.

1. Cover front of notebook with vertical strips of duct tape.

2. Fold the duct tape strips over the top, bottom, and right edges of the cover.
3. Trace letters onto the parchment paper.

4. Cover the traced letters with a strip of duct tape.

5. Flip over the parchment paper. You should be able to see the traced letters.

6. Using a pair of well-oiled scissors, cut out the letters.

7. Move around the cut letters on the notebook cover until you find an acceptable position.

8. One by one, remove the parchment paper on the back of each letter and adhere it onto the notebook cover.

Richela Fabian Morgan began her duct tape odyssey 8 years ago with a simple bi-fold wallet, before writing the best-selling crafting books Tape It & Make It, Tape It & Make More, and Tape It & Wear It. She is an indie crafter specializing in paper, adhesives, and found materials. Her newest duct tape crafting book, Duct Tape Bags, is available nationwide. For more information, please visit, www.RichelaFabianMorgan.com

Sunday, September 4, 2016

Book Review: I Can Make My Own Accessories

For the past 2 1/2 years I have regularly gotten together with my now 7 year old granddaughter for regular craft dates. Like most children, she loves to sit down with me and do various arts & craft projects, many of which we've shared right here on the craft blog. Today, we are featuring a complimentary book that we received for review.

Title: I Can Make My Own Accessories
By: Thames & Hudson
ISBN: 978-0-500-65082-0

Synopsis: This book includes easy-to-follow patterns to make & customize fashion accessories. Make unique, stylish accessories with some fabric scraps, a few buttons & a ribbon. Create bags, belts, jewelry, hair accessories and more. Follow actual-size patterns, which are quick and easy to make. Super clear instructions aimed at beginners, with tips & tricks along the way.

My Thoughts: Wow, where do I begin with this one. My granddaughter is 7 1/2 years old and with my assistance she could make the majority of the projects featured in this book. While the projects inside are not my fashion style at all, they are perfect for her and for teenage to young adult women. Inside the pages you'll find instructions on:
- A Lip's Brooch
- Cat Ears
- A Bag Charm
- Festival Garland
- Pasta Necklace
- Braided Belt
- Jeweled Collar
- Kawaii Bear Bag

Along with design tips, techniques and tricks to help you get the projects done quickly and how you can customize several of them to suit your own needs. For example: I never knew how to dye pasta but thanks to this book, I do now! The pasta necklace project would be a great project for little girls and for those of you who teach scouting groups...this book would be great for you too.

In the back of the book they teach you how to use pom-poms to adorn socks, pony tail holders, to make jewelry, etc. I love the little ideas on how to use felt flowers to decorate sunglasses, barrettes, pony tail holders, hair clips, etc. All of the designs are super easy-to-make and whip up quickly.

You can learn more about this book and where you can purchase it by visiting Thames & Hudson online.

Disclosure: Shelly H. received a free complimentary copy of this book to review on her blog. No monetary compensation was received. Her thoughts, opinions and words are 100% her own and are unbiased and truthful opinions of the item she has reviewed.

Tuesday, August 30, 2016

Kid's Craft Projects - Sharpie Marker Painted Clam Shells

Did you take the kids to the beach for summer vacation? Got an abundance of seashells that you collected from the beach? If so, I've got a great kid's craft project to share with all of you today and it's one that will allow them to get creative and stay busy for several hours!

For this craft project, you'll need the following supplies (just a handful of items) and you'll be ready to go for an afternoon filled with fun! We used surf clam shells that we collected from the beach, but you can use most seashells that you have on hand. Some will be better for just doing "dot-style" patterns on and others (like the clam shell) are great for artistic drawings.

Kid's Craft Project: Sharpie Marker Painted Clam Shells

Seashells and/or Clam Shells
Sharpie Markers
Newspaper
Clear Acrylic Spray Sealer
Soap, Water & Towel

The day before, you'll want to wash up all of the seashells to remove sand and debris. You can use a little bit of liquid dish soap & water. Rinse clean and then lay them on a towel to dry. They need to be thoroughly dry before you begin the next step.

Lay newspaper down onto your work surface. Give the kids a pile of Sharpie Markers and let them draw designs, patterns, dots, swirls or whatever else they would like on the inside and outside of their seashells. We found it best to use markers with a medium point and NOT a fine point tip. You'll want to use permanent markers, not ones that will easily smear & wash off.

Once the designs have been "painted" you'll want to take them outside for the next step. Lay some old newspaper down onto the grass or sidewalk. Place the painted shells on top. Have an adult spray the clear acrylic sealer onto one side of the seashell. Let it dry for 2 hours. Flip over the shells and spray an additional coat. Let them dry for several more hours. Now your done!

By spraying them with the clear acrylic sealer...it will add a nice glossy coat to the finish and protect the painted design underneath. We placed our seashells in our flower bed and garden. They can be used inside or outside of the home.

Thursday, August 18, 2016

No-Sew Superhero Capes for Kids

I love making arts and crafts, especially when I can make items and give them to my grandchildren or donate them to charity. Such as the recent campaign that I participated in called Capes for Kids, sponsored by FamilyFun Magazine.

People were encouraged to get together & throw superhero cape making parties and then donate those capes to charity. All of the capes made during the campaign were donated to homeless shelters and given out to kids. How cool is that? Totally cool.

I was honored to participate in this important campaign and had my little cape making party with my mother, husband, granddaughter and godson volunteering to help me. We used the pattern and instructions online to make the No-Sew Superhero Capes. You can print it all out and make some kid's superhero capes for charity and/or make a few for your own kids to enjoy.

To decorate some of the No-Sew Superhero Capes that we made for the campaign I used some complimentary products that I received from the May Arts Ribbon Company. Here's some information about the company and their gorgeous ribbons & trims that they offer.

May Arts offers a variety of different products featuring:

* Decorative Ribbons for Apparel, Crafts, and Floral Design
* Lace Ribbons
* 100% Silk Ribbons
* May Arts’ Signature Adhesive Ribbons
* Trims & Embellishments
* Gift Tags
* Banners & Garland

When we made the children's superhero capes, I decided to use some of the May Arts ribbon on two of the capes. On the one shown above, I used some fabric glue and glued the red pom-pom decorative ribbon around the collar portion of the cape and left it dry overnight & then trimmed it to the proper length. I drew a simple flower onto a piece of paper and used that as my flower template and simply cut out the flowers from various pieces of colored felt. I glued them onto the cape along with a colored pom-pom to accent the center of each flower. A really easy design for little girls!

For the second little girl's design I used the burgundy decorative ribbon in a zig-zag pattern to trim around the bottom of the cape. Again, I just used fabric glue to adhere it to the felt. I then drew a large heart onto a piece of paper and used it as my template to cut out a heart from purple felt. I glued it on and decided that it needed a little more special trim, so I used that same decorative ribbon around the collar of the cape. When using fabric glue, you always want to let it thoroughly dry overnight before using your items. If you use special glue for fabric, they are indeed washable and dryable!

Over the coming weeks I'll be using more of the ribbons that I received from May Arts in various sewing and craft projects and will be featuring them all here on my craft blog. I plan on using some of the ribbons & trims in some of my holiday cardmaking & scrapbooking projects that I want to do. In addition, I'll be using them to make some cool ribbon holiday ornaments too. Stay tuned for all of those craft projects in the coming weeks!

May Arts ribbon can be purchased through their new retail website www.ribbonresource.com, or through one of their many suppliers found in the retail locator.

Disclosure: Shelly received complimentary ribbons & trims from May Arts to feature in various craft & sewing projects here on her blog. No monetary compensation was received. Please visit our sponsor and thank them for helping to support our blog. Thanks!