Showing posts with label Easter Projects. Show all posts

Thursday, March 21, 2019

Kid's Crafts: Painted Seashells for Spring and Easter

Looking for a fun craft project to do with the kids? To make these adorable painted seashells you'll need to collect a few large clam shells found lying around on the beach. If you don't have access to seashells, you can try adjusting the designs and using smooth river rocks or another type of found object from nature.

We completed this craft project with a group of kids ages 9 to 12 years of age. I will describe each design briefly, but they're pretty easy to figure out by just viewing the photographs. You can use these designs to inspire your own. Looking for more fun easy-to-make Seashell Craft Projects? You can find over 100+ different projects on our TwoClassyChics blog.
Kid's Crafts - Painted Easter Design Seashell

PAINTED EASTER DESIGN SEASHELL

We used purple metallic acrylic craft paint to give the shell 2 base coats of paint. We left it dry for about 40 minutes. Use a white medium-tip paint pen to write the word EASTER. Let dry for 30 minutes. Dip the end of your paint brush into medium pink paint and add your polka dots around the border. Dip the end of your paint brush into teal green paint and add polka dots around the border, between the pink dots. Let dry.

PAINTED SPRING FLOWER DESIGN SEASHELL

Base coat your shell in your desired color. We used 2 coats of lavender colored craft paint. Let dry. We decided to do a free-hand easy floral design by using white craft paint and making 4 tear drop shaped petals. Have the points of each tear drop over-lap in the center to form the flower. Use green acrylic craft paint to make the stem and leaves. Dip the end of your paint brush in pink paint to dot on the center of the flower. While that's drying you'll want to add your polka dots around the border of your seashell. Let dry.
Kid's Crafts Painted Easter Bunny and Spring Flowers Seashell Designs

PAINTED EASTER BUNNY DESIGN SEASHELL

This design will take longer to make and you'll need 1 large clam shell and 2 smaller slipper shells, along with craft paint and glue to make it. When gluing seashells together we recommend using E6000 Adhesive Glue and recommend that an adult to do that step. The adhesive is powerful, so avoid contact with your skin.

Give all three of your seashells 2 base coats of white paint. Let dry. Use pink paint to make an oval shaped nose. Use a black medium-tip paint pen to draw on the oval shaped eyes, outline the nose, add the whiskers and the mouth. Let dry. Use pink paint to add the color to the bunny's inner ears on the slipper shells. Set aside to dry. Dip the end of your paint brush into white paint and dot on the inner eyes. Let thoroughly dry. Once everything is dry you'll use the E6000 Adhesive Glue to attach the slipper shell ears to the top of the head. Glue them on the back side of the large clam shell and be generous with the amount of glue that you use. Let dry for 4-6 hours.

To Finish: Take all of your finished designs outside and lay them down onto an old plastic table cloth or placemat. Give each one a light coat of clear acrylic spray sealer. Wait 20 minutes and spray them with a second coat. You'll want to do this on both sides! Let thoroughly dry. You can now display them inside or outside your home. It's important to spray them which will help to protect the painted finish from chipping, cracking or crazing...and will prevent the colors from fading over time.

Wednesday, March 23, 2016

4 Easter Egg Painting and Decorating Ideas for Kids

Easter is only a few days away but you still have time to paint and decorate some beautiful Easter Eggs. If you're stuck for decorating ideas or just looking for some different and new...you'll love these ideas from the great folks over at FamilyFun Magazine.

Get ready to see your kids’ most creative (and silliest!) eggs ever! Think silly monsters, sparkles, baby fruits and veggies and sweet sea creatures! With simple party prep tips and four different egg ideas, kids will love the chance to design some wild creations with their friends and family.

Before the party, hard-boil and dye a dozen eggs per child. Once they’re dry, place a few of each color egg into clean egg cartons and refrigerate. At the party, give each child a carton and let them loose at the craft table. Show them these ideas to get inspired—but the real fun is in seeing their wild creations!

WHAT YOU’LL NEED

Markers
White circle label stickers and/or holepunch reinforcements
Self-adhesive googly eyes
Scissors
Pipe cleaners
Glue dots
Glitter & sequins
Tacky glue
Small paintbrushes
Construction-paper leaves and stems
Felt features

1. SILLY MONSTERS

Show the children how to use markers to draw different mouths onto the label stickers or hole-punch reinforcements, then adhere them to the eggs. Stick on googly eyes. Cut and bend the pipe cleaners into arms, legs, hair—whatever!— then attach with glue dots.

2. SPARKLING GEODES

Fill small paper plates or bowls with glitter and sequins, and pour an inch or so of tacky glue into a paper cup. Have the kids brush the glue onto the eggs, then roll them in the glitter or sequins, shaking off the excess. Place the geode in the egg carton to dry. Tip: Leave a few eggs partially dyed and then cover just the colored part with glitter for a cool effect.

3. BABY FRUITS & VEGGIES

Strawberries! Lemons! Limes! Carrots! Show kids how to fold the pre-cut construction-paper leaves and stems so they can “grow” their favorite foods. Attach ’em with glue dots.

Full How-To: For the strawberry Show children how to accordion-fold the leaves, then use a glue dot to connect the edges, creating a circle. Attach the leaf circle and a ½-inch pipe-cleaner stem to a red or pink egg with glue dots. For the lemon or lime Crease the leaf down the middle, attach one end to a 1-inch-long piece of pipe cleaner with a glue dot, then use another glue dot to attach the pipe cleaner to a yellow or green egg. For the carrot Roll the leaf cutout into a tube; close it with a glue dot. Attach the leaf bundle to the top of an orange egg with a glue dot, then bend the ends of the leaves outward.

4. SWEET SEA CREATURES

Kids can create their own turtles, crabs, and octopuses— not to mention any type of fish!— with pre-cut felt features, glue dots, paint, and pipe cleaners.

Full How-To: For the crab Use glue dots to attach the pre-cut felt claw shapes to 1½-inch-long pipe cleaners. Use two more to attach the pipe cleaners to an orange egg. Attach self-adhesive googly eyes to the ends of inch-long pipe cleaners, then attach the pipe cleaners to the egg with glue dots. For the turtle Use acrylic paint to add a yellow stripe around a green egg, leaving an oval showing, for the turtle’s shell. Adhere the felt fins and head with glue dots, and dot on eyes with a marker. For the octopus Use glue dots to attach each of the legs, then draw on the eyes with a marker.

MOD YOUR TABLETOP

Cut two to three pieces of colored craft paper to your table’s dimensions, plus six inches. Drape them over the sides and overlap each one at an angle. Attach them underneath with painter’s tape and trim any excess.

MAKE SWEET CENTERPIECES

Cut the pointy ends off six wooden skewers, then trim them to the height of your flowerpot, plus two inches. Paint the skewers green; let dry. Use a craft knife to poke holes in the bottoms of six plastic eggs, twisting to enlarge (an adult’s job). Cut one to two leaves per stem out of construction or crepe paper (find a template at familyfunmag.com/printables) and fold each one in half. For each flower, push the skewer into the egg about ½ inch and hot-glue it in place. Dot the skewer with hot glue, then wrap the leaves around it. Place a piece of flower foam in the pot. Fill flowers with wrapped candies and push them into the foam. Make at least three pots per table.

HANG AN EGG GARLAND

Inflate ten white balloons.To make stripes, place a ring of glue dots around the center of the balloon,
then wrap it with a crepepaper streamer. Adhere circle label stickers (at office supply stores) directly onto the balloon for polka dots. Attach the balloons to a store-bought garland or streamer with clear tape, and string up with painter’s tape.

Thursday, April 9, 2015

Wooden Easter Bunny Egg Figures

Sigh...I really wanted to get this post published before the Easter holiday but things just got in the way. In any case, I am publishing it now and this way it will be on the blog for when next Easter rolls around.

These wooden Easter Bunny Egg Figures are really easy to make and I love their little country appeal. You can make up an entire family of them for less than $10.00 max.
Craft Project - Bunny Wood Easter Eggs

Wooden Easter Bunny Egg Figures

Solid Wood Unfinished Eggs
Vanilla or Off-White Acrylic Paint
Paint Brush
Sharpie Fine Tip Markers: Black, Pink and White
Scraps of Muslin Fabric
All-Purpose Craft Glue or Glue Gun

Lay down some plastic or newspaper onto your work surface. When painting, you always want to take the time out to protect your work surface!!!
Craft Project - Bunny Wood Easter Eggs

Paint your eggs the color that you want them (we did an off-white almost an antique pale beige color). Let them thoroughly dry. Use the fine-tip Sharpie markers to draw on the eyes, whiskers, nose and mouth using the appropriate colors. If you're a good decorative painter, please feel free to paint on your own cute facial features. Cut some muslin fabric into thin strips and tie each strip into a knot. Glue the knotted strip on top of each of the bunny's heads to resemble ears.

Note: If you would like to add some pink to the center of the fabric ears use a little bit of powdered cosmetic blush.

Sunday, March 29, 2015

Creative Easter Crafts from Southern Living

Easter is one week away and there is still plenty of time to do some holiday crafting especially with these quick and easy ideas from the great folks over at Southern Living. You will find all kinds of crafty ideas like the Easter Carrot Centerpiece, Gold Leaf Gilded Easter Eggs and 10 Fail-Proof Easter Craft Ideas (plus many more) over on the Southern Living web site.
Easy Carrot Centerpiece

Instead of the expected floral arrangements, mix it up with this festive and clever carrot centerpiece. Watch how to assemble it here.
Gold Leaf Gilded Eggs

When decorating eggs this year, wow everyone with this glamorous gold gilding instead of the traditional pastels. Watch the step-by-step video here.
10 Fail-Proof Easter Crafts

Southern Living has gathered their 10 favorite DIY crafts for the holiday, including marbled Easter eggs and napkin rings made from toilet paper rolls. Click here to see the rest.

Thursday, March 28, 2013

How To Guide: Star Wars Easter Egg Designs!

Easter is just around the corner, so we thought we would help out Star Wars fans by providing you with a guide to how you can decorate your own LEGO Star Wars-inspired Easter eggs. With our step-by-step guide you will be able to re-create all your favorite LEGO Star Wars characters including Yoda, Darth Vader and Luke Skywalker.

Decorate your Easter Eggs LEGO® STAR WARS® Style! Ask Yoda-bunny for The Empire Strikes Out ~ Available on DVD March 26th, 2013.
Star Wars Easter Egg Designs Darth Vadar


Star Wars Easter Egg Designs Stormtroopers

Star Wars Easter Egg Designs Yoda


STEP #1 Hard boil your eggs

To save a lot of mess and wasted time make sure you hard boil your eggs before decorating them.

STEP #2 Choose your characters

There are plenty of Star Wars characters to choose from, favourites of ours include Yoda, C-3PO, Darth Vader, R2-D2 and Darth Maul.

STEP #3 Prepare your paint and colors

To decorate your LEGO Star Wars inspired eggs it is best use either poster or acrylic paint and to use the right colors for each character. Here is a helpful color guide for you:

Darth Maul: black, red, white Yoda: green Darth VADAR: black, grey

Stormtrooper: white, black C-3PO: yellow, gold, white R2-D2: blue, white, black

STEP #4 Prepare your brushes

Eggs are pretty small so it is best to use very small brushes for your eggs. For the really detailed ones like R2-D2 a felt-tip pen is advised.

STEP #5 Use a pencil first

Some of you more experienced decorators may want to dive straight in but if you are unsure of your artistic ability then use a pencil to trace where your paint will go before you begin with the brush.

STEP #6 Start decorating – take your time

You are now ready to get going. Don’t rush straight in, take your time and make sure that each colour is dry before you add any extra details

STEP #7 Coat your egg with glue

To protect the paint and give a cool shine to your egg you can coat your themed Easter egg with PVC glue.

STEP #8 Don’t stop at one

So you’ve now got a kick-ass LEGO Star Wars inspired Easter egg character, but why stop there? Don’t let your character get lonely, make a whole bunch and begin re-creating your favorite scenes.

STEP #9 Make your eggs 3D

To make your LEGO Star Wars inspired Easter eggs even better why not add extras to each character. Maybe you could add some cotton wool to make Yoda’s white hair, or some colored Play-Doh as Darth Maul’s horns.

STEP #10 Show off your LEGO Star Wars-inspired Easter eggs

You now have an awesome set of LEGO Star Wars inspired Easter eggs to show-off to all your friends.

Friday, March 16, 2012

This Easter Decorate Your Home with some Beautiful Fresh Tulips!

This is a partnered post written by me on behalf of iBulb. All opinions are 100% mine.

Today I would like to tell you all a little bit about iBulb from Anthos, Holland's Royal Trade Association for nursery stock and flower bulbs. This is a new foundation that was just set up in January 2012 to focus on the financing and implementation of three activities that are important for the Dutch flower bulb sector. These three activities include promotion, technical research and market access. You can learn more about iBulb and their great association by visiting their web site for additional information.

I have always loved tulips because there is so much I can do with them around my house and with Easter just around the corner, I am excited about having some fresh beautiful tulips in my home once again. For example, did you know you can place some colorful jelly beans in a glass vase and then put your beautiful tulips inside the vase? How pretty would that be sitting on your Easter dinner table or on a hall table in your foyer this spring? cute, cute, cute!

tin can vase.JPGI also love their idea on how to take an empty and clean coffee can and decorate it up with some wiggle eyes, felt nose, mouth and ears to make it look like the Easter bunny! Just place your beautiful tulips inside the decorated coffee can and you have a beautiful centerpiece for your dinner table.

to go tulips.jpgOne year I took a pretty Easter print gift bag that I purchased at the local dollar discount store and placed a glass vase inside it so that you couldn't see the vase inside the gift bag. I then placed my bouquet of fresh tulips inside it and had just the tops of them sticking out the top of the bag. It looked so pretty and you can do the same thing or purchase one of those Chinese-style takeout food boxes and place your tulips inside it.

There is so much you can do with a fresh bouquet of tulips to spruce up your home this spring season so I hope these ideas have inspired you to get busy doing some new spring decorating this year. If you have any tulip decorating ideas that you would like to share, please leave your ideas here on my blog in the comment form below.

Tuesday, April 5, 2011

How To Make Easter Themed Foam Refrigerator Magnets

Looking for an inexpensive Easter Craft idea for your next project? This craft project costs less than .75 cents per refrigerator magnet and takes less than 20 minutes to make.

Great Project for: Sunday School, Vocational Bible School, Girl Scouts, Boy Scouts, School Craft Projects, Birthday Parties, and Easter Parties.

Appropriate Age Group: 4 and up

Materials Needed:

Patterns: Easter Egg, Easter Bunny Head, Chick, Cross, Basket

*note* A great source for patterns are preschool aged coloring books

Child Safety Scissors
All Purpose White Tacky Glue
Wiggle Eyes
Markers
Magnets
Foam Sheets: White, Yellow, Tan, Pink, Light Brown, Blue, etc
Miscellaneous: beads, buttons, sequins, yellow feathers

For the purpose of this project, we will assume that you are using Easter Patterns cut from a child's coloring book in the following shapes: Easter Egg, Bunny Head, Chick, Cross and Easter Basket.

To turn the coloring page into a pattern: Cut out the pattern by cutting just outside the patterns shape.

Place the paper shape from the coloring book on the reverse side and place it onto a piece of foam and trace around it. Using safety scissors, cut out the pattern from the foam sheet by cutting on the traced line.

Now its time to decorate your shapes using markers, beads, buttons and sequins.

Ideas:

Easter Eggs: glue on beads, buttons and sequins in pretty wavy patterns. If you are working with older children, you can coat your foam egg with white craft glue and let them sprinkle on colored glitter which also makes for a pretty magnet.

Easter Chick: glue on wiggle eyes and yellow feathers. Using a black marker draw on a nose and a mouth.

Easter Bunny Head: Using markers color in pink ears and a pink nose. Using a black marker add on whiskers and a mouth. Glue on wiggle eyes.

Cross: You can decorate them however you choose or have the children write a bible quote onto them using markers

Basket: Have the children draw designs onto their baskets. They can cut out small oval shapes in pastel colors and glue them onto the front of their baskets to make Easter baskets.

After you are done decorating all your magnets, flip them over and glue a 2 inch piece of magnet on the back and let dry for approximately 20 minutes.

Now you are all done! Super easy to do and they work up quickly. A great inexpensive craft project for kids!

This article is copyright 2009 by Shelly Hill, All Rights Reserved. Please do not reprint my article without my permission. You may talk about my article on your site but you must link to my article here on my site.

Friday, April 1, 2011

Easy To Make From Felt Easter Egg Refrigerator Magnets Craft Project!

Looking for a quick, easy and inexpensive Easter craft project? Well, I got one to share with you today! This "Easter Egg" is made out of felt and takes about an hour to make if you hand stitch on your floral design or you can make it in less than 15 minutes if you use fabric paints to make the design!

Supplies Needed:

Pastel Colored sheets of crafting felt
Embroidery Floss and Needle (or fabric paints in a bottle with fine tip nozzle)
Scissors
Magnet strips or Magnet Discs
Quick Drying tacky glue

Draw an oval onto a sheet of paper that measures 4" high by 2 3/4" wide (at it's widest) point and cut it out to use it for a pattern. (you can make your ovals any size that you would like). We then drew some flowers onto our felt using a sharp pencil. Using 3 strands of embroidery floss and a needle, stitch a floral design onto your oval (covering up your pencil lines). If you want to use fabric paints, make sure you use ones that come in a fine tip nozzle style bottle and let the paints dry before assembling your egg. Once your stitching or painting is done, place two ovals together and hand sew them together (using a blanket stitch) or machine sew or glue them together. The choice is yours...I like to hand sew them together using a blanket stitch around the edges. Once done...glue your magnet on the back and slap them up onto your refrigerator!

You should really try to make several of them in a variety of colors and patterns as they look super cute on the fridge when there is a variety of them. They are also light-weight enough that you can tuck them inside your Easter greeting cards and mail them off to friends and family.

Happy Crafting!

Friday, March 18, 2011

Scrapbooking ~ Fun with Foamies Easter Scrapbook Layout

Fun with Foamies Easter Scrapbook Layout by Rachel Paxton

Kids love making craft projects out of foamies. You can find them for almost any holiday or occasion. Watch for them on sale after holidays, one container can last you for several years! Joann's and Walmart usually have good selections of them.

We had fun making crafts with our Easter foamies last year, and there were still enough left over to play with this year. I got out some Easter pictures from last year I hadn't scrapbooked yet, and came up with a couple of cute layouts using the Easter foamies.

For these scrapbook layouts, you will need a container of foamies that includes alphabet letters. The Easter set I found had a bunch of pastel letters to spell out the word "Easter", so that worked out perfectly.

Supplies:

Easter foamies
Eight family Easter photos
12x12 sheet of pastel, solid-colored scrapbook paper
2 12x12 sheets of coordinating spring or Easter patterned scrapbook paper
Scrap of white scrapbook paper
Paper cutter
Glue stick
Coordinating pastel brads (optional)

I created two different layouts for these sets of pictures. The background papers are the same color but a little bit different pattern, and then I used one sheet of solid-colored paper for matting for both layouts.

Easter Scrapbook Layout #1:

For the first layout, I cut a long, vertical piece of solid-colored scrapbook paper. It is about 2 inches wide, and is placed about an inch from the left edge of the patterned paper, and an inch from both the top and bottom of the page.

If you want you can attach pastel colored brads to the corners of this vertical piece to draw more attention to it. If you are going to use them, attach them to the four corners of the piece and then glue the entire piece centered about an inch from the left hand side of the patterned scrapbook paper.

This vertical piece will be used to showcase some of the Easter foamies. After I glued this piece in place I placed four foamies vertically on it, two Easter eggs and two bunnies (see photo).

I next cut out a white piece of scrapbook paper for the heading on the page. It is about 6 inches long and 3 inches high. I then matted this piece with solid-colored scrapbook paper. I then glued this piece approximately an inch from the top and an inch from the right hand side of the patterned scrapbook paper.

On this heading piece, I spelled out the word "Easter" with the foamies. I let my pieces go slightly over the left and right-hand edges of the matting, but if you want you can cut out a bigger caption piece to fit all the letters (see photo).

Lastly, I arranged and glued on four Easter family photographs. I arranged them so that they were slightly overlapping the solid piece on the left and slightly overlapping each other. For time's sake, I didn't mat these photos. If you want to, you can use the solid-colored paper to create mats for the photos.

Easter Scrapbook Layout #2:

For the second layout, I cut out and glued on the solid colored piece on the left the same as for the first layout. Instead of using the bunnies and Easter egg foamies, I vertically spelled out "Easter" with the foamies.

On this layout I did not include a caption at the top, but I did use the solid-colored scrapbook paper to create mats for the photos.

After I glued the solid colored piece on the left-hand side of the page, I arranged the four matted photos on the page and glued them in place. I then used Easter egg shaped foamies to fill in the spaces between the photos.

There you go, two easy Easter scrapbook layouts using Easter craft foamies!

Photos of finished layouts:
http://www.crafty-moms.com/scrapbooking/Easter-foamies.shtml

Rachel Paxton is a freelance writer and mom of five. For scrapbooking, card making, gift-giving ideas, and more family memory-making activities, visit http://www.crafty-moms.com/.

Monday, March 7, 2011

How To Make An Easter Basket From Cake Icing Plastic Tubs

My trash to treasure craft project for the month of March is on how to take a clean and empty cake icing can (icing tub) and turn it into a mini Easter Basket. These is a great way to keep those plastic icing tubs out of our landfills and turn them into a cute Easter basket. You could decorate them and turn them into candy containers for other holidays of the year too! For mine, I used an empty cake icing tub that I removed the label from and washed it.

I then used my 1/4" hole puncher and punch 2 holes into the tub, one on each side so that I could thread my ribbon handle through the holes once done. I used scrapbook paper to cover the outside of the tub so measure your tub and cut your paper accordingly. I used a liquid craft glue pen to glue the paper to the plastic tub and left it dry. I then used my hole puncher again and punched holes through the paper for the handle. I had some pretty purple satin ribbon that had light purple crystals hanging from it and glued that around the top edge of the icing tub.

I then used a piece of white sheer ribbon that measures 1 1/2" wide by 7" long and threaded that through each hole and knotted the ends inside to serve as my pail's handle. I purchased a pack of Easter theme'd rub-ons from the craft store for $1.00 and rubbed them onto the paper that surrounds the pail.

Now you can add a little bit of Easter basket grass and fill your little pail up with some chocolate candies and jelly beans! This project costs about $1.00 to make and even less if you have a lot of left-over craft supplies lying around.

Saturday, February 5, 2011

Cardmaking ~ Quick and Easy Handmade Easter Greeting Cards

Are you looking for some quick, easy and affordable handmade Easter greeting card ideas? If so, I have two greeting card designs that I would like to share with you today. This project would be great to make with older children, scouting troops, church youth groups, paper craft groups and with school groups.

We made these cards with 10-14 year old girls for them to give to their parents for Easter. Once they were done making them they were very proud of their creations. If you don't own a Cricut Die Cutting Machine (used to cut the ovals and lettering) you can hand draw and cut out various sized oval shapes and you can purchase letter stickers at your local arts and crafts store.

We used the Cricut George and Basic Shapes Cartridge for these projects.

Supplies Needed:

4" by 5" blank cardstock note cards with envelopes
various scrapbooking papers (prints and solids)
decorative edge scissors and regular edge scissors
adhesives - glue dots, glue sticks and glue pens
various colored scrapbooking fine tip markers and pens
*optional ink pads and Easter sentiments rubber stamps

For these 2 designs we also used self-stick plastic scrapbooking mesh in mint green and self-stick round purple rhinestones.

For Card Number One: (shown above)

Cover the front of your card with pink scrapbooking paper that was cut to fit. Using the Cricut set on the number one size setting and using the Cricut Georges Basic Shapes Cartridge we cut out eight ovals from different colored papers. Using the same cartridge turn your dial to the shadow option and cut out four more ovals (we used dark blue paper) as these will serve as the base for your eggs. Using your glue stick, glue a smaller oval on top of each larger oval to serve as your Easter egg. Using decorative scissors, cut a part the remaining four smaller ovals into various widths. Using a glue pen, glue the cut up pieces onto the eggs and let dry. (about 5-10 minutes). If desired...use various colored markers to add polka dots and squiggles to your eggs to decorate them even further. Using glue dots, attach each egg to the greeting card near the top and going horizontally across the front. Using the Cricut Georges Basic Shapes Cartridge set your dial to the number two size setting. Cut out the letters E A S T E R from medium blue scrapbooking paper. Cut out a strip from white scrapbooking paper that measures 2" by 5" in size and glue it to a piece of dark blue scrapbooking paper that is cut slightly larger than your white strip. We used decorative edge scissors to add interest to the design. Glue this strip onto the lower half of your card. Using a glue pen glue each letter to the white base strip to spell out the word EASTER. If desired...use a ink pad and rubber stamp to stamp a sentiment inside or write your own message.
For Card Number Two: (Shown Above)

Cover the front of your card with pink scrapbooking paper. Using a piece of self-adhesive plastic mesh in a mint green color, attach that to the center front. Use blue self-stick letters (in this case we spelled out the word EASTER) and place those right above the mesh strip. Using the Cricut Die Cutting Machine and the Georges Basic Shapes cartridge, cut out two purple ovals on the 2 1/2 size setting and on the shadow effect, cut out one medium blue oval on the same setting. These three ovals will serve as your base for the eggs. Using the same 2 1/2 size setting cut out six to seven more ovals from various colored scrapbooking papers. Glue one of these ovals onto each of the larger ovals that you first cut out. Using wavy edge decorative scissors, cut a part the remaining smaller ovals. Use a glue pen or a glue stick and use those pieces to decorate your egg bases. Once done, use glue dots to attach your eggs on top of the plastic mesh strip. We decided to decorate the egg in the center with little purple self-stick rhinestones to add decorative interest to it. Using an ink pad and rubber stamp, stamp your sentiment inside or handwrite your own message.

There you have it...two quick and easy handmade Easter theme'd greeting cards that you can make with older children or even make them yourself. Happy Crafting!

Tuesday, June 15, 2010

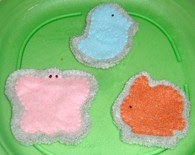
How To Make Felt Animal Shaped Cookies - FREE Pattern!

As part of my onoging series on how to make felt food items for your little girl kitchen play sets, I came across this FREE pattern & instructions online to make felt animal crackers...although I think they look a lot like iced animal shaped cookies. I decided to make a bunny, chick and a butterfly.

I dug out my Tupperware (tm) Spring and Easter Cookie Cutter Set and decided to make a set for my grand daughters felt foodie collection. I used the cookie cutters for my pattern of the Spring set I made 2 weeks ago.

You can find the free patterns & instructions on the Lit'l Brown Bird's Blog and she gives GREAT detailed instructions on how you can make them. You will need tan colored felt along with various colors of felt to use for your frosting.

While you are visiting her site, you can find other FREE felt foodie patterns too so make sure you check them all out while you are there!


Thursday, April 29, 2010

Easy To Make Felt Easter Cookies For Girls Playfood Sets

Last week I decided to make some felt Easter Theme'd play food cookies for my grand daughters kitchen play food set and this is what I came up with. They were really easy to make and worked up quickly. Yes...I know Easter has come and gone but I was sick at Easter time so I am just now posting this!

Felt Easter Egg Sugar Cookie

Vanilla colored felt
Striped piece of fleece
Vanilla colored embroidery floss
Sewing Needle and Scissors
Oval Paper Pattern Measuring 4 3/4" long by 3 1/4" wide

Using your paper pattern, cut out 2 ovals from vanilla colored felt. Using the same pattern, cut out an oval shape from striped fleece. Once you have the fleece oval cut out, trim off a 1/4" from all sides so that its now smaller than your vanilla colored felt ovals. Using 2 strands of vanilla colored floss, whip stitch the fleece oval to one of your vanilla colored ovals. Next, whip stitch the 2 vanilla colored ovals together. Optional: You can insert a tad of stuffing if you would like, I chose not to do that as I wanted flat cookies.

Felt Easter Cross Cookie

Dark brown and vanilla colored felt
Tiny dark brown seed beads
Vanilla & Dark Brown embroidery floss
Paper Cross Patter that measures 4" tall by 3" wide
Scissors and sewing needle

Use your paper pattern to cut out 2 dark brown crosses and then cut out 1 cross from vanilla colored felt. Once you have the vanilla one cut out, trim off 1/4" from all sides so that it is now smaller than your dark brown crosses. Using 2 strands of vanilla colored floss, hand sew the seed beads onto the vanilla colored cross. Then hand sew the vanilla cross onto the top of one of your dark brown crosses. Using 2 strands of dark brown floss, sew both of your dark brown crosses together by using a whip stitch or a blanket stitch.

Felt Easter Carrot Cookie

Orange and green felt
Orange and green embroidery floss
Scissors and sewing needle
Hand-drawn carrot paper pattern

Note: I just free-handed a carrot shape onto paper and then used that as a pattern. My measures 5 1/4" long and then my green stem measures 1 3/4" tall.

Cut out your pattern from the appropriate colored felts (see photo). Using 2 strands of green floss, I stitched my leafy top together. I then placed my 2 orange carrot pieces together and used 2 strands of orange floss to stitch them together by starting at the left top corner, working down and back up the other side. Before I stitched the top shut, I inserted my leafy top and then stitched the top shut so that it would hold the leafy stem in place.

Felt Easter Pink Peep Cookie

Pink Felt
Pink and dark brown embroidery floss
Scissors and sewing needle
Pattern: Buy some Peeps (tm) and trace one for your pattern onto paper.

Cut your bunny PEEP (tm) pattern out of pink felt, you will need 2 of them...a front and a back. Using 3 strands of dark brown embroidery floss, make 2 french knots for his eyes and his nose, then fasten off. Using 2 strands of pink embroidery floss, hand stitch the front to the back using whip or blanket stitches. Super Easy!

Saturday, April 3, 2010

How To Make A Handcrafted Easter Bunny Made From A Sock!

How To Make A Handcrafted Easter Bunny Made From A Sock!
Oh my goodness...how cute is this? Too cute if you ask me! Recently I was MIA for several weeks due to an illness. While I was in the hospital, one of my good friends who is also very crafty made me this adorable Easter bunny made from a sock! I asked her if I could share it with all of my blog readers and she said yes!

Now...I don't have all of the measurements or the particulars so I will describe how 'it' looks like she made it...I think you could easily come up with some similar yourself.

My Easter Sock Bunny measures approximately 10" tall including the ears. She took one long sock and cut the leg part in half and then firmly stuffed the foot part with stuffing and tied the head with ribbon to close it. She then machine sewn the ears...you could easily do this by hand using some strong embroidery thread and small nice stitches.
How To Make A Handcrafted Easter Bunny Made From A Sock!

She tied a fabric piece around its neck and also used matching fabric to make a bow and glued it on top of her head using a glue gun. She used a small scrap piece of matching fabric and glued that onto the upper chest with a hand painted little wooden heart.

The face has a pink pom-pom for the nose and she hand sewed to round black beads on for the bunny's eyes. The cheeks are lightly blushed with some cosmetics.

I also believe she has a small amount of pellets inside her body because she sits up nicely and doesn't fall over...you could use some pellets or dried beans if you prefer to do so.

Overall...she looks pretty simple and next year when Easter rolls around, I hope to use her idea to craft up a family of bunny's for some family members.

Thursday, March 18, 2010

Upcycled Easter Eggs Craft Project From Air Freshener Containers

Back in January 2010, I had my nephews here visiting. They are ages 11 and 9 and love to craft with their auntie Shelly...so every time they come, we play with items from my trash to treasure bin. In my bin...I put left-over craft supplies, odds and ends and things that I feel could be upcycled and used in crafts.

Well...for the past several months, I have been purchasing these air fresheners at the local dollar store that come in plastic oval shaped containers. Once the air freshener has dried up, I remove it and wash out the containers (they are 2 part containers). I put them in my scrap bin. While the boys were here, they wanted to paint up the containers and I asked them why...they said "Because they look like Easter Eggs." ding...ding...ding...a new craft project was born.

We laid newspaper down across our work surface since painting is involved. We used both acrylic paints and some of my metallic finish paints. You need to make sure your empty air freshner containers are clean (wash and dry them good). Remove the top portion from the bottom portion and paint each portion separately. You can paint any design that you would like.

Note: We didn't need to use 2 coats of paint...one was sufficient.

Once the paint was dry...we used some glitter glue that dries clear and drew squiggle lines and dots on some of the areas to make them even more pretty. We then left them dry. Using a sponge foam brush, we coated them some matte finish Mod Podge which I watered down. (1 teaspoon tap water per 3 tablespoons of Mod Podge) and sponged it on to seal the paint. We left it dry again for one hour.

Once they are dry, pop the top section back on top of the bottom section. Now you have a colorful reusable Easter Egg Decoration.

You could paint them any color or design that you would like...then place some great smelling potpourri inside them and leave them all all year long.

~ Happy Crafting ~

Saturday, March 6, 2010

FREE Crochet Duck and Easter Bunny Pins


Two years ago I found this free pattern online to make cute little crochet duck and bunny pins which I think are totally adorable for the Easter Season.

You can find the pattern and print it out ---> HERE

(Sorry, the designer has removed her post over the years, so I've now removed the link)

The designer of the pattern is named Marlo Cairns and I found her pattern and instructions to be super easy to follow. I think a beginner in the world of crochet could make both of the pins. (printable pattern includes both designs).

Instead of using a black bead for the bunny's eye, I chose to just glue on a wiggle eye as it was quicker. I then used tacky glue and glued a pin back on the backside. You can use your glue to glue on a tiny pom-pom for his 'cotton' tail.

Please read Marlo's copyright guidelines and policy before printing out and using her pattern.

~ Happy Crocheting ~


Monday, February 22, 2010

Easter Crafts: Decoupage - Easter Dessert Plates Project

I just love to decoupage items that I need for holiday entertaining...decoupaging is easy, quick and a great way to use up left-over fabrics or gift wrap. I will be entertaining some guests for the Easter holiday and decided to make up a few Easter items.

Since this will be my grand daughter's first Easter, I decided to make a Easter plate that we can set out with some Easter cookies and some carrots for the Easter Bunny when he makes his house rounds to leave her an Easter Basket.

Decoupage Easter Bunny Dessert Plate

Here is what you will need:

inexpensive glass plates
foam painting brush
decoupage (I used glossy finish)
scraps of cotton fabric, a little larger than your plates
disappearing ink pen
scissors
several sheets of newspaper

Lay the newspaper down onto your work surface as this can get a little messy.

Lay your plates down onto the back side of your cotton print fabric and trace around your plate with a disappearing ink pen. Using your scissors, cut out your fabric about 1/2" an inch past your traced line. (fabric should be slightly larger than your plate).

Dip your foam brush into your decoupage medium and then coat the back side of the plate. Place the fabric down onto the plate with the right side touching the plate (so that it shows through to the front side of the plate). You will want to use your hands to smooth out the fabric if any wrinkles occur. Wash out your brush and let your plates dry for 2 hours.

Once your plate has dried, use your scissors to trim off any access fabric. Use your foam brush and dip it back into the decoupage medium and coat the back side of the fabric. I like to really apply it thick so that it seals it good. Once done, wash out your brush and let the plates dry for 6 hours.

I think the plate turned out fabulous since I used a piece of left-over Easter fabric that I had. What do you think?

Saturday, February 13, 2010

Decoupage- Easy To Make Spring Dessert Plates


One of my favorite spring and summer flowers happens to be purple pansy's and I had some left-over pansy fabric from one of my sewing projects that was just begging to be used up. After thinking about it, I decided to go to my local dollar store and purchase some plain glass dessert plates and then decoupage the fabric to the back side of the plates...they turned out so cute!

Decoupage Spring Dessert Glass Plates

Here is what you will need:

inexpensive glass plates
foam painting brush
decoupage (I used glossy finish)
scraps of cotton fabric, a little larger than your plates
disappearing ink pen
scissors
several sheets of newspaper

Lay the newspaper down onto your work surface as this can get a little messy.

Lay your plates down onto the back side of your cotton print fabric and trace around your plate with a disappearing ink pen. Using your scissors, cut out your fabric about 1/2" an inch past your traced line. (fabric should be slightly larger than your plate).

Dip your foam brush into your decoupage medium and then coat the back side of the plate. Place the fabric down onto the plate with the right side touching the plate (so that it shows through to the front side of the plate). You will want to use your hands to smooth out the fabric if any wrinkles occur. Wash out your brush and let your plates dry for 2 hours.
Once your plate has dried, use your scissors to trim off any access fabric. Use your foam brush and dip it back into the decoupage medium and coat the back side of the fabric. I like to really apply it thick so that it seals it good. Once done, wash out your brush and let the plates dry for 6 hours.

These plates are not dishwasher safe...so as you use them, you will need to hand wash them as needed. They look really pretty displayed in a hutch or kitchen shelf. Great for serving appetizers, desserts and cookies on them this spring.

Happy Crafting!

Friday, November 13, 2009

Creating Your Own Gift Baskets For The Holidays

Creating your own gift baskets to give as holiday gifts is really easy and fun. You can save money by making them yourself instead of buying them from a trendy gift store. You can make them for personal use to give as gifts or start a home based gift basket business.

You only need a few simple supplies to get started.

Supplies Needed

Basket
Basket Filler (shreds)
Basket Clear Cellophane Bag or Basket Wrap
Ribbon (to tie off the bag)
Ribbon (to make a bow)
Gift Tag
Product Fillers
Scissors

Now let's get you started with some theme ideas for those on your holiday gift giving list.

1. Correspondence Gift Basket: note cards, all occasion greeting cards, book of stamps, personalized address labels, pens and address book.

2. Manicure - Pedicure Gift Basket: top coat, base coat, colored nail polish, nail polish remover, nail polish remover pads, cotton swabs, toe separators, nail file, nail buffer, cuticle pusher, nail clippers, nail brush, hand cream, foot cream, foot file and a travel pack of tissues.

3. Book Lovers Gift Basket: journal, pens, 2-3 books, 2-3 bookmarks, reading glasses, candle, gift card to a book store and a magazine.

4. Bakers Gift Basket: cookbook, oven mitts, hot pads, trivet, recipe cards, spices, 6 cup muffin pan, muffin pan liners, spatula, mixing spoon, measuring cups, measuring spoons, apron, rolling pin, pastry sheet and baking pan liners.

5. Snack Lovers Gift Basket: microwave popcorn, bag of popped popcorn, chips, pretzels, candy bars, cookies, snack cakes and crackers.

6. Movie Night Gift Basket: 2 tickets to a local movie theater, 2 DVD movies, 3 bags of microwave popcorn and several packs of candy.

7. Gardener Gift Basket: flower seed packets, vegetable seed packets, gardening gloves, knee pads, gardening hand tools, small gardening decorations, outdoor thermometer, gardening book and gardening magazines.

8. Dog Lover Gift Basket: dog book, dog bones, dog treats, dog leash, dog collar, dog clean-up waste bags, dog shampoo, dog toys and a disposable camera.

9. Cat Lover Gift Basket: cat book, cat treats, cat leash, cat collar, cat shampoo, cat toys and a disposable camera.

10. Teen Girl Gift Basket: nail polish, nail remover, cotton swabs, cotton balls, nail file, perfume, shower gel, body lotion, hair items, teen girl magazines, journal book, pen and a disposable camera.

11. Bath Spa Gift Basket: bath sponge, mesh pouf, shower gel, body lotion, bath back brush, bubble bath, bath salts, bath bombs, bath soaps, wash cloth, bath towel, robe, slippers and a bath wrap.

12. Hair Care Gift Basket: hair towel, shampoo, conditioner, hair mask, hair gel, hair mousse, hair spray, head bands, pony tail holders, barrettes, hair clips, brush and a comb.

13. Laundry Care Gift Basket (great for housewarming and bridal showers): stain remover stick, spray and pen, dryer sheets, laundry detergent, fabric softener, hand washing detergent, lint brush and an iron.

14. Scrapbooking Gift Basket: 8x8 scrapbook, solid 8x8 scrapbooking papers, print 8x8 scrapbooking papers, 3 glue sticks, 1 pkg. glue dots, 1 pkg. brads, 1 pkg. eyelets with eyelet tools, 3 packs of stickers, decorative border scissors, disposable camera and other scrapbooking embellishments.

15. Bird Lovers Gift Basket: hardbound coffee table bird watching book, bird watching journal book, pen, bird feeder, small bag of bird seed, binoculars, small birdhouse and a disposable camera.

These are just some suggestions on what you can use as basket fillers, you don't have to fill your gift baskets with all of those items. Get creative and 'think' outside the box.

This article is copyright 2009 by Shelly L. Hill, All Rights Reserved.