Showing posts with label Refrigerator Magnets. Show all posts

Saturday, October 20, 2018

12 Easy-to-Make Seashell Craft Projects

I love the beach and coastal lifestyle, so obviously I love to collect and craft with seashells. My current seashell collection has over 150+ specimens and growing. I like to use my leftover seashells in various craft projects and to decorate my home.

Besides the Passionate About Crafting Blog, I also own another blog called Two Classy Chics, which is a mom & lifestyle blog. It's my largest and most popular blog. With that said, I've been posting the majority of my seashell craft projects over on the TCC Blog and wanted to highlight them here on Passionate About Crafting. 
12 Easy-to-Make Seashell Craft Projects

Here are 12 Easy-to-Make Seashell Craft Projects

* Seashell Windchime - Made with clam shells, paint and clear fishing line. This one will take you a few hours to make and you'll need a lot of smaller-sized clam shells to make it.

* Tropical Fish Seashell Yard Art - Made with a large clam shell, scallop shell and craft paint. 

* Seashell Soap Dish & Trinket Dish - I love making these and giving them out as gifts along with a bar of handcrafted soap.

* Painted Clam Shells for Summer Yard Art - You can use stencils or free-hand your own summer designs onto large clam shells. 

* Patriotic Design Painted Shells - These are fun to display in your flower beds, on your front porch, around the swimming pool or to decorate your table during summer picnics. 
Painted Patriotic Seashells

* Painted Puppy Dog Seashells - My grandchildren loved making these adorable puppy dog seashells. Fun to display if your a dog owner and love dogs! 

* DIY Coastal Style Flower Pots - You can easily paint your own terracotta flower pots and then decorate them with your favorite seashells. 

* Seashell Crabs Yard Art - You can make these adorable red crabs with large clam shells, pipe cleaners, acrylic craft paint and some glue. A fun way to decorate for summer! 

* Home Decor Metallic Painted Seashells - Use metallic paints in bright colors to paint some of your seashells, toss them into a larger shell or basket to decorate your home.
Vacation Beach Memories in a Glass Memory Block

* Displaying Beach Vacation Memories - Collect sand and seashells while on vacation and then display them in a glass memory block. 

* Seashell Refrigerator Magnets - I like to turn my smaller shells into refrigerator magnets! A quick and easy project that also makes a great little gift. 

* Panda Bear Painted Seashell - My granddaughter loves panda bears and made this adorable Panda Bear by utilizing a large clam shell for his head and 2 smaller shells for his ears. Cute! 

If you enjoy crafting with seashells you'll want to check out all of my Seashell Craft Projects by visiting my Two Classy Chics blog. You'll find over 100+ craft project designs! 

Monday, February 20, 2017

Craft Project: Trolls Theme'd Refrigerator Magnets

Kid's Craft Project: Trolls Theme'd Refrigerator Magnets
My 8 year old granddaughter spends a LOT of time over at our home and 2-3 times every month, I sit down with her to work on various arts and crafts projects. Even at her age, she's quite capable of working on and completing various projects. Yup, she's caught the crafting bug and has caught it at a very young age!

A few weeks ago we sat down and watched the new Dreamwork's Trolls movie and decided to whip up a little craft project in honor of the movie. She absolutely LOVES those adorable Trolls! This project is something the older kids can do, but I do recommend that ONLY the adults do the laminating process if you're using a laminating machine. If not, you can purchase 'cold' laminating sticky sheets at your local craft store.

Kid's Craft Project: Trolls Theme'd Refrigerator Magnets

Trolls stickers
Trolls Cut-Outs
Laminating Machine or Self-Stick Laminating Sheets
White Cardstock Sheets
Markers, Colored Pencils or Crayons
Scissors
Magnets

Some of the refrigerator magnets that we made were made from Trolls theme'd glitter stickers and some were made from cut-outs that my granddaughter colored. You can also make them by printing out Trolls designs from the internet.
Dreamwork's Trolls Stickers and Cut-Outs

To make them sturdy, you want to apply the stickers or cut-outs onto some white cardstock, using a glue stick in needed. Make sure they are smooth and flat. Use scissors and cut around the edge of each design.

If using a laminating machine, ONLY an adult should do this step. Place the cut-out items between two laminating sheets and run through your machine per manufacturer's instructions. Let cool. Once they're cool, have the child cut out each design around the edge, leaving a small space around each edge to keep the design sealed underneath the plastic. We left 1/16" of an inch edge.

If you're using self-stick "cold" laminating sheets, read the package directions. Usually, you just stick the cut-outs between the two sheets and then cut them out. The don't need to be ran through a machine and are readily available at most craft supply stores.

Flip them over and apply magnets on the back. We used self-adhesive magnets that we picked up at the craft store. You're done!

Friday, April 1, 2011

Easy To Make From Felt Easter Egg Refrigerator Magnets Craft Project!

Looking for a quick, easy and inexpensive Easter craft project? Well, I got one to share with you today! This "Easter Egg" is made out of felt and takes about an hour to make if you hand stitch on your floral design or you can make it in less than 15 minutes if you use fabric paints to make the design!

Supplies Needed:

Pastel Colored sheets of crafting felt
Embroidery Floss and Needle (or fabric paints in a bottle with fine tip nozzle)
Scissors
Magnet strips or Magnet Discs
Quick Drying tacky glue

Draw an oval onto a sheet of paper that measures 4" high by 2 3/4" wide (at it's widest) point and cut it out to use it for a pattern. (you can make your ovals any size that you would like). We then drew some flowers onto our felt using a sharp pencil. Using 3 strands of embroidery floss and a needle, stitch a floral design onto your oval (covering up your pencil lines). If you want to use fabric paints, make sure you use ones that come in a fine tip nozzle style bottle and let the paints dry before assembling your egg. Once your stitching or painting is done, place two ovals together and hand sew them together (using a blanket stitch) or machine sew or glue them together. The choice is yours...I like to hand sew them together using a blanket stitch around the edges. Once done...glue your magnet on the back and slap them up onto your refrigerator!

You should really try to make several of them in a variety of colors and patterns as they look super cute on the fridge when there is a variety of them. They are also light-weight enough that you can tuck them inside your Easter greeting cards and mail them off to friends and family.

Happy Crafting!

Friday, February 11, 2011

Trash To Treasure Project ~ Cute Potato Refrigerator Magnet From Old Pantyhose!

As women...we all know how quickly we wear out and snag up our old pantyhoses and then we trash them into the garbage. However...did you know that you can use those old pantyhoses to make really cool new crafts?

I made this country-style potato refrigerator magnet out of old pantyhose that I was going to toss because they had a snag. I made this potato magnet in less than 15 minutes and this is how I did it.

Supplies Needed:

6" by 4" piece of beige or nude pantyhose (cut into a block shape)
dark brown 6 strand embroidery floss & embroidery needle
small amount of fiberfill stuffing
1 1/2" diameter round magnet
quick drying craft glue (tacky glue)
scissors

Use 3 strands of dark brown embroidery floss for all hand sewing. I placed a small amount of fiberfill stuffing in the center of my block, I tightly gathered one end using hand stitches so that the end actually falls behind the potato shape. I then did criss cross stitches and sewed a seam along the backside of my potato shape, inserted more stuffing to firm it up and then gathered up the other end. When you are gathering up your ends, make sure to tack them behind the potato so they don't show. Tighten it all up and knot it off in the back. Re-thread up your needle with your floss and starting at the back of the potato, bring you needle to the front going through the potato...then slightly off from where you came up, go back down so that you are forming the eyes of the potato. You will make random eyes all over your potato and pull your threads TIGHT so that it makes nice realistic indents all over your potato. Fasten off in the back. Use your tacky glue and glue on your magnet disc and let dry for 24 hours before placing it onto your refrigerator.

Quick and Easy project to save all of those old pantyhose from the local landfill!

Sunday, January 16, 2011

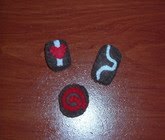
How To Make Valentine's Day Chocolate Candy Magnets Out Of Craft Felt


How To Make Valentine's Day Chocolate Candy Magnets Out Of Craft Felt
Do you enjoy making handmade craft items to decorate your home with for Valentine's Day? If so, I've got a really easy craft project to share with you today. These little chocolate candies are completely hand sewn and crafted together out of your classic crafter's felt.

Once you complete them, you can add magnets onto the back side of them and place them on your refrigerator or file cabinet. If you have a little girl in your family, you can place them inside an empty clean Valentine's Day candy box so that she can use them as pretend food with her little toy dishes. No matter how you decide to use them, they are super easy to make and work up quickly.

Here is what you will need to make them:

1 sheet of craft felt in each of these colors: pink, red, chocolate brown, dark brown, white and vanilla.
Embroidery floss (to make all colors of your felt)
Small amount of poly fiber fill stuffing
Sharp Scissors, Embroidery Needle, Measuring Tape
Paper Shape Templates (use as patterns)
Round Magnets
All Purpose Liquid Quick Drying Craft Glue

To Make Paper Pattern: On a piece of paper, draw out a 1 3/4" diameter circle, 2" square and a rectangle that measures 1 1/2" by 2" in size. Cut out these shapes and use them as patterns.

Round Chocolate Candy: Cut two round shapes out of chocolate brown colored felt, cut one strip that measures 1/4" wide by 5 3/4" long. From red felt, cut out a swirl shape that is the diameter of your circle temple by about 1/8" wide. Using two strands of embroidery floss and your sewing needle, blanket stitch the thin strip around the edges of one circle and fasten off. Using two strands of red embroidery floss, hand stitch the red swirl to one of the chocolate brown circles using tiny whip stitches, fasten off. Using two strands of brown floss, blanket stitch the remaining circle onto the other side of the skinny strip. Right before you have it completely sewn shut, insert in a little bit of stuffing and then finish stitching it shut.

Square Chocolate Candy: Use your square paper pattern and cut two squares from dark brown felt. Cut a strip that measures 1/2" wide by 4 3/4" long. From white felt cut a strip that measures 1/8" by 2" and from red felt cut a heart shape that measures approximately 1/2" in diameter. Using two strands of white embroidery floss, hand stitch the white strip to one of the brown squares using tiny whip stitches. Using two strands of red floss, hand stitch the heart on top of the white strip using whip stitches. Using two strands of brown floss and a blanket stitch, attach the dark brown strip around the sides of the square you just decorated. Pick up your blank square and attach that to the other side of the strip using a blanket stitch. Right before closing, insert some stuffing inside and finish your stitching. Fasten off and hide your ends inside the square.

Rectangular Chocolate Candy: This is made just like the square but decorated a little bit differently. For this piece of candy, I used vanilla colored felt for my base. I then cut four tiny strips from brown felt and hand sewn them on top to resemble lines of icing. On top of that, I sewed on a red heart to decorate it. You will assemble this piece just like the other pieces.

Variations: You can change up the colors of your felt and make various theme'd shapes to decorate them...like little flowers, hearts, cupid's arrow, etc.

Once you are all done stitching them, you can glue magnets on the back and use them as cute holiday refrigerator magnets.

This project, instructions and idea is written by Shelly Hill, copyright 2011, All Rights Reserved.

Tuesday, December 7, 2010

Easy To Make Felt Flower Refrigerator Magnets Pattern

Does your refrigerator need a little sprucing up? If so, I have an easy refrigerator magnet pattern to share with you today. These two magnets are simply made from craft felt and all are done with simple hand sewing and embroidery techniques. If you have a pile of little felt scraps laying around your craft room...this project is a great way to use those scraps up!

Here is what you will need to make each refrigerator magnet:

felt circles each measuring 2" in diameter. (you will need 2 per magnet)
felt tear drops to fit on your circle. (you will need 5 per magnet)
felt circle measuring 1/4" in diameter. (you will need 1 per magnet)
felt strip measuring 1/4" by the circumference of your large circle.
embroidery floss (colors to match felt), sewing needle and scissors
tiny amount of stuffing
craft glue
round magnet disk

Cut out all of your felt pieces as outlined above. The 2" diameter circles and the strip should all be cut from the same color of felt. Using two strands of embroidery floss to match the color of your felt circle, hand stitch on the tear drop shapes to form the shape of a flower. Use two strands of embroidery floss and hand stitch the tiny 1/4" diameter circle in the center of the flower. Make sure all of your knots are on the reverse side.

Using two strands of embroidery floss, use a blanket stitch to attach the felt strip to your flower circle. Once it has been attached around the edges, start attaching the blank back circle until you reach 3/4 of the way around. Use a tiny bit of craft stuffing and insert it into the magnet and finish blanket stitching around. Finish off and hide the threads inside of the mini pillow that was formed.

Flip the flower over and use craft glue to attach a magnet disk to the back side. Let it completely dry for several hours and then use the magnets to decorate the front of your refrigerator.

Pattern and instructions is copyright 2010 by Shelly Hill, All Rights Reserved. This pattern can not be reproduced or published elsewhere without Shelly's permission and official Author's bio attached. Please email Shelly for a copy of it.

Sunday, November 28, 2010

FREE Crochet Dress Refrigerator Magnets Pattern

A few weeks ago I found this really easy crochet pattern online to make cute dresses refrigerator magnets! You can make them in any color combination that you want and besides the yarn all you will need is some glue, satin ribbon and a magnet to complete them.

These crochet fridgies work up super quickly...I was able to crochet 3 of them in less than 1 hour and a great way to use up some of your yarn scraps. You can find the FREE pattern over Marie's Cozy Corner Blog. As Marie suggested...you can make up a lot of them in baby girl colors and use them at a baby shower for table favors which I think is a fabulous idea!

Happy Crocheting!

Tuesday, November 2, 2010

FREE Crochet Pattern - Hearts Refrigerator Magnets!

A few days ago my aunt asked me to crochet some new refrigerator magnets for her to give out to her lady friends and she wanted them heart shaped...so I got online and found a great free pattern that you can find ----> HERE

They used a size F crochet hook but I wanted them a little smaller so I used a size D and they came out just fine. These heart refrigerator magnets work up quickly, I was able to make 6 of them in less than 1 hour. The instructions have 2 ways that you can finish them...one is with a lacey border and one is for a flat edge border...I made them both!

I think they would be super adorable done in red, pink and white for Valentines Day too!

Happy Crocheting!

Sunday, September 19, 2010

FREE Crochet Candy Corn Refrigerator Magnet Pattern

I love decorating the front of my upright freezer and the front of my refrigerator with homemade holiday magnets. In the fall of 2008, I found this free crochet pattern online to make Halloween Candy Corn magnets.

What I really like about this pattern is that its super easy, even a beginner can crochet them...and better yet, its a great way to use up some of your yellow, orange and white yarn scraps.

I made my refrigerator magnets using acrylic 4-Ply yarn and then glued magnets on the back with some all-purpose craft glue. If you decorate your home with a little Halloween ornament tree, you could omit the magnet and add a little hanging string.

You can find the pattern for FREE on the Crochet Memories Web Site ---> HERE

Have fun crocheting!

Thursday, September 16, 2010

FREE Crochet Pattern - Turkey Butt Refrigerator Magnet


Last year (fall of 2009) I found this adoreable free crochet pattern online to make a Thanksgiving Turkey...but not your regular turkey head...a turkey butt! LOL I thought it was cute and funny all at the same time!

You can find the FREE crochet pattern to make the Turkey Butt Refrigerator Magnet by heading ----> HERE (sorry ~ The original pattern poster has removed their site which means the pattern is gone.)

You only need a little bit of chocolate brown yarn, some varigated yarn and a size G crochet hook...although I used a size F as I wanted them a little smaller. Then glue some magnet on the back of them with some tacky glue and your done.

It took me less than 15 minutes to crochet a Turkey Butt! (gosh, I love saying that!)

~ Shelly ~

Thursday, September 9, 2010

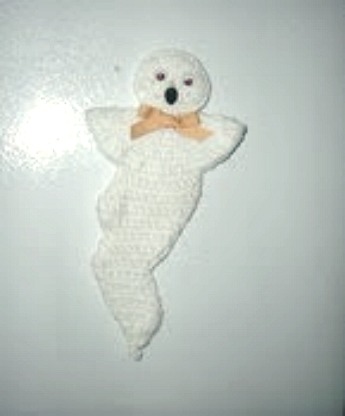
FREE Crochet Halloween Ghost Refrigerator Magnet Pattern

I love decorating my home for the various holidays through out the year with handcrafted holiday accents. A few years ago, I found this free crochet pattern online and then I lost the instructions. After some searching, I finally found Myra's great crochet blog and low and behold...she has the pattern posted there.

You can head on over to Myra's blog ---> HERE to print out the crochet ghost fridgie pattern. While you are there, check out all of her other patterns.

Now that I found her site...I will be making several more of her items. Her patterns are easy to follow and understand.

~ Happy Crocheting ~


Monday, February 8, 2010

Crochet - Easy To Make Granny Square Refrigerator Note Pad Holder


I love to buy magnetic note pad holders for the front of my refrigerator as it is just too handy to jot down things I need to pick up at the store if the list is right in front of my face :) However, a lot of times, the cardboard backing that the magnet is attached to will rip off and then I have loose note pad paper falling all over my kitchen floor.

To solve that problem, I crocheted my own note pad and shopping list holder by making a traditional granny square pouch. For this project you will need to crochet 2 granny squares. I used some left-over variageted cotton yarn that I had laying around from another project. You will only need a small amount so its a great way to use up scraps.

I used a size G crochet hook.

How To Crochet A Granny Square:

With a size G crochet hook, chain 3, join with a sl st in the first chain to form a ring.

Rnd 1: Chain 3, 2 double crochet in ring, chain 3, (3 DC in ring, chain 3) 3 times, join with a sl st to top of chain 3. Sl St over to the first chain 3 space.

Rnd 2: Chain 3, (2 DC, chain 3, 3 DC) all in the same space, chain 1. (3 DC, chain 3, 3 DC) all in the next space, chain 1, repeat around and join in the top of chain 3 and then Sl St over to the next chain 3 space.

Rnd 3: Chain 3, (2 DC, chain 3, 3 DC) all in the space, chain 1, 3 DC in next chain 1 space, chain 1, (3 DC, chain 3, 3 DC) all in the next chain 3 space, chain 1, 3 DC in next chain 1 space, chain 1 and repeat around. Join with a Sl St in top of begining chain 3 and fasten off.

You will make 2 granny squares. Using your crochet hook and a single crochet, attach the 2 granny squares together by going around 3 sides (leave the 1 side open so that you can insert your paper and pen/pencil).

Once it is done, use some all-purpose glue and glue a heavy duty magnetic disc on the back side and let dry for a few hours.

This is big enough to hold a shopping list table, note pads, post-it notes and a pen or pencil.

~ Happy Crocheting ~


Thursday, January 28, 2010

FREE Crochet Apple Refrigerator Magnet Pattern


Like most people who crochet or knit, I often end up with a big box of yarn scraps that I don't know what to do with. A few weeks ago I found this very easy crochet pattern over on the Crochet 'N More web site to make a small apple refrigerator magnet (fridgie). You can find the printable pattern ---> HERE

The designer of the pattern used a size G crochet hook, I opted to use a size F as I found it better to use for the thickness of yarn that I was using. You only need a small amount of red yarn and even smaller amount of green yarn to make the magnet. Once you have it completed...some tacky glue to affix a magnet disc onto the back.

Happy Crocheting!

Wednesday, January 20, 2010

FREE Crochet Pattern - Owl Refrigerator Magnets!


If you love owls...then you will love these! I have been collecting owls since I was a teenager so when I came across this free crochet pattern two weeks ago, I just knew I had to find some time and crochet some up!

The pattern is designed by Myra Shaw and you can print out the pattern directly from her blog ---> HERE

While you are on her blog, check out all of her gorgeous free crochet patterns!

I was able to make up my owl refrigerator magnets in a matter of minutes (about 10 minutes per owl) using 2 strands of yarn and a size F crochet hook. (she used a size J). Once done, just glue on some magnets on the back side using tacky glue.

I didn't have any dark brown pipe cleaners on hand for the tree branch so I used black ones...which I think is passable :) For one of my owls, I chose to use some dark colored variegated yarn (the owl on the end) along with one strand of dark brown yarn and I think he looks fabulous!

Happy Crocheting~


Saturday, January 16, 2010

FREE Crochet Butterfly Refrigerator Magnet


Last week I was browsing online for some free crochet fridgie (refrigerator) magnet patterns and came across this free pattern over on the Around The Crochet Table web site.

I decided to print out the crochet instructions and sit down and make one for my aunt who just loves butterflies! You only need some variagated yarn, crochet hook size H, a pipe cleaner (chenille stem), tacky glue and a magnet.

This butterfly magnet took me less than 20 minutes to crochet and I am no expert at this crafting medium. The original pattern maker used pastel colored yarn and I went with a jewel-toned acrylic yarn and she used a size H crochet hook and I used a size F as I wanted mine a little smaller.

~ Happy Crocheting ~

Shelly

Monday, January 11, 2010

Crochet Mini Mitten Refrigerator Magnet or Ornament Pattern


Several years ago my aunt gave me instructions (she wrote them down for me on a piece of paper) on how to crochet mini mittens that you can turn into refrigerator magnets or holiday tree ornaments. I don't know if it was her original pattern or if she got it from someone else.

With that being said, I am going to post the instructions for you. You can crochet one and glue a magnet on the back to turn it into a refrigerator magnet or you can crochet 2 of them, tie them together and hang them onto your Christmas tree.

Crochet Mini Mitten Pattern

Crochet Hook size F
Multi-Colored Holiday Yarn
Scissors

Note: You will want to work in the back loops unless otherwise stated in the pattern.

Row 1: Starting at the cuff of your mitten, chain 6, sc in 2nd chain from your hook, sc in the last 4 chains, turn. (total of 5 sc)

Row 2-12: Chain 1, sc in each stitch across, turn.

Row 13: You will want to hold the first and last rows together, matching up the stitches, work through both thicknesses, chain 1, slant stitch in each stitch across, do not turn.

You will now be working in rounds instead of rows.

Round 14: For hand, working in end of rows on the cuff, chain 1 , (sc in next row, 2 sc in next row) around, join with a slant stitch in the first sc. (18 stitches)

Rounds 15-17: Chain 1, sc in each stitch around, join as before.

Rounds 18: sc in first stitch, sc in the next 10 stitches, 2 sc in next stitch and then leave the last 6 stitches unworked, join. (13 stitches)

Rounds 19-21: You will repeat rounds 17 and then 16 alternating between the two but starting with round 17 and then ending with round 17.

Round 22: Work this round in both loops, chain 1, sc in each stitch around and then join.

Round 23: Work this round in both loops, chain 1, sc in each of the first 2 stitches, sc next 2 stitches together, (sc in each of next 2 stitches, sc next 2 stitches together) 2 times, sc in last stitch, join.

Leave a 8" yarn tail for weaving and fasten off. Weave end through stitches of round 23, pull to gather, secure the end.

To Make The Thumb

Round 1: Working this round in both loops, sc in first unworked stitch on round 17, sc in next 4 stitches, 2 sc in last stitch, join with a slant stitch in first sc. (total of 7 sc).

Rounds 2-3: Work these rounds in both loops, chain 1, sc in each stitch around, join as before. At the end of the last round, leave 8" of yarn for weaving, fasten off. Weave end through stitches of round 3, pull to gather and secure your end.

Once done, take some tacky glue and glue a magnet onto the back and stick your pretty little crochet mitten on the front of your refrigerator. If you want it to be a tree ornament, thread some satin ribbon or extra yarn through the top to make a hanging loop.

Optional: Cut a 5" piece of solid green yarn and thread it through the stitches to make an accent bow using a tapestry needle. (see photo for placement).

~ Happy Crocheting ~

Shelly

Ps. If anyone comes across the original designer of this pattern, please let me know as I am not sure if its original to my aunt or not.

Thursday, December 24, 2009

Easy and Quick Felt Holiday Refrigerator Magnets


Last week I was looking online for some free easy patterns to make felt holiday refrigerator magnets and tree ornaments. I needed a project that I could do with my 12 and 13 year old nieces that didn't take a lot of time.

I found this pattern over on the Joann's Fabric Site (crafts and fabrics) to make fabric holiday ornaments. We downloaded the free pdf project sheet and patterns and used the pattern/template to make some cute felt holiday refrigerator magnets. Since my nieces are not great (yet) at machine sewing, we did hand-sewing.

You can find the free printable patterns ---> HERE

You can use fabric and make them into holiday tree ornaments as called for in the instructions or you can trace the pattern onto felt like we did. We traced each one onto 2 pieces of scrap felt and hand-sewed them together with tiny straight stitches. We added some ribbon bows (on the dog and cat). We glued a 1 1/2" long piece of magnet strip on the back side of each one. To turn them into ornaments, just add a hanging string...simple as that :)


Thursday, November 12, 2009

Easy To Make Christmas Foam Refrigerator Magnets


Looking for an inexpensive Christmas craft idea for your next project? This project costs less than .65 cents per refrigerator magnet and takes less than 40 minutes to make.

This is a great project for: Sunday School Class, Scout Troops, School Craft Projects and Holiday Parties. Children ages 5 and up could make these with the appropriate adult supervision.

Christmas Foam Refrigerator Magnets

Materials Needed

Patterns (found in coloring books)
Child safety scissors
All-purpose quick-drying craft glue
Markers
Magnets
Wiggle eyes (optional)
Foam sheets in your traditional holiday colors

Patterns: You can find patterns in pre-school and school-aged coloring books. To turn the coloring page into a pattern, cut out the pattern by cutting just outside the patterns shape. If you don't have any coloring books on hand, you can go onto the Internet and search out free printable color pages from various web sites.

Place the paper pattern from the coloring book on the reverse side of your craft foam and trace around it with a pencil or marker. Using safety scissors, cut out the pattern from the foam sheet by cutting on the traced line.

You can make these a simple or as elaborate as you would like. I like to cut apart my paper patterns and use different colors of foam to add dimension to my magnets. (see photo)

To construct these magnets, start with your large base shape and then cut out the accents from additional colors of foam. Glue those accents onto the base shape and let dry. You can use markers to draw on facial features if necessary. Once your design is dry, flip it over and glue a 2" to 3" piece of magnet strip on the back side.