Showing posts with label Party Favors. Show all posts

Wednesday, October 9, 2019

Mickey Mouse Seashell Birthday Party Favors

A friend of mine is hosting a birthday party for her 4 year old son in a few weeks. The theme for his party is Disney's Mickey and Minnie Mouse. She asked me to help her make some decorations and unique party favors for the upcoming event.

We decided to paint some seashells that feature an image of Mickey Mouse or Minnie Mouse on the front. We're NOT artists, so we needed the design to be easy to paint. This is what we came up with and guess what? You can whip up several of them in one afternoon! Plus, they don't cost a lot of money to make.

You will need to collect large clam seashells from the beach. Wash and thoroughly dry them. Base coat each one with 2 coats of red acrylic craft paint. If you're making several of them to use as party favors...do it in an assembly line fashion. After they're all dry...move on to the next part.
Mickey Mouse Seashell Birthday Party Favors

Use Google to find a FREE Mickey Mouse (head) image. We found one that we liked, re-sized it, printed it out and used scissors to cut it out....use this as your template. Place it onto the shell and use a black Sharpie Marker to trace around it.

You'll need 2 coats of black acrylic craft paint to fill in the image, allowing 15-20 minutes of drying time between each coat of paint. You can use a Sharpie Marker to add a child's name, birth day, or other wordage onto the shell. Let everything dry.

Take them outside and spray them with a coat of clear acrylic spray sealer. We used a glossy-finish, but you can certainly use a matte finish. Let them dry for several hours. This is a project that the kids can do too!

Thursday, July 21, 2016

Coastal Beach Seashell Candle Holders

Last month we took an extended vacation down to the Jersey Shore. We spent 2 1/2 weeks at the condo and had a wonderful time. Every time we go down...I go shelling and pick up all of the seashells, sand dollars and star fish that I find. In addition, I always bring home a small zipper closure baggie full of beach sand. I like to use these things in various craft projects & home decor projects around my home.

Last week I whipped up 6 of these very easy-to-make beach seashell candle holders to sit out around our deck and near our swimming pool for an upcoming party that we are hosting. Here's how I made them.

Coastal & Beach Seashell Candle Holders

Colored Glass Mason Jars
Battery-Operated Votive or Tealight Candles
Beach Sand
Pebbles & Seashells
Jute Rope
Glue Gun & Hot Glue

I found the colored glass mason jars at my local craft supply store for $1.00 each on sale. I also picked up battery-operated tealight candles and a roll of jute.

You can fill your jar up with beach sand, smooth pebbles that you found on the beach and small seashells. Whatever you found on vacation...use it in the jar, including small pieces of driftwood. You can fill your jars up as far as you would like. Since I am using small tealights, I filled my jars up pretty full.

I then took hot glue and glued jute roping around the neck of each of my jars...I think 6-7 rows of it. I then glued small clam shells on top of the jute roping to finish them off. You can decorate the neck opening of the jar however you would like.  You can make them simple & plain like mine (that's the way I like them) or fancy them up. You can make them all the same or vary the design & fillings to suit your own taste.

These look so pretty sitting on the tables and our deck railing during the day and at night...they look even prettier with the candlelight glow.

Wednesday, August 19, 2015

DIY Baby Boy Baby Shower Ideas

My daughter is expecting her second child later next month and it's a boy! I am super excited to be a grandmother again and I look forward to spoiling this new bundle of joy once he arrives. Previously when she was pregnant the firs time around we had a very large & catered baby shower. This time around we decided to have a simple baby shower and did most of the decorations, party favors, table centerpieces and food ourselves.

Today...I wanted to share some very simple & frugal baby boy baby shower ideas with all of you.

1. Blue Punch! You can buy all kinds of punches these days that are blue or you can make your own. You can whip up a batch of blue Kool-Aid too! For the ice...we used flavored water so that added additional flavor the drink! Display your punch in a glass beverage dispenser so that your guest can help themselves.

2. We went to our local dollar-type of store and picked up one medium sized yellow rubber ducky and two smaller sized yellow rubber duckies. We were looking for blue ones which we've seen before but couldn't find any on this particular trip. With that said...I think the yellow ones pop & just look better! To keep them from falling off the top of your beverage dispenser stick some two-side tape or little self-adhesive scrapbooking glue dots on their bottoms. Cute!

3. Instead of doing a big fancy baby shower cake we elected to do cupcakes! This was a co-ed & family-style baby shower and a lot of children were in attendance. We baked the cupcakes ourselves and added a little bit of blue food coloring to the batter. We simple used a cream cheese frosting on top and added blue sprinkles to some of them and left others plain. Super simple to do!

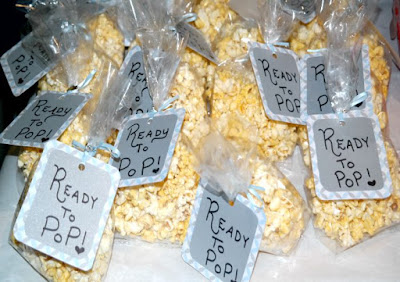
4. The "Ready to Pop" popcorn bags were a big hit with the party guests! We purchased little food-safe party bags at our local dollar-style store and microwave popcorn. We popped it and then left it cool. Measure out about 1/4 to a 1/2 cup and place it into the bags. (avoid using popcorn with a slew of butter or flavorings as it will look greasy & oily in your bags...plain or light butter is best!). We made our own tags from scrapbooking cardstock and used a glue stick to glue them together. Punch a hole in the corner and write your message onto the tag. Finish up by tying the tag to your little popcorn bags!

5. My husband had seen numerous posts on Pinterest for making a fruit basket out of a watermelon. Some of these included designs for turning the watermelon into a baby buggy (stroller). He looked them over and then came up with his own simple concept which is shown in the photo. Is it perfect? No, but it's darn cute and everyone loved it! You will need to pick up a watermelon, a cantaloupe, pineapple, blueberries, green seedless grapes, strawberries and any other fruits that you want to use. We do suggest making it up no earlier than the night before or very early in the morning the day of. You want your fruits to be ripe and crisp!

Note: You can click on the images in this post and they will open up in a new window and will automatically ENLARGE so that you can see all of the details close-up.

Over the coming weeks I will share some additional ideas that we did for her special baby boy baby shower. Everyone in attendance had a great time!

Wednesday, June 10, 2015

Baby Gender Reveal Party - The Balloon Box

My daughter is pregnant with baby #2 and is due late this Summer. Recently they held a baby gender reveal party at their home and revealed the sex of their new baby to all of their party guests (family and friends). She found a really cool idea online and used it at the party.

She took one of her best friends along with her to an ultrasound and had the technician print out the photo and label it if it was a boy or girl on the back. The technician placed the photo into a sealed envelope which her friend kept with her. In other words, my daughter had no idea if she was having a boy or a girl until the party!

The Balloon Gender Reveal Box

1 large cardboard box
Pink, Black and Blue Markers
Pink or Blue Helium Balloons
Pink or Blue Ribbon

The box needs to be decorated in a baby girl and baby boy theme. Her friend kept the box simple as you can see in my photo. In private...she read the contents of the envelope and place the photo back inside a new sealed enveloped and tied the envelope around one of the ribbons on one of the balloons. Depending on the sex of the baby...that will determine the color of your balloons and ribbon. In our case...all of the balloons were blue!

Seal up the box...you can either just fold-over the flaps on the top or use a little bit of clear shipping tape but you definitely want to make sure that the balloons are securely inside the box. We also recommend that you fill up the balloons no more than 10 hours before the party as you don't want them deflated.

The box is now ready for the party and it is best to take the box outside and let the new parents open it up in front of their party guests to learn if they are having a baby boy or a baby girl! (or in some cases, one of each!).

Very inexpensive and fun! The parents loved this idea and all of the guests enjoyed it too! Most importantly, have fun at your gender reveal parties and don't stress yourself out by having elaborate & fancy parties where people can't have fun and enjoy themselves.

Tuesday, May 26, 2015

Tropical Dinner Party DIY Palm Frond Balloons and Centerpiece Ideas

Palm Fronds and Bon Bons Tropical Dinner Party for Balloon Time
DIY Projects, Styling + Text by Studio DIY
Photos by Mary Costa

We’re taking a classic tropical theme and turning it on it’s head! We kept the palm trees and pineapples, but added balloons, cocktails and an elegant color palette to make this theme appropriate for all your summer dinner parties. A “Palm Fronds & Bon Bons” bash is the perfect way to show everyone that balloons and luaus can be modern and sophisticated, too.

DIY Palm Frond Balloons

Who knew you could “decoupage” balloons? We added a fun palm print to plain white balloons with photos of palm fronds and spray adhesive.

Supplies:

Free Printable Palm Leaves (Download here!)
Tissue Paper (That matches your balloons) 8.5” x 11” Cardstock
Inkjet Printer
Masking Tape
Latex Balloons (We used a mix of 11” and 17” balloons)
Balloon Time Helium Tank
Ribbon or String

Cut out several rectangles of tissue paper, about 8” by 10". Tape one of the rectangles (glossy side of the tissue paper DOWN) to a piece of cardstock with masking tape on the top and bottom of the paper (see photo). Feed this through your printer to print the palm leaves, one sheet at a time, onto the tissue paper. Be sure you are feeding the paper through the printer the right way (each printer is different) so that the image prints onto the tissue paper. Remove cardstock and let dry for about 10 minutes while you continue printing additional images.

Cut out the leaves. This doesn’t have to be perfect as the tissue will blend in with the balloon, just a rough cut around the perimeter works.

Inflate balloons with helium and tie with string or fishing line.

Spray the back of each leaf with spray adhesive and let dry slightly until tacky. Adhere the image to the balloon, tacky side down and smooth over with your fingers. Repeat with as many images as desired.

DIY Dinner Party Balloon Centerpiece

If you need an easy way to add a statement to your dinner table, create a balloon centerpiece! This is a great alternative (or addition!) to flowers and adds just as much color, depth and drama.

Supplies:

Latex Balloons (We used a mix of 11” and 17” balloons)
Balloon Time Helium Tank
Fishing Line
Balloon Weights (We used mini pineapples from the grocery store!)
Scissors

First determine how long you’re table will be. To ensure you have one cohesive centerpiece, you’ll want to place clusters of balloons about 12­-18” a part. After you know how many clusters you'll need, start inflating balloons with helium. We had one 17" and five 11" balloons per cluster.

Tie each balloon with fishing line and tie clusters, as desired, to your balloon weights. Place the weights down the center of your table and adjust or fill in balloons as necessary.

Tropical Party Lounge + Treats

Change up a typical dessert bar and incorporate your sips and sweets into a lounge area at your party. We arranged plates of different chocolates, truffles and bon bons on a coffee table in-front of lounge furniture, making for an intimate post-dinner treat! Make a couple extra clusters of balloons and use them as decor flanking each side of the seating area. To take the tropical theme even further, pick up various palm leaves at your local floral supply or garden center and use them as decor on the tables. Happy Luauing!

Disclosure: This is a guest post by Balloon Time. You can connect with Balloon Time on Facebook.

Sunday, April 19, 2015

Party Favors: DIY Homemade Glitter Nail Polish

My 13 year old niece was having a sleepover Birthday party and I was in charge of making some party favors for the girls. The girls at this age are all experimenting with bath, body and beauty products so one of the party favors that we made were DIY nail polishes. Here is how we made them.

Party Favors: DIY Homemade Glitter Nail Polish

Bottles of Clear Nail Polish (we got ours at the dollar store)
Cosmetic-Grade Fine Glitter (in desired colors)
Funnel (made from paper)

* We purchased our cosmetic grade "fine" glitter online. You can find several web sites that sell it in a large variety of colors. We stuck with their school colors of silver, white and black.

Make a funnel from regular paper. We used cardstock. You will want the funnel to be very narrow or cut down some drinking straws that will fit through the top of your nail polish bottle. Sprinkle some of the glitter down through the funnel and into the polish bottle. You don't need a lot. Place the lid back on top and shake it well to disperse the glitter through all of the polish.

That's it, super easy! You can decorate the outside of the bottles with name tags, sating ribbons and little charms if desired.

When the girls are ready to pain their nails...it will take two coats of polish unless you add in a lot of glitter. That's entirely up to you on how much glitter you want to add. You can click on the image in this blog post which will enlarge it. Enjoy!


Friday, April 25, 2014

Craft Project - Mickey Mouse Lollipop Party Favors

Back in late February we held a Disney theme'd party at my daughter's home and had 10 little kids over to celebrate. All of our decorations, games and goodies were done in a Disney Mickey Mouse theme. We needed some additional party favors and had a hard time finding some things that we wanted. What we couldn't find, we made ourselves.

We decided to make these super quick and easy Mickey Mouse Lollipop Party Favors that the kids got to take home with them in their Disney theme'd goodie bags that we had made for them. Here is how we made our lollipop favors.

Disney Mickey Mouse Lollipop Party Favors

2 sheets black cardstock
scissors
1/4" diameter glue dots (found in scrapbook section)
mickey mouse template
1 bag lollipops
Scotch tape
tracing pen
roll of curling ribbon

Template: We had a coloring book and cut out Mickey's head from that coloring book to use as our template. The head measures about 4" in diameter.
The lollipops that we used had larger plastic wrappers on them. We folded the edges of the wrapper in and secured it with one small piece of Scotch tape. We did this so that the wrappers were less visible. You can avoid this step if you buy lollipops that don't have larger wrappers on them.

We traced the Mickey Mouse head (using the template) onto solid black card stock. You will need two of these per pop that you are making. Use one glue dot and secure one head onto each side of the lollipop. Finish up by cutting a 5" long piece of curling ribbon, tying it around the stick and then curling it with a pair of scissors.
There you go! A quick, easy and inexpensive Mickey Mouse Lollipop Party Favor that you can make all by yourself! We made 24 of them in just under 90 minutes for our party. Enjoy!

Monday, July 1, 2013

4 Do-It-Yourself Baby Shower Table Centerpiece Ideas


When it comes to hosting a baby shower for a new mom-to-be you don't have to spend over your budget when it comes to baby shower table centerpieces. Matter of fact, I think the best table centerpieces are ones that you (yourself) create.

Here are four great Do-It-Yourself Baby Shower Table Centerpiece Ideas

* Purchase a box of wooden ABC blocks at your local toy store or baby store. Take these wooden ABC blocks and stack them up on the tables in pretty pyramid shapes. Once the baby shower is over, the new mom-to-be will have a stack of baby blocks for her new little one to play with.

* Purchase a revolving countertop spice rack that has clear glass jars (no labels on them). Fill them up with pastel colored candies, baby theme'd confetti, diaper pins, etc. You can print out your own custom baby theme'd wording and stick on label onto each filled spice jar. Add a big fluffy bow to the top and sit it on the main table at the party. Once the party is over, the new mom-to-be can keep the spice rack and use it for spices once the "decorations" have been removed.

* Purchase a few clear glass mixing bowls or cake pedestal plates. Fill them up with all kinds of things like pastel colored holiday ball shaped tree ornaments, baby confetti, pastel color candies, pastel colored marshmallows, pastel lollipops, cookies, cupcakes...all kinds of things can be used as fillers. Place them on the tables as centerpieces. Use your imagination and get creative!

* Purchase white, ivory or pastel colored pillar style candles. Print out some custom candle wrappers from online in the design, colors and wording that you would like. Wrap the labels around the candles and secure them shut with a glue dot. These are for decorative use only, when ready to burn you will need to remove the paper labels. In addition, you can purchase glass candle plates and pretty paper ruffled doilies at your local dollar store and really get creative with this idea.

When it comes to hosting a baby shower, you don't have to break the bank with party decorations. You can think outside-the-box and hit your local dollar store & craft supply store and make them yourself!

Thursday, June 6, 2013

Kids Crafts - Homemade Gold Glitter Princess Dust with Wand


A few days ago I sat down with Princess Gia (my 4 year old grand daughter) and we made a craft project that we are calling ~ Gold Glitter Princess Dust with a Little Magic Wand. These are not full-size at all and are meant to be a decoration on a shelf in her princess theme'd play room and bedroom. Everything to this 4 year old has to do with princesses at this time!

All of the supplies required for this craft project are available at most craft stores. We got our supplies at Michael's and the project cost us less than $5.00 to make (we even have some leftover supplies for another project). We found the little glass jars with locking lids in the aisle that sells sand art supplies, so look there for a jar or recycle (upcycle) an empty baby food jar or empty spice jar!

Here is what you will need to make one along with the instructions on how we did it!

Homemade Gold Glitter Princess Dust with Wand

1 glass container with locking lid 3" tall (we found them at the craft store)
1 bag of fine-grade gold glitter
1 piece of gold glitter ribbon 1/4" wide by 4 1/2" long
1 bottle tacky glue
1 wooden dowel 4" long by 1/8" in diameter
2 white felt stars 1" diameter
various rhinestones in various colors (round & star shaped)
newspaper and scissors

Lay newspaper down on your work surface as kids can be messy crafters, especially when they use glitter and glue. Give your child the tacky glue and let them glue the rhinestones in a random pattern around all sides of the little glass container/jar. Glue the gold glitter ribbon around the neck of the container. Pour gold glitter into the glass container, filling it 1/3 of the way full. You don't want to fill it up completely as kids like to shake it around and make their princess wishes (or fairy wishes).For the wand, we simply glued two white felt stars together at one end of the wooden dowel. We then just inserted the wand into the locking mechanism of the glass lid.


Final Notes: It took us less than 20 minutes to make this project and then about 1 hour for the glue drying time. If necessary, use a little funnel to pour the glitter into your jar so that none is spilled or wasted. You can make a lot of these as party favors in a short amount of time and in any color that you would like. Have fun and get creative!

Sunday, March 11, 2012

Candy Bar Baby Shower Party Favors


I just had to show you all this picture of some candy bar baby shower favors that were made for my nieces baby shower a few weeks ago. Aren't they cute? Her mother purchased them from a crafty seller online and had the wrappers custom printed. The front of the candy bars has my nieces name (first, middle & last name). By the time you all see this post she will have been borned!

I love how my sister-in-law then hand wrote thank you messages (thank you for attending the shower) onto pink paper, rolled them up like a scroll and used glue dots to stick the paper scrolls to the corner of each candy bar wrapper.

I think they are too cute and so much cuter than those plain candy bars you see at showers these days! Congrats on the new baby girl Ashley!

Monday, February 27, 2012

Butterfly Theme Baby Diaper Cake


My 26 yr. old daughter has finally taken an interest in crafting and today I am sharing a photo of a diaper cake (the second one she has ever made) with all of you. She made this butterfly theme'd diaper cake for my nieces baby shower last weekend. I think it is totally cute!

She did an excellent job making it and as a crafty mommy myself...I am very proud of her! She found these sparkly butterfly wings from a child's costume shop and put them on the backside of the cake...totally cool! Sorry the photo isn't too great but trust me...the baby diaper cake is absolutely gorgeous!

Everyone who was at the baby shower remarked how cute it was and my daughter has been getting orders to make more since that time! She has surprised me with her creativeness when it comes to making homemade baby diaper cakes!

Friday, February 3, 2012

How To Make A Three-Layer Scrapbook Diaper Cake

Scrap booking and diaper cakes meet with a winning combination.

You will want to watch Barb's cool YouTube Video:


This three layer cake can be easily modified to fit any theme for Baby. Tried of the same ole diaper cakes? Do you love scrap booking and just itching to try something new? You'll just love creating a cake like this then. There are no rules to bind you, just use your imagination! If you can dream it , you can make it! The recipient of this gift will be amazed because it will be one of a kind, you simply ask the baby shower giver what the New-Mom -To Be theme is and create, go wild!It's fun!

Items used to make the cake are:

Poster broad or you may use card stock if you can find pieces large enough
Fabric
Lace
White rosebuds
Pink paint
Chalked ink (pink) to stamp on lace flowers.
Hand sewn lace flowers ( either purchase them on Ebay, or make them.I made mine and it's simple.You can find instructions on Youtube.
Diapers -size one "luvs"
Mixed color of shred to match theme.
Double sided tape
Hot glue

To construct your cake, you'll need to cut three and a half strips of poster broad.
Bottom layer - takes one and a half lengthwise and 5 1/2 inches in height.

Second layer-takes one strip and you want to make this one 5 inches in height and about 6 inches round ( you may cut some off) Just hold the ring over bottom layer and eyeball where to cut off excess.You just want to make sure the second layer will not overlap bottom layer.( Think cake when eyeballing it:)

Third layer- takes about a little over a half of the strip and should be 4 1/2 inches in height and about 5 inches in roundness.It's always best to cut a little over than be short, then just eyeball how far to take in end of strip to make sure the layer does not overlap the second layer.

Next take your fabric and measure out enough fabric to cover strips, but leave an inch or so bare on one end of each strip.Next wrap and secure fabric on the inside of strips with double sided tape ( no one is going to see the inside) You may iron the fabric too. Check once again where you'll secure both ends together to form a ring, or layer. Take a strip of double sides tape and put on end of poster broad, insert that end into the other side where the fabric is and hold a few seconds till secure.

Embellish them now with your flowers, strips of lace or whatever you choose, let dry good.Next you'll add diapers. Make sure you pack the diapers in tight so there is no room to move ( Very important). Complete all three layer. Stack them and add shred, and your done!

You may also want to position your bottom layer on a cake plate before adding the other layers! Most of all have fun and create!

May be reprinted with Authors bio intact - Copyright Barb Ireland 2011
http://www.makeadiapercaketoday.com/

Thursday, December 15, 2011

Tips for Putting Together a Baby Shower

Tips for Putting Together a Baby Shower by O Quinn

More well liked than bridal showers baby showers are almost a necessity as baby’s needs can break the bank.

Here’s how to make it fun for all guests.

It is considered in bad taste for the pregnant mother or any of her relatives to throw the shower. Ask a close friend to throw one instead.

Let your guests know if the baby’s gender is already known. If it’s not known let the guests know in the shower invitation so they can shop accordingly (if they would be so kind).

Decorate the baby shower with baby accessories which are then presented to the expectant mother or couple at the end of the baby shower.

Diaper cakes, while ever so popular, are also practical because they are made from cloth diapers and decorated with baby accessories. These items will become well used once the baby is born.

Do include the father in the baby shower if at all possible. Many men turn their noses up at the word “baby shower” but this can be made fun so they are not upset they came. Also if the father is part of the shower invite other males so he is not left out.

Don’t overwhelm your baby shower guests with games. More than five and it’s overkill. These are not toddlers who need you to direct their day. Some other ideas can be let the guests mingle with each other and the guest of honor. Have an activity where the guests each write out a lovely piece of baby wisdom on decorative cards to give the mom-to-be. She can read them aloud once they are done and keep them in a decorative tin for future reminiscing.

Some fun baby shower games include...

Word scramble: Scramble up words of baby items and give your guests a few minutes to figure out what they are. Make them hard words too. Don’t let them off easy with words such as crib or bottle.

Guess the baby accessory: Find some not so common baby items and have people guess what they are used for.

Ask questions from common childhood stories. Such as “What was the second pig’s house made out of in the Three Little Pigs?” or “Who were the three lazy characters in The Little Red Hen?”.
Baby’s are precious. Visit Infant and Baby Needs for great tips on shopping for gear and caring for these tiny precious lives.


Tuesday, November 8, 2011

Baby Shower Tips for a Fabulous Baby Shower by: Barb Ireland

Baby Shower Tips for a Fabulous Baby Shower - by Barb Ireland

A baby shower is a day full of joy and anticipation for the mom-to-be and all her family and
friends. It’s a time to get together and share in the happiness of a new baby coming and to
show how much the mom means to you. It’s also an opportunity to help prepare for the arrival
of their new bundle of joy. But how can you make the shower memorable and something that
will be long remembered?

One of the growing trends you find at more and more showers are diaper cakes. Diaper cakes
are baby shower gifts that are shaped like a “real” three-layer cake, but made from diapers,
blankets and other useful items. A diaper cake is a fun and rewarding hot new product for baby
showers, baby gifts, and also other celebrations. You can make your own or order one at http:
//www.makeadiapercake.biz

In addition to the diaper cake, you also want to have a party that is fun and memorable. Here
are some other ways you can “wow” your guests at a baby shower.

Make candle favors ~ Buy scented votive from your favorite craft store, tulle circles and ribbon.
Take the votive center. Put this in middle of tulle circle and then bring all ends up and secure
with ribbon. Make a nice bow and you have great gifts for guests.

Make bath salts~ Buy muslin bags, Epsom salt, and fragrance oils. Most items you can buy
from craft stores. Salt can be bought at your local supermarkets. Combine salt and fragrances
and stir good and place in the muslin bags. Beautiful way to say, “thanks for coming.”

Make Specialty Cupcakes~ These aren’t the kind you eat, but instead made from a washcloth.
You then fill with candies, coffees, teas, or more small bath items. Everyone will remember
this one and be talking about it for a long time after the shower.

Spoons — In center of tulle circle, place kisses on spoon part and wrap up the tulle over spoon
and secure and handle with ribbon. Place these at table for guests.

Make your own soap favors. Your craft stores sell complete kits. You then simply buy some
tulle circles and place favors in middle and then tie up with ribbon.

Most of all have fun and create your own style your mom to be and guests will remember for
forever. Everyone will love the personalized attention you gave to the party.

Barb Ireland is the founder of Make A Diapercake biz, MAKE A DIAPER CAKE. Articles are free to be reprinted as long as author’s bio remains intact.

Sunday, October 16, 2011

Quick and Easy | Baby Shower Party Favor Ideas


A few weeks ago I attended one of my nieces baby showers and her mother had made these adorable little girl theme'd baby shower favors so I wanted to share them with all of my craft blog readers.

For the pink plastic baby shoe party favor she purchased those at her local craft store and then used a perm. marker to write the baby girl's name on the bottom of the shoe. In the center is a piece of mesh tulle and she wrapped up silver and pink colored Hershey Kisses in that and tied it shut with a pink satin ribbon bow. The final item is a pink plastic umbrella that is filled with small candies and she simply printed out a tag that says "Thank You" and tied that onto the umbrella with pink satin ribbon.

These are excellent ideas for baby shower party favors...especially for those who are not too crafty or don't have a lot of time to invest into making other types of party favors.

Wednesday, September 28, 2011

Halloween Party Cakes | Holiday Fun For All

Halloween Party Cakes - Holiday Fun For All
by: Barb Ireland

Halloween will be here soon. Goblins, ghosts and ghoulish fun too. Halloween also brings with it the start of the Holiday Season, pumpkin patches, and that warm fuzzy feeling that winter is on the way. Many families celebrate with a huge bash for friends and family and even the neighborhood kids. Bobbing for apples, yummy goodies, and dressing up in costumes are just some of the fun to be had.

On my Youtube channel, I like sharing how to make my creations, guaranteed to make any party a success. You can makeyour own Halloween Cake, not the sugary kind with those extra calories we don't want, but one with all your kids favorite goodies (and yours too). You can make a cake for any age, putting their favorite surprises in it. Plus, why limit it to only a party at home? Why not, make a cake and surprise your office or even send one to your nieces and nephews?

This unique design can be customized for any size party and with your imagination you can design it for any holiday event. In fact, why not also bring a Halloween Cake to the office and spice up the day or surprise your favorite nieces and nephews. You're be their favorite aunt for sure after this.

Here are just some of the ideas for your cake:

1. Put your favorite games, stickers, Halloween-themed popcorn, and other party ideas for all to enjoy. Then they can take right from the cake and it makes a great centerpiece.

2. If you know of someone with a new baby or even a toddler, put a cute costume in your design and include a Halloween bib, and other special baby items.

3. For the office - Use the template available on our site and shred for a good base. Then add in Halloween themed coffees, candy, notepads, pens, popcorn and more for your next party cake at the office.

4. Safety cake - All kids need to be extra special careful at Halloween. You can design a cake with Halloween safety items, such as flashlights, light sticks, Halloween Trick-Or-Treat bags, etc. Tuck in little gifts, games, candy or toys for the kids too. It's Halloween; you want it to be loads of fun.

5. You can welcome a new puppy or kitten by using kitten or puppy Halloween outfits and then include a disposable camera to take pictures of them in their cute little outfits. Halloween themed chew toys and other items new pet owners will need for their kitten or puppy.

Whichever you choose, you'll be delighted you made this cake and put a smile on their faces young and old.


About The Author

Barb Ireland is the founder of Make A Diaper Cake Biz, www.makeadiapercake.biz Barb has been designing diaper and towel cakes for the last ten years,and taught others for the period of five years.

Wednesday, September 21, 2011

Great Ideas For Crafting A Rustic Wedding Look For Your Upcoming Wedding!

Attend nearly any wedding these days and you're bound to see some rustic, country touches. A full 44-percent of brides plan at least some rustic elements in their weddings, according to The Wedding Report. And some go full-bore.

Here are several ways to incorporate the rustic look into your wedding while making it personal and within budget.

1. Barns
Rustic barns are the quintessential location for a rustic wedding. Dress it up with sweeping curtains (sew together fabric drop clothes from a home improvement store) and hanging lights (borrowed white Christmas lights work, too). A farm, open field, country church or plantation home can also provide the perfect backdrop to your themed wedding.

2. Painted Wood Signs
Add some personality to the big day with whimsical or romantic painted signs that signal to your guests what's happening where. Look locally for free reclaimed or salvaged wood to add rustic charm and eco-friendliness. For inspiration, check out this Etsy artisan's sign work.

3. Burlap
Nothing says rustic like burlap and this versatile fabric can be used in a number of ways. Use it as table coverings, then top with smaller borrowed vintage tablecloths. Use it as a background to frame table numbers for your reception. Use it as an aisle runner or atop haystacks for extra casual seating.

4. Mason Jars
Mason jars are perhaps the most-seen wedding accessory these days -- and for good cause. They ooze charm, they're economical, they come in a variety of sizes and they go with just about anything. Throw a handful of wildflowers into a mason jar and you've got an instant centerpiece. You can also use them to hold utensils or candy at the reception. Fill them with something sweet and top with burlap and ribbon for wedding favors.

5. Chalkboards
Like painted signs, chalkboards add a fun element to wedding day signage. They make perfect menus, Mr. & Mrs. signs on the back of the couple's chairs, seating charts and directional signs. Paint a vintage frame the color of your wedding, then paint over the glass with chalkboard paint for an instant showpiece.

6. Homemade
A rustic wedding is not complete without something homemade. And there's no better place to feature homemade than the reception. Pies are a big trend in weddings this year, and local vendors are making it easier to find baked goods and more with that down-home taste. Decorate the dessert table with bowls of eggs, flour and honey for that extra home-made feeling. Handwrite favorite family recipes on index cards to use as wedding favors.

7. Registry
Guests can contribute to the rustic theme through gift-giving. Register for gift cards at CardAvenue.com for retailers who specialize in rustic products, like J.Crew, Timberland, Restoration Hardware and Bass Pro Shops.

8. Music
More than decorations, music tells the story of the rustic wedding and instantly sets the mood. Whether it's country, bluegrass, folk or a combination, your choice or musicians, deejay or soundtrack will complete your theme and leave your guests tapping their feet for days to come.

###

Weddings expert Cara Davis is the author of Cheap Ways to Tie the Knot and blogs from her home in Orlando, FL, about cheap ways to spend and save at CheapWaysTo.com.

Monday, December 27, 2010

Christmas Candy Santa Sleighs ~ Ornaments or Package Toppers

Looking for a cute candy ornament, package topper or table favor? If so, you have got to check out these santa candy sleighs that my sister in law made for us this year. I think they are way too cute! (although my pictures stink) LOL

She used scrapbooking glue dots to assemble them all together. The sleigh has 2 candy canes attached to each side of the sled. The sled itself is made up of a travel size candy bar (in this case a Hershey's Cookies & Creme bar) that measures 1" by 3" in length. On top of the sled she stacked 3 square pieces of wrapped candy that each measure 1" square and on top of that a wrapped Hershey's kiss. In front of the sleigh is a chocolate wrapped candy who is Santa! All of the pieces are attached to one another using scrapbooking glue dots.

These are great as package toppers or table favors or add a string to turn them into edible ornaments! cute cute cute!

Happy Crafting!

Sunday, November 28, 2010

FREE Crochet Dress Refrigerator Magnets Pattern

A few weeks ago I found this really easy crochet pattern online to make cute dresses refrigerator magnets! You can make them in any color combination that you want and besides the yarn all you will need is some glue, satin ribbon and a magnet to complete them.

These crochet fridgies work up super quickly...I was able to crochet 3 of them in less than 1 hour and a great way to use up some of your yarn scraps. You can find the FREE pattern over Marie's Cozy Corner Blog. As Marie suggested...you can make up a lot of them in baby girl colors and use them at a baby shower for table favors which I think is a fabulous idea!

Happy Crocheting!

Tuesday, January 5, 2010

How To Make Paper Cupcake Treat Box Party Favors


Back in April 2009, I held a large baby shower for my daughter who was pregnant with her first child. We were expecting 65 guests and ended up with 69...so over all, it was a huge baby shower!

Anyway, we did a theme...she wanted a care bears and a cupcake girlie theme so that is what we did. I wanted to make some cupcake treat box party favors and found a cupcake template over on the Paper Wishes web site ---> HERE I purchased the template and it arrived about a week later.

The template has 2 different designs on it along with a little cupcake shaped hang tag. I went out and purchased scrapbooking paper to go along with the pink theme of the baby shower (yes, she had a baby girl). The template has a paper cherry part to it but I decided to use red and pink 1" pom-poms for our cherries and just tacked them on top of the paper cupcakes using scrapbooking glue dots.

It's hard to tell by my photo's (flash issues) but I used baby pink paper to make the cupcake and black paper with a pink print for the cupcake holder.

Inside the cupcake party favor treat boxes I put candies and little baby novelty items. It took me about 6 weeks to make up 70 of the cupcake boxes but it was well worth it as they were a huge hit at my daughters baby shower.


~ Shelly ~