Showing posts with label Christmas Projects. Show all posts

Saturday, January 19, 2019

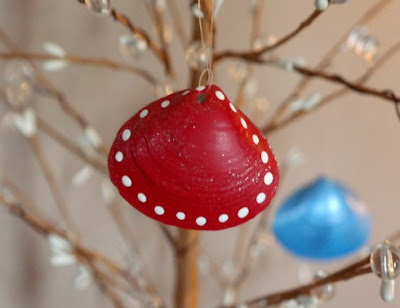
Kid's Crafts: Painted and Glitter Seashell Christmas Ornaments

During our beach walks my grandchildren will collect hundreds of seashells that wash up onto the beach. We collect them in our mesh bags and then wash/dry them once we return from vacation. So, what do you do with all of those seashells the kids collected? Turn them into fun Christmas and holiday ornaments with just a few basic craft supplies! For this project we used small clam shells which worked perfectly for the project! 
Kid's Crafts: Painted and Glitter Seashell Christmas Ornaments

Kid's Crafts: Painted and Glitter Seashell Christmas Ornaments

Clean Seashells
Acrylic Craft Paints
Paint Brush, Water Dish, Paper Towels
Clear Fishing Line
Scissors
Clear Acrylic Spray Sealer with Glitter
All-Purpose Craft Glue
Sheets of Old Newspaper

Lay newspaper down on your work surface. Let the kids paint their seashells in solid or multi-colors. They can paint elaborate or really simple designs. We opted to paint our's in a solid color using 2 coats of acrylic paint. Left them dry for 30 minutes and then used acrylic paint to add a simple "polka dot" design. Let them dry for 45-60 minutes.

While the paint is drying you'll want to make hanging loops for all of your new ornaments. We used clear fishing line. Cut a piece that measures approximately 4 1/2" to 5" in length. Tie it into a loop and knot the ends together. Trim ends if needed. Set aside.

Take 2 sheets of newspaper outside. Lay them onto the newspaper. Lightly spray a coat of clear acrylic sealer with glitter onto the painted side of the shell. You don't need a lot! This sealer will protect the painted surface and add a shimmer to it thanks to the fine-grade glitter inside it. Let them dry for 1 hour.

Bring them back inside. If the clam shell has a tiny hole in the end (some do, some don't) you can add your hanging loop through the hole. If not, you can glue the hanging loop to the backside of the shell. Let dry for 2-3 hours. That's it, you're done!!!  

You can hang them on your Christmas tree or use them as holiday package toppers. A great way for kids to use up some of those seashells that they collected during summer vacation. 

Friday, December 21, 2018

Craft Project: Scrabble Tile Personalized Christmas Ornaments

Craft Project: Scrabble Tile Personalized Christmas Ornaments
We enjoy making our own Christmas tree ornaments and giving them away to family & friends during the holiday season. This year we decided to make these super-easy Scrabble Tile Personalized Christmas Ornaments! You will only need a few craft supplies to make them.

Once completed you can attach them to your holiday packages (as gift toppers), use them as place settings on your holiday table or just hand them out as your classic Christmas tree ornament.

Craft Project: Scrabble Tile Personalized Christmas Ornaments

Wood Scrabble Tiles
Wood Glue
Satin Ribbon
Scissors
Metal Eye Hooks
Drill with Small Drill Bit

You will need to use a drill to put a small hole in the top of a Scrabble Tile. You will want to do it with the First letter tile of the word that you're spelling. You will then screw in the metal eye hook into that hole. If it doesn't fit tightly, you can add a tad of wood glue into the hole. Let dry.
Craft Project: Scrabble Tile Personalized Christmas Ornaments

Lay out your tiles in the order that you need them for each of the words that you're spelling. Glue them together with just a tiny amount of the wood glue and lay them flat to dry. I laid mine out on an old cookie sheet that I then threw away. You want to lay them down onto a surface that they won't stick to if the glue oozes out. A sheet of aluminum foil would work well too. Let them dry.

Once they're dry use scissors to cut satin ribbon in a length of 6" long. Use that ribbon to make a bow around the metal eye hook. You can cut another length of satin ribbon and thread it through the eye hook if you want to make a hanging loop. I opted to not do that as I like the look of just hanging them onto the tree with an ornament hook.

You can decorate them even further by adding tiny seashells, artificial flowers, rhinestones, faux jewels, etc. That's entirely up to you. Easy project!

Tuesday, December 4, 2018

Preschool Crafts: Easy Snowman Refrigerator Magnets

Working with a preschool group of children and looking for an easy-to-make holiday craft project? If so, we've got one for you today! This project utilizes just a handful of general craft supplies that can be picked up at your local craft store. If you want to save time, you could paint the wood circles ahead of time with white craft paint and then let the kids add the facial features. If you didn't want to mess with paint, you could have the children use black and orange markers.
Preschool Crafts: Easy Snowman Refrigerator Magnets

Preschool Crafts: Easy Snowman Refrigerator Magnets

2" or 3" Round Unfinished Wood Circles
White Acrylic Craft Paint
Black Acrylic Craft Paint
Orange Acrylic Craft Paint
Paint Brush, Water Dish, Paper Towels
Peel & Stick Magnet
Cotton Swab
Round Wood Toothpick

Paint the unfinished round wood circles with 2 coats of white acrylic craft paint. Let dry. Dip the cotton swab into black acrylic craft paint and dot on the snowman's 2 eyes. Dip the end of a round wooden toothpick into black paint and dot on his mouth. Have the kids use a fine-tip paint brush to paint on a triangular shaped carrot nose using orange acrylic craft paint. Let dry.

Once all of the paint has dried, flip them over and add the peel-n-stick magnet on the back. You'll want to use heavy-duty magnets. Make sure they're strong enough to hold the wooden snowman to the refrigerator without sliding down. That's it, you're done!

Sunday, November 4, 2018

Kid's Crafts: Penguin Popsicle Stick Christmas Ornaments

These cute Penguin Popsicle Stick Christmas Tree Ornaments are a big hit in our family and we've been making them for over 20+ years with the kids. I think every generation (at least for the past 4 generations have made them at one point or another). They're really easy to make and you only need a few general craft supplies to make them.
Kid's Crafts: Penguin Popsicle Stick Christmas Ornaments

Kid's Crafts: Penguin Popsicle Stick Christmas Ornaments

Wood Craft Stick
Wood Popsicle Stick
Black Acrylic Paint
White Acrylic Paint
Orange Acrylic Paint
Paint Brush, Water Dish, Paper Towels
2 Small Orange Pom-Poms
Red Satin Ribbon
Scissors
Quick-Drying Craft Glue
Clear Fishing Line

Paint the wood craft stick with 2 coats of black paint. Paint the wood popsicle stick with 2 coats of white paint. Let dry. Once they're dry, glue the white popsicle stick onto the black craft stick, leaving space above to form the penguin's head. Let dry for about 30 minutes.

Have the kids paint a white oval-shape on the black craft stick to form the penguin's face. While it's drying they can glue the 2 small orange pom-poms on the bottom of the craft stick to form his feet. Cut a 5" long piece of fishing line and tie it into a loop, knotting the 2 ends together.

Add 2 black dots onto his face to form the eyes and a triangular shaped orange beak. Dot white paint in the center of each eye to form the inner eye. Let dry. Tie a piece of satin ribbon around the penguin's neck to form the scarf. Glue the hanging loop onto the back of the craft stick. Let dry.

Your finished Penguin Popsicle Stick Christmas Ornaments are now ready to be hung onto the tree or used as holiday package toppers.

Note: You can double click on the photo in this post. It will automatically open up in a new browsing window and in an enlarged size.

Sunday, December 18, 2016

Kid's Crafts: Christmas Candy Trains

Kid's Crafts: Christmas Candy Trains
Looking for a super-easy and quick Christmas craft to make with the kids? Got a church youth group, school classroom or Girl Scout Troop and looking for an easy project? If so, these adorable Christmas Candy Trains work up super quickly and are adorable!

To save money, we buy the majority of our supplies at our local dollar-type of discount store. You can find the glue dots that you need at your local craft store in the scrapbooking section.

Kid's Crafts: Christmas Candy Trains

Rolls of LifeSavers
Packs of Bubblegum (stick variety)
Bag of Hershey's Miniatures
Bag of Hershey's Kisses
Bag of ROLO Chocolate Candies
Bag of Mary Jane Candies
Bag of Peppermint Candies
Box of Large-Sized Glue Dots
Kid's Crafts: Christmas Candy Trains

When purchasing the candies, make sure that they are individually wrapped! You'll be adhering all of the wrapped candies together using the large glue dots.

Start by adhering the LifeSaves to the pack of gum using three to four large Glue Dots, as shown in the photos. Then use the Glue Dots to add on the train's wheels and then add the rest of the pieces to form the train. Some of the candies you'll need to use one Glue Dot and other's you'll need to use two, depending on the weight of the candy.

If you want to use them as edible Christmas tree ornaments or as package toppers, you'll need to purchase a roll of hanging metallic string or satin ribbon. Cut a piece 5 to 6" in length and tie it onto the train to form a hanging loop. That's it, you're done!

Saturday, December 10, 2016

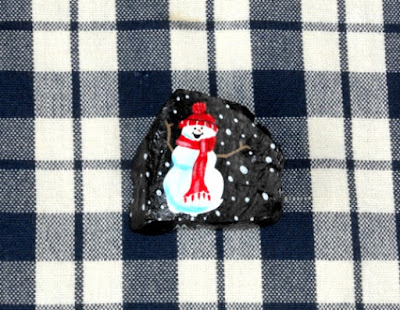
DIY Rock Painting - Christmas Snowman

DIY Rock Painting - Christmas Snowman
I am the first one to admit...I'm not great at decorative painting although I enjoy doing it. I find decorative painting to be a great way to de-stress, relax and a way to be creative. When it comes to painting, I'm all about the quick and easy projects that anyone can do...regardless of talent.

With the Christmas holiday coming, I wanted to share a quick & easy painting project with all of you today. You can do any holiday design that you want...I chose to paint snowmen as they're easy to do. Here is what you'll need to make your own DIY Handpainted Snowmen on Rocks.

DIY Rock Painting - Christmas Snowman 

Square-Shaped Rocks 2 1/2 to 3 1/2" in Size
Acrylic Paints
Fine Line Paint Brush
Medium Paint Brush
Clear Acrylic Sealer (comes in a spray can)
Old Plastic Place Mat
Paper Towels
Plastic Lid
Water Bowl
DIY Rock Painting - Christmas Snowman

Find some square-shaped or rectangular-shaped rocks. Wash and dry them. Once dry you'll want to paint them a solid black color for your background. Let it dry completely. Next, you'll want to paint your design. I chose to do an easy snowman design. Once my snowman was dry, I added his facial features, scarf, hat and twig arms. I left him dry for a few more hours. I then took my rocks outside and placed them onto an old plastic place mat. Spray one side of the rock with clear acrylic sealer. Let dry for several hours. Flip your rocks over and spray the other side with the sealer and let dry overnight. By spraying them with the sealer, you're protecting your newly painted design.

Once they're done drying you can place them on a shelf, your mantle or any little place that needs a little decoration. I like seeing several of them grouped together on a shelf in different holiday designs. The one I'm featuring today reminds me of a piece of black coal with a snowman design on it since I sprayed the rock with a glossy finish to make it shiny. I think it turned out really cute and super simple to do!

Sunday, November 20, 2016

DIY Coastal Seashell Christmas Ornaments

DIY Coastal Seashell Christmas Ornaments
Every year I decorate a 6 foot tall Christmas Tree in a beach and coastal theme. I decorate three trees for the season, but I admit...my coastal Christmas Tree is my favorite.

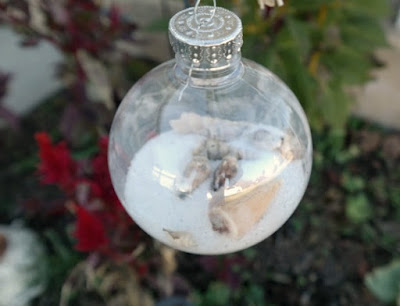
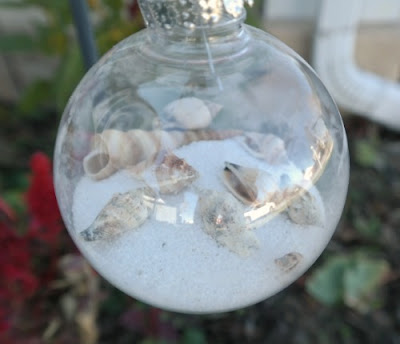
Last week at our local Dollar Store I picked up some craft supplies to make my own Coastal Seashell Christmas Ornament Balls. I love frugal holiday crafts like this and I'm pretty pleased with how they turned out. Here's how to make them!

DIY Coastal Seashell Christmas Ornament Balls

Clear Plastic Ornament Balls
Sand
Bag of Seashells
All-Purpose Craft Glue
Raffia
DIY Coastal Seashell Christmas Ornaments

Note: I purchased all of the supplies at my local Dollar Store.

Remove the top from each ornament ball. Fill the ball 2/3 of the way full with purchased craft sand. Place small seashells down into the ornament through the hole at the top. Your ornament will be semi-heavy, so they are best for the bottom branches of your tree. Since they are semi-heavy, I used all-purpose craft glue to glue the top back into place...just for added extra-strength, so that the little prongs on the cap don't pull out.
DIY Coastal Seashell Christmas Ornaments

Cut a 6" to 8" long piece of natural-colored raffia and tie it through the top for the ornament's hanger. If desired, you can make a loopy bow out of the raffia too. I kept mine pretty simple. I like the calming neutral tones, so I kept to those, but you could certainly use colored sand or small dyed (or painted) seashells too. Super simple to make!

I made a total of 8 of them and they will be hanging this year on my bigger, bottom branches on the Christmas Tree. If I can find smaller ornament balls and even tinier seashells, I would like to make some smaller ones too! Fun!

Wednesday, December 23, 2015

Craft Project - Snowman Made from Kid's Socks

Christmas is only 2 days away but one of the things I love about our next Christmas craft project is that you can make these adorable sock snowman in a variety of colors and leave them sitting out all winter long. The one I'm featuring today is decorated in red & green for the Christmas holiday, but you could change the colors to blue and silver for a wintertime theme.

I whipped up this snowman yesterday afternoon and really didn't keep any measurements. With that said, with my basic directions you'll be able to whip one up too!

Craft Project - Holiday Snowman

1 single baby sock (in a color)
1 child's sock
ribbon or homespun fabric scraps
4 round black beads
1 wooden heart, painted (we painted it dark red)
wooden toothpick (painted orange)
rice, dried beans or tiny pellets
fiberfill stuffing
sewing needle and thread
teabag and water
all-purpose glue or glue gun
cosmetic pink blush

The first thing you'll want to do is take a child' white sock and tea-dye it. We soaked our's in a solution of one brewed tea bag in 1 cup of hot water. We left it soak for about 2 hours. We then squeeze the water out and tossed it into the dryer to dry for a few minutes. We did this to make our snowman look antiqued & primitive. You could leave them white if you wanted to.

Place rice, beans or pellets into the toe portion of the sock which will add weight to him so that he stands upright. I didn't measure this out and then I added some stuffing on top. I cut the cuff off of the sock and used a sewing needle and thread to sew the opening shut. I cute a piece of green homespun fabric into a strip and tied that around the neck area (or the area that I wanted to be the neck).

I took a pair of sage green baby socks and cut the foot portion off of the sock and used just the cuff to form the snowman's hat. I did fold back the sock opening by about a 1/2" to form the rim of the hat and used a needle & sewing thread to gather up the top opening of the hat and tied it shut. I cut another smaller strip of homespun fabric and tied it into a bow...used my glue gun and glued it to the top of the snowman's hat.

To finish him up...I glued on two black beads for his eyes and I painted a wooden toothpick orange, cut it down to size and then glued that onto his face to serve as his nose. I got into my cosmetic bag and used a Q-tip dipped into my blusher to make his rosy cheeks. Finally, I painted a small wooden heart a dark red color and once it was dry...I glued that onto his chest along with two additional black beads to serve as his buttons.

I think my snowman turned out adorable and I had all of the craft supplies on hand and my daughter donated the grandchildren's socks to me to use in my various craft projects.

Monday, December 21, 2015

Holiday Craft Project - Clay Pot Gingerbread Man

Christmas is just a few short days away and thankfully...this little craft project works up quickly. You can make several of these Clay Pot Gingerbread Guys and Girls in just a few short hours. All of the supplies are basic ones that you can find at your local craft supply store.

Once completed these little guys look cute sitting on shelves, on your mantle, table top, buffet table, as place card settings on your holiday table or add strings to hang them on a Christmas tree.

Craft Project - Clay Pot Gingerbread Man

3" high clay pot
2" diameter wood ball
1/8" wide white rick-rack
E6000 adhesive glue
1/4" diameter butters x3
acrylic paints (brown, black, white and pink)
paint brush, water and paper towels

Note: I found that hot glue did NOT work well at keeping these pieces perm. together. I found that using E6000 adhesive glue did the job perfectly.

Paint the outside of the clay pot and the wood ball in a solid chocolate brown color, let dry. Once your base paint has dried...paint on the gingerbread man or girl's facial features. Let dry completely before proceeding.

Once all of your paint has dried it's time to glue on the buttons and rick-rack trim, let dry. Once everything is dry...glue the head onto the body (the clay pot) and let dry overnight.

Friday, December 18, 2015

Clay Pot Toy Soldier Holiday Decoration

Are you looking for a quick and easy holiday craft project? Do you like to decorate with a toy soldiers motif? If so, you've got to check out these adorable Clay Pot Toy Soldiers! You can make one in only a few short hours and with just a few general craft supplies.

You can make these clay pot toy soldiers in a variety of sizes but just changing up the size of the flower pots, wood ball and wood candle cups. You can make them smaller than this one or quiet large, that's totally up to you! All of these supplies can picked up anywhere general crafting goods are sold.
Craft Project - Clay Pot Toy Soldier

3" Clay Pot
1 1/2" Clay Pot (2)
1" Wood Ball
1 1/2" Wood Candle Cup
E6000 Glue Adhesive
Acrylic Paint: Red, Black, Flesh, Pink, Brown and Yellow
Paint Brush, Water and Paper Towels
Gold Metallic Cord (if you want to hang them)
Clear Acrylic Spray Sealer

Lay down newspaper. Paint each piece as shown in the photos with their base color. Let dry for an hour and then paint the smaller details on top. Let dry for another hour.
Using E6000 glue adhesive you'll want to assemble your pieces. Turn the two 1 1/2" clay puts upside down to form the soldier's boots and glue them onto the upside down 3" clay pot (the body). Glue the wooden ball (the head) on top and then turn the wood candle cup upside down (the hat) and glue that on. You'll need to let this sit for several hours for the glue to adhere and completely dry.

If you plan on using them for Christmas tree ornaments...add the metallic gold cord. Just a warning, they will need to be placed on bigger & sturdy tree branches. Otherwise, they look cute sitting on shelves, your fireplace mantle, window sills, etc.

Friday, November 20, 2015

Kid's Crafts - Ribbon Christmas Tree Ornaments

Last weekend my little 6 1/2 year old grand daughter was over for a visit. Every time she comes we always sit down for a few hours and work on some craft projects together. It's a great way for her to explore her creativity and for us to bond together doing something that we both love to do.

One of our recent projects were these adorable Ribbon Christmas Tree Ornaments! This project has been around for many years...I can remember making these myself when I was a child. Furthermore, you only need a handful of inexpensive supplies and they work up really quickly. Each ornament took us less than 30 minutes to make.

Kid's Craft Project - Ribbon Christmas Tree Ornaments

Twigs 5" to 6" Long
Scissors
Brown Yarn
Various Colors of Satin Ribbon
All Purpose Craft Glue
Decorative Buttons
Hanging String or 1/8" Wide Satin Ribbon

When selecting twigs from your yard...you want to make sure they are primarily straight and no thicker than a 1/4" in diameter. Make sure they are dry and bug-free before using them.

Place a dot of glue at one end of the twig and wind a piece of brown yarn around the entire length of the twig, securing it at the other end with a dot of glue. The entire twig should be covered with the yarn. This serves as the trunk of your tree.

Starting 1" up from the bottom end of your tree trunk starting tying ribbons onto the trunk. The ones you start with first should be longer pieces than the ones you'll use last. Don't worry about specific lengths right now because you'll use scissors at the end to trim them up and to shape the tree. Ours are mostly the same length as you can see in the photograph above. Continue tying ribbons on until you reach the top. Please note...keep your "knots" all in the same direction which helps your tree to look nicer and more polished.

Once you've reached the top...lay the ornament down onto the table. Use a pair of scissors and trim all of your ribbons into a triangular shape to form your finished tree. The ones at the bottom will be longer than the ones at the top.

Take a piece of string or a piece of 1/8" sating ribbon and tie it into a hanging loop. Add a spot of glue at the top of your ornament and place the knotted end of the hanging loop into the glue. Add another spot of glue on top of that and add a satin ribbon bow and decorative button on top of that. Let your ornament air dry for approximately 4 hours.

This easy Christmas craft project is great for kids to do! The ornaments work up quickly and are inexpensive to make. A nice project for scout groups, classrooms or church youth groups too. They can be used as package toppers, hung onto a Christmas tree or placed all over the home to add some holiday cheer!

Thursday, November 5, 2015

Rustic Wood Gingerbread Man Ornaments

Last week we sat down at church with a group of 6-8 year old kids and whipped up these adorable wooden Gingerbread Christmas tree ornaments. It's a great little project for kids to do because it lets them paint and get creative.

All of the supplies we got at our local craft store and/or had them on hand. For each gingerbread ornament, here is what you will need:

Wooden Gingerbread Christmas Tree Ornaments

1 unfinished gingerbread man wood cut-out
jute or thin gauge rope
scraps of homespun fabric
buttons
1/4" diameter unfinished wood heart
bottle all-purpose craft glue
brown, pink, white and black acrylic craft paint
paint brush
paper towels

* Each unfinished gingerbread shape measures 4" to 5" tall.

Lay some newspapers down or an old plastic table cloth. Let the kids paint their gingerbread wooden shapes however they would like. (The one shown in the photo was done by an 8 year old girl). Once all of the paint is dry let them glue on ribbon, fabric bows, buttons or whatever else you have to decorate them. Let the paint and glue dry completely before hanging.

Note: Some of the kids decided to not glue on hanging loops and instead glued on magnets on the back and turned them into refrigerator magnets.

Monday, January 5, 2015

Kid's Crafts - Penguin Christmas Tree Ornament

In early December my grand daughter's school class held a crafting session and they made these adorable craft stick penguin Christmas tree ornaments that I wanted to share with all of you today. This ornament is a great project for kids 5 years old and up. You only need a handful of craft supplies.

Penguin Christmas Tree Ornament

black acrylic paint
white acrylic paint
paint brush
wooden craft stick
wooden popsicle stick
craft foam sheets in: black, white, medium blue, light blue and orange
1/8" satin ribbon
scissors
craft glue
paper pattern
pencil
paper towels and water (for rinsing paint brushes)

The teacher told me she drew out the shape for the penguin's wings, two head pieces, the beak, scarf and hat onto paper and then made her own paper patterns. She photo copied the paper patterns and had the children cut them out, trace them onto the foam sheets and then cut out the foam pieces.

The kids painted the wooden craft stick a solid black and the wooden popsicle stick solid white. These two wooden sticks were then glued together to form the body. They used the end of their paint brush to dot polka dots with white paint onto the foam scarf. They layered the white face shape onto the black face shape using glue & then glued the beak on top. They used the end of their paint brushes to dot on eyes with black paint.

They layered the foam hat pieces together using glue and glued it off-center onto the penguin's head. They cut a piece of 1/8" by 5" long satin ribbon and tied it into a loop and then glued it behind the head so that it can be hung on the tree after it has dried.

The shapes the teacher used are very easy to make and she free-handed them onto paper and to scale to work with the wooden penguin body. I am sure you can come up with something similar to these too. The entire class loved making these Penguin Christmas tree ornaments.

Tuesday, December 30, 2014

How to Make Peace Sign Holiday Ornaments with Beads

I know I am a little late with this blog post but I still wanted to show you what the kids made two weeks ago at Girl Scouts during one of their "craft" sessions. The girls made these adorable Peace Sign Holiday Ornaments using pipe cleaners, ribbon and beads. They then gave them to their parents and grand parents to hang on our Christmas trees.

They used the instructions on how to make a peace sign holiday ornament from ----> HERE. As you can see, the author provides great step by step instructions along with photographs. Once you make one of them, you will be able to breeze through multiples in rapid fashion. What a great little project for school kids, scouting groups, etc.

The only changes the girls made was instead of using tri-beads like the author suggested, the girls decided to use pony beads because they were on-sale at our local craft supply store. The girls made them in tradition red, green and clear/white. You can use any color combination that you would like.

Very cute and easy Christmas ornaments that the kids can make and you only need a handful of crafting supplies and scissors! Use them as holiday ornaments on the tree or as cute little adornments on your Christmas packages. Enjoy!

Wednesday, December 10, 2014

Craft Project - Faux Pearl Snowflake Holiday Ornaments

Last year our local dollar store had packages of white plastic snowflake Christmas tree ornaments on sale (after Christmas they were two packages for $1.00) so I snagged several packages for future crafting needs. While I was there, I also purchased two packages of silver metallic pipe cleaners and a bottle of tacky glue. I threw everything into a bin and finally got busy crafting some ornaments.

These faux pearl, beaded and plastic snowflake ornaments are really easy-to-make. If you have older children, they can help you with them and each one will cost about $1.00 to make once finished. Here is what you need and some instructions.
Faux Pearl Snowflake Christmas Tree Ornaments

2 pkgs. White Plastic Snowflake Ornaments
1-2 pkgs. Silver Pipe Cleaners
Small Oval White Faux Pearls
Small Round Colored Pearls
Small Round Faceted Beads
Satin Ribbon Roses (for the center)
Bottle of Tacky Glue or Glue Gun
Scissors or Wire Cutters

Note: For our project I used white faux oval pearls, round mint green faux pearls and clear round faceted beads. You can use any shape or color of beads or pearls that you have on hand.

Use scissors or wire cutters to cut down your pipe cleaner into sticks that are shorter than the snowflake. We simply glued them onto the plastic snowflake to add color and dimension to the ornament. Let dry. Slightly bend each end and glue on a faux pearl or bead. Let dry and then bend the little arm (pipe cleaner) back into place. You can also glue them on before affixing them to the snowflake but we preferred doing it the other way. Each pipe cleaner end should get a bead or faux pearl. To finish them up, we simply glued a large bead, satin ribbon rose or other small items onto the center of our snowflakes. For some of them, we glued fancy metallic buttons into the middle which really jazzed them up. Use whatever you like and have on-hand.

As you can see, they look a whole lot nicer than just slapping those cheap plastic snowflake ornaments all over your Christmas tree. You can really decorate those things a slew of different ways and it is a great way to use up some of your left-over crafting supplies. Enjoy!

Friday, December 5, 2014

Kid's Crafts: Edible Gingerbread House

My 5 1/2 year old grand daughter officially became a Girl Scout a few days ago and is in a wonderful Daisy Troop. My daughter did 12 years of Girl Scouts and I just love the program and I am really excited to see my little grand daughter participating for her first year.

Anyway, last week the kids made these adorable Edible Gingerbread Houses and I just wanted to share them here on my blog. What a great troop project, school project or just a kid's project for parents to do with them at home. Here is how they made them along with a materials list.

Supplies Needed:

Cardboard covered with aluminum foil (the base)
Graham Crackers
Empty Single-Serving Milk Carton
Ice Cream Cone (for the tree)
M & M Candies
Licorice Ropes
Licorice Nuggets (bite-size)
Gumballs
Round Peppermint Hard Candies
Store Bought Frosting

This project can get messy. Cover your work surface and have the kids wear old clothing.

Have the kids spread the white frosting (they used tubs of vanilla frosting from the dollar store) all over the base to simulate snow. Spread the vanilla frosting all over the empty milk carton and have them break the graham crackers a part to cover the carton to simulate the Gingerbread House. Let them put more frosting on top and decorate the house with little candles.

Turn the ice cream cone upside down and cover it with frosting and additional small candies. The skinny licorice ropes work well wrapped around the trees. Let them finish up by using all of the leftover candies to decorate their snow village scene. Simple and Easy!!!

Thursday, November 20, 2014

Quick and Easy Christmas Scrapbooking Layout Idea

It is hard to believe but another Christmas holiday is quickly approaching and I am still scrapbooking my photos from 2013. I guess I really need to pick up the pace and get caught up so I am ready for Christmas 2014.

Last week I sat down and made this really quick and easy Christmas Scrapbook Layout which took me less than 1 hour to make. Plus, I had all of the supplies on-hand and left-over from previous layouts that I had made. I guess you could say, it is a "frugal" layout and great for beginners.

My background is one sheet of holiday printed paper from Paper Pizazz - Hot off the Press called Corner Ornaments. It is done in your traditional red, off-white and green color scheme accented with blue and gold.

I had 4 photos which I cropped down. The 2 larger ones are the same size and the 2 smaller ones are the same size, arranged in a grid. I matted them onto dark green cardstock and then red cardstock leaving an 1/8" edge around all mats.
The title of my page is "Presents for Me" and I picked that as my title because my little grand daughter kept saying "is that a present for me?" all day long. She was so cute! I used Alpha Letter Stickers in red for my title and used 3 tiny green holly stickers to accent the letter P, the letter o and the letter E in the word ME.

In the top right corner I used a 3-dimensional ornament embellishment (forget which brand) which I applied to the layout using foam dots. I used some gold metallic cord to hang them and taped the ends down on the back of the page. I stamped the words "Merry Christmas" onto off-white cardstock using red ink. I then matted my words on green and red cardstock and attached it to the page using foam dots. I decided to not do any journaling as I don't like my pages too cluttered up.

Over the next couple of weeks I will share a few more holiday scrapbook layouts with all of you as I get them completed. Thanks for reading my craft blog!

Sunday, October 26, 2014

Easy Christmas Scrapbooking Layout in Traditional Colors

For the past 2 weeks I have been trying to get caught up with all of my scrapbooking and finally found the time to sit down and work on my Christmas photographs from last year. Yes, I am running 9-10 months behind and now on a mission to get caught up before the holidays arrive.

Last weekend I made this 12 x 12 layout and I think it turned out pretty nicely. It would be great for a beginner who is just getting into scrapbooking and it only took me an hour to complete. In addition, it is also on the frugal size because it cost me less than $2.50 in supplies.

The title for this layout is "Season's Cheer" because I wanted a more adult theme since my grand daughter is growing up and now 5 years old. The background is a solid sheet of dark evergreen cardstock. I made my two border strips from green plaid print paper with each strip measuring 1 1/2" by 12" in length. The bottom border strip is accented with a red "JOY" sticker border strip and the top border strip is accented with a green holly & red berries adhesive border sticker strip.

I used one photo which measures 4" by 6" (your standard photo size) and framed it with a gold metallic photo frame. I then used a "cut out" of a spray of green holly with red berries to accent it and used adhesive foam dots to attach it to the page on the left side of the photo frame.

My title is a pre-printed piece of cardstock that says "Season's Cheer" which I matted onto red cardstock. I used foam dots and attached it to the page "off center" above the framed photo. I accented the title with a 3-dimensional embellishment of a snow covered house. To the right of that is another embellishment of green holly in a square shape, attached with a foam dot.

Down the right side of the page is a cardstock strip that has small pictures of holy, holiday gifts, red stars, etc. which I matted onto red cardstock and then used a glue stick to attach it to my page. Near the bottom of the page you will see another cardstock square embellishment of a candle and a cardstock secondary title block that says "Merry Christmas" which sits underneath the framed photo.

I didn't do any journaling on this page but you certainly could. I am currently working on the second page in this 2-page layout and my journaling block is on that page. If you check back next week you can see the coordinating page that goes along with this Christmas Scrapbook Layout.

Tuesday, January 14, 2014

Make a Scissor Holder Using a Potholder - Craft Project Idea

Looking for a last minute gift idea? These are great little no-sew projects that work up in a few short minutes. They make great little gifts for the holidays, for Easter, Mother's Day and/or for Birthdays. You can buy your supplies at a local dollar store to save money.

Scissor Holder Using a Potholder Craft Project

1 large square shaped pot holder w/hanging loop
1 tube fabric glue
1 full-size pair of scissors
2 clothes pins

Note: If kids are doing this project use liquid fabric glue. If adults are doing them, you can use a hot glue gun with glue sticks.

Lay your square shaped potholder down onto the table in a diamond shape with the hanging loop to the right. The ones we used are solid color on one side and have a print on the other side. The solid color is facing up and the print is facing the table.
Fold the pot holder in half with the edges over-lapping one another. Squirt a thin layer of fabric glue down the one side and sandwich the other edge on top. We used two clothes pins to hold them together until the glue dried. 

Once the glue has dried you can tuck your full-size scissors inside. We have a little hook on the side of our refrigerator where our scissor holder is hanging which keeps my kitchen shears in easy reach. I also keep one hanging on a wooden knob in my sewing & crafting room. I always know where my scissors are and they are always within my reach!

Thursday, December 26, 2013

7 Crafty Ways to Use Leftover Christmas Gift Wrapping Paper

The Christmas holiday is now over and instead of throwing away all of that used gift wrap and scrap pieces of your holiday wrap...its time to put them to some good crafty use!

I am a frugal crafter and every year I bag up that torn gift wrap and toss it all into a bag with my small scrap piece. Then throughout the winter when I am stuck inside...I get into my bag and make some new crafty items for the next holiday season.

Here are 7 craft project ideas that you can do to use up all of that Christmas gift wrapping paper instead of tossing it away!

* Homemade Bookmarks - Takes those scraps and turn them into holiday bookmarks! Cut from cardboard or cardstock rectangular shapes that measure 1 3/4" by 6" in length. Use a hole puncher and punch a hole on one end. Cut the paper to measure the width and length of the cardstock and glue one piece onto each side. Use yarn or ribbon and thread through the hole to make a bow or tassel.

* Decoupage Vase - Save old clear glass vases and jars. Rip the scraps into odd shapes measuring no large than 3" in size. Use decoupage and adhere them to the outside of a glass vase or jar. Let dry and then cover with a top coat of the decoupage medium, let dry for 24 full hours. You now have a holiday vase or container for next year! If using jars, save the lids and use them for gifts in a jar!

* Gift Tags - From cardboard or cardstock cut pieces that measure 4" in size. Cut from gift wrap a piece that measures 4" in size. Use quick drying glue and a foam brush to adhere the paper to one side of the cardstock. Let dry. Fold the square in half or using a scoring tool to score it down the center, fold. Use a hole punch to turn it into a gift tag. Use scraps of ribbon or yarn through the hole so you can attach your new tags to package boxes or onto gift bags.

* Gift Bags - Purchase solid color gift bags at your local party supply store. Cut shapes and designs out of your scrap gift wrap and glue it onto the bags using a quick drying glue and a foam brush. Let dry for several hours. You can place your design just on the front of the bag or continue it around all four sides.

* Cardboard Boxes - Save all of your small and medium sized boxes along with their lids. Cut shapes and/or designs out of the gift wrap and glue them onto all sides and the lid of the box in a pleasing design using quick drying glue and a foam brush. Let dry. You now have pretty gift boxes for next year all ready to go!

* Tall Glass Candle Holders - Recycle or buy clear glass cylinder candle holders at your local dollar store. Use decoupage medium and a foam brush to glue on shapes, designs and patterns from the gift wrap onto the glass candle holder. Let dry. Use the decoupage medium to add a top coat across your design and let dry for 24 hours. You now have pretty holiday candle holders for next year.

* Scrapbooking & Cardmaking - Purchase a bottle of archival mist and lightly mist your scraps of Christmas gift wrapping paper. Let dry for 24 hours. You can now cut up those scraps and use them safely in your scrapbooks or use them in your cardmaking to make scrapbook layouts or new holiday cards.

Hope you enjoy these project ideas! If you have any other frugal craft project ideas or Trash to Treasure craft project ideas that you want to share with me and my readers, please feel free to leave me a comment below & I will contact you. Enjoy!