Showing posts with label Paper Crafts. Show all posts

Wednesday, April 5, 2017

Beach and Boardwalk Fun Scrapbooking Page Idea

Beach and Boardwalk Fun Scrapbooking Page Idea
I love the beach and one of my favorite places to visit is Wildwood in New Jersey. We try to get down to Wildwood about 6 times a year, spring, summer and of course, fall. There is always something interesting to see and super-fun things to do!

I'm a traditional scrapbooker and I enjoy playing with paper and embellishments. I know some people are into digital scrapbooking, but that's not me. The layout that I'm featuring today is a really easy one in the traditional 12" by 12" size. Plus, I was able to squeeze on 8 photos without the page coming out too gaudy looking.

The background is a sheet of 12" by 12" piece of scrapbooking paper in a wood board print. I selected it because it reminds me of the boardwalk boards! A lot of my photos had a red color in them so I selected red and turquoise for my accent colors.

The first photo mat has 4 photos on it and all of them were cropped down to fit. I matted them onto turquoise colored cardstock, trimmed to have an 1/8" edge and then matted onto red cardstock with a 3/16" edge. I accented this photo block in a unique way. I had taken a lot of photos of various signage down in Wildwood and on the boardwalk. One sign was in the shape of a string of beach balls and it spelled out a saying about Wildwood. I blew it up slightly, printed out the photo & then used scissors to cut it out. I then placed it onto the photo block (top left) using foam adhesive squares.
Beach and Boardwalk Fun Scrapbooking Page Idea

The second photo mat features 4 mini photos of us goofing off in one of those photo booths up on the boardwalk. I left them in "strip form" and just matted the entire strip onto turquoise and red cardstock, so that they matched the first photo block. Underneath this photo block is a rub-on word that says "LOVE" and above the photo block is a rub-on word that says "Memories" with both being in a dark red color.

At the bottom of the page I added 3 different rope boarder stickers which reminds me of the rope you see all over the place down at the shore. I added a 4th rope boarder along the top of the page.  For the title block, I enlarged a photo that I had taken that said Wildwood from a sign that was on the boardwalk. I printed it out, cut it out around the edges and then matted it onto red cardstock. I used foam adhesive back squares to apply it at the top of my page.

What was fun about this page is that it didn't cost me a lot to make and took very little time. Two of my embellishments were made from actual photographs that I took, along with 2 rub-on words and 3 rope stickers. I wanted to squeeze on 8 photographs without it being too much and I think this worked out pretty well. Thanks for checking it out!

Monday, March 20, 2017

Family Beach Vacation Scrapbook Page Idea

Family Beach Vacation Scrapbook Page Idea
We're really fortunate that we only live 3-4 hours from the Atlantic coast and visit the beach several times every year. Our beach trips are always special with our daughter and her family show up to spend a few days with us. Let's face it...vacation is a lot of fun when the entire family get's together!

I finally found some time to sit down and work on my scrapbooking projects again and to get things rolling...I'm working on our family vacation photos from 2015 to the beach in Wildwood. I had forgotten how many photos I had taken during that trip until I sat down to look through them. During the trip...my daughter was 7 months pregnant and she wanted a few family photos taken that showed off her very pregnant belly.

I decided to go with a simple scrapbook layout and with a pretty neutral color scheme of light beige, brown, seafoam and blue. The background is a sheet of 12" by 12" printed cardstock in a pretty light beige color. I then took two pieces of brown paper and ran them through my machine to turn them into cardboard-looking paper. You can see on the photo where I placed them on the background.

Two vertical photographs were used after they were slightly cropped down and matted onto light turquoise and bright blue cardstock. The inner mat has a 1/8" edge and the outer mat has a 3/16" edge. The title of the page is a block that says "Sunny Day Everyday" which I matted onto the bright blue cardstock and then accented it with a flower embellishment. To add a little pizzazz, I added a tiny turquoise colored rhinestone to the center of the flower. Underneath the title block is a 3-D pennant flag embellishment done in the same color scheme.

The bottom right corner features a travel themed 3-D embellishment and I added a pair of plastic sunglasses to the right upper corner to add more interest. I used a turquoise colored gel ink pen and made a mini list of some of the activities that we did together as a family during that vacation down to the beach. The top right photo is accented with a lighthouse cardstock sticker embellishment and the bottom left photo is accented with a blue ship's anchor cardstock sticker embellishment.

I didn't want to over-do it with the embellishments or color scheme with this particular scrapbook layout because I wanted the two photographs to stand out and speak for themselves.

Note: You can double click on the photograph to get it to open up in a new browsing window and in an enlarged size. That will allow you to see all of the smaller details up close.

Sunday, March 5, 2017

Ice Cream Cones Scrapbooking Page Layout Idea

Ice Cream Cones Scrapbooking Page Layout Idea
Every time we take our grandchildren on vacation with us down to the beach we make the point to take them out for ice cream cones and/or ice cream sundaes. There is this one really cool place called Cool Scoops in Wildwood New Jersey that has tables and booths that are replica's of vintage cars that you sit in! The kids get a real kick out of sitting in those old car seats when they eat their ice cream.

To remember this annual family tradition, I took two photos the last time we were there and whipped up a super-easy scrapbook page using them. In addition, all of my embellishments on the page are ones that I had leftover from other projects, so it was a great way to use up some of my scrap stash!

Ice Cream Cones Scrapbooking Page Layout Idea

The background is a sheet of texture cardstock in a solid light turquoise color. I used three strips of paper to make my own bottom boarder and simply cut them out with a wavy edge, layered them together and put them onto the page. I used a coral colored printed piece of scrapbook paper, a dark turquoise textured piece of paper and a solid bright red piece of paper to make the border. Those colors worked well with my photos. Layered on top of the boarder are three chipboard ice cream cone embellishments.

I matted both of the photos (after I cropped them) onto solid bright red cardstock, trimmed that mat leaving an 1/8" edge and matted it again ton the coral piece of printed paper that I had used in the border. This way my photo mat coordinates with the boarder. I left a 3/16" edge around the outer mat.

The word SMILE was made with a glitter adhesive word kit and I used dark turquoise glitter for that. Underneath each photo I used vellum word stickers, SAY CHEESE and TOGETHER FOREVER. To the left of the photo block is a file folder tab that has the date on it and to the right is a thing-a-ma-jig with coral flower epoxy sticker. Both of the embellishments were inked around the edges with turquise colored ink.

I really like the color scheme that I used which pulled out the colors from the photographs. The layout was really simple to put together, allowed me to use up bits & pieces that I had leftover from other projects and I think it's funky looking which I like.

Note: You can double click on the photo to have it automatically open up in a new window and in an enlarged size, so that you can see the details up close!

Wednesday, November 30, 2016

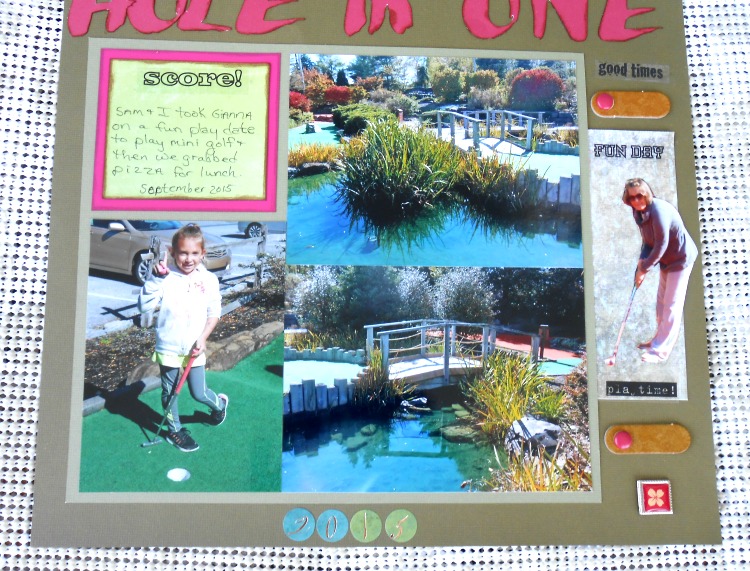
Scrapbooking - A Hole in One Mini Golf Layout Idea

As a family, we love to get out a few times every year to play miniature golf. Matter of fact, every time we travel...we look for a mini golf course nearby. It's a lot of fun and a great way to bond together as a family and a game that both adults & the kids enjoy.

About 6 weeks ago we took our 7 year old granddaughter out to play miniature golf and to remember our fun day...I whipped up 3 scrapbook pages that are full of photos from our day. Here's one of the mini golf pages that I made.

* Note: I'm a traditional scrapbooker so all my layouts are done in the 12" by 12" size. No digital layouts here!

My background is a sheet of olive green textured cardstock. I had a piece of muted sponge-texture green & brown colored scrapbook paper that I cut down into: A block measuring 5" by 3 1/2" in size and then I cut 2 1/2" squares from it and cut those in half to make the zig-zag pattern running across the top of the page. The block is used underneath the photo mat to add accent and so that I had something to mount the one photo onto (me putting the ball on the right side of the page).

I used three other photos (2 horizontal and 1 vertical) and slightly cropped them down. I then matted them onto one big block of light olive green cardstock. I left a 3/16" mat edge. I then cut from light green a journaling square and inked around the edges in chocolate brown. I matted it onto a dark berry piece of cardstock and inked around the edges again. I added a clear adhesive word sticker to the top of the journaling block that says SCORE! and did the journaling in my own handwriting. Underneath the photo block are 4 small number stickers for the year.

To the right of the photo block you'll see 3 clear adhesive word stickers: Good Times, Fun Day, Play Time!. Also accenting the right side of the page are 2 brown chip board tags and I added a dark berry colored brad to each one & attached them to the page for textural interest. Underneath is a silvertoned metal brad with a flower on it.

I used my Cricut cartridge "Everyday Fonts"  and the F3 font to cut out the letters HOLE in ONE from berry colored cardstock. I inked around the edges of each letter with chocolate brown distressing ink. I ran each one through my Xyron and then added them to the page for my page title.

Note: Double Click on each image in this post & it will automatically open up in a new window & in an enlarged size so that you can see the smaller details.

Sunday, October 30, 2016

Mini Golf Scrapbooking Layout Idea

My family  loves to get together and go out and play miniature golf. Matter of fact, we play mini golf at least once a month locally and then when we travel, we are always looking for new places to play. Several months ago we took our 7 year old granddaughter out to play the game, so I wanted to make a quick & easy scrapbook layout featuring 3 of the photos I took that day.

This scrapbooking page is done in the traditional 12" by 12" size. I don't do digital, so this is classic scrapbook page.

The background is a sheet of pale yellow cardstock. I used my Life's A Beach Cricut Cartridge to cut out the bamboo leaf border from dark olive green cardstock and I used the same cartridge to cut out the page title of "Mini Golf Pro" from the same olive green cardstick. I love that cartridge and use it often on my non-beach pages too.

I cropped down my 3 photos and matted them in a block-style pattern onto coral pink cardstock. I then matted that onto lime green cardstock and then onto dark olive green cardstock. I left an 1/8" border with the lime green mat and a 3/16" border on the dark olive green.

In my scrap box I found some leftover mini golf embellishment from a layout that I did 2-3 years ago. I ended up using the windmill cardstock embellishment along with a plastic blue golf ball sticker. I had a gold club rub-on and added that too. In my own handwriting I wrote the name of the miniature golf course and Par 3...which is what each of averaged during this particular game.

Also from my scrapbook, I added a metal embellishment tag on the left side of the page and on the right side I added a gel phrase sticker "The Sweetest Face" and two round gel stickers feature silver leaves. Quick, Inexpensive and Cute Layout! You can click on each photo which will open it up in a new window and automatically in an enlarged size. This will allow you to see the smaller details.

Thursday, October 20, 2016

DIY - How to Make Your Own Laminated Bookmarks

I've been really enjoying various adult coloring books as a new creative & stress-relieving outlet. During the evening hours while I'm sitting down and watching TV, I like to get out one of my adult coloring books and color in a design. When it comes to coloring, I prefer using glitter gel pens and/or metallic gel pens which gives the designs some added sparkle and shine.

One way that you can utilize those coloring book designs (once you have them finished) is by cutting out the design into strips and laminating them under plastic. You can then turn them into fancy bookmarks and give them as gifts! Matter of fact, I make them all of the time and place them inside birthday greeting cards and holiday cards when I send them out. They add NO EXTRA postage to my envelope and makes a personal little gift for the person receiving it. Here's how I make them.
How to Make Your Own Laminated Bookmarks

Colored Design from Adult Coloring Book Page
Laminating Machine with Laminating Supplies
1/4" Hole Puncher
Fiber or Ribbon
Scissors
Ruler
Once you have a design, pull out the page from your adult coloring book. Using a ruler, cut 2 strips each measuring 2 1/2" by 7" in length. One strip will serve as the front and the second the back of your bookmark.

Line up the 2 strips, back sides together. Lay them inside a plastic sheet and place your plastic sheet in the protective cardboard folder. Heat up your laminating machine and feed the folder through it. Remove and let it cool to remove temperature for 5 minutes. Open up the folder and remove the plastic sheet. Using scissors, cut around the edge of your bookmark, leaving an 1/8" edge. You don't want to cut on the design at all, you want your paper bookmark to remain sealed underneath the plastic.

To finish up, use the hole puncher to punch a hole at the top. Cut a 5" piece of fiber or ribbon and thread it through the hole in a loop fashion. Tie it off and you're done! Easy peasy!

If you don't own a laminating machine, most office supply stores have them and you can use them for a small fee.

Monday, October 10, 2016

Visiting the Pumpkin Patch Scrapbook Layout Idea

Last October we took both of our grandchildren to a local petting farm and pumpkin patch for some Fall festivities. They had a chance to feed baby farm animals, ride tractors, milk a cow, climb on hay bales, go through a corn maze, take a hayride and of course...we visited the pumpkin patch to buy pumpkins for Halloween.

Today's scrapbooking page idea features one 4x6" photo of my grand daughter and my husband. Pappy happens to be the Princess' best friend! At the pumpkin patch, she selected 3 beautiful pumpkins which they later carved into jack-o-lanterns.

My background is a solid sheet of olive green cardstock. Layered on top of it is a sheet of printed scrapbooking paper in a dark red, dark orange, cream and sage green plaid pattern. It measures 12" by 8" in size. The one photo was matted onto dark orange and dark red cardstock with an 1/8" edge around each mat.

The bottom of the page features a pumpkin that I cut out using my Cricut. The pumpkin was a free pattern on the Cricut Design Studio. I cut it from orange, brown and green cardstock and then ran it through my Xyron machine to adhere it to the page. On each side of that is a chipboard dark red maple leaf. I used two different rub-on words to accent that section and one word says MEMORIES and the other word says TOGETHER.

I ran 1/4" by 12" FALL printed satin ribbon at the bottom of the plaid scrapbooking paper and at the top, to act as a frame for that section. Plus, it finished off those edges nicely. The ribbon is in an orange color and has the word FALL printed on it with brown maple leaves.

I had some dark red and dark orange alpha stickers and used those to spell out the words PUMPKIN PATCH. I placed each alpha sticker onto a yellow cardstock square. I then framed those squares with dark red cardstock. I used my postal stamp edged scissors to make a design around the edge of the red cardstock to add interest to the alpha letter blocks.

To finish up, I had a pack of Soft Spoken sticker embellishments that had a 3-dimensional bat sticker which I added to the top left corner of the matted photo and a 3-dimensional jack-o-lantern (pumpkin stack) sticker which I added to the right of the photo.

Overall, I'm pretty pleased how this Pumpkin Patch Halloween scrapbook layout turned out. I was able to use up some of my scrap sized papers and embellishments that I had leftover from other projects. Always nice to use up things from the leftover scrap box for sure!

Note: You can click on each photo in this blog post which will open it up in a new window and in an enlarged size. This will allow you to see the details up close. Enjoy!

Tuesday, September 20, 2016

Scrapbooking - A Day in Hershey Layout Idea

We are really fortunate that we live only 20 minutes from Hershey Pennsylvania and travel there pretty often to participate in family-friendly activities. On one particular day we decided to take our 6 year old granddaughter to The Hershey Story Museum on Chocolate Avenue and I made up a few scrapbook pages to remember our day.

The following scrapbooking layout was done in the traditional 12" by 12" format. I don't care for digital scrapbook pages, so this one is totally made with paper.

My background is a sheet of 12" by 12" printed scrapbooking paper. The main color is a beige and it has a printed floral border running down the left side. Since Hershey's chocolate is in a brown color, I wanted to use mostly neutral shades on my page.

For this page I used three photos, two are horizontal and one is vertical. I cropped them all down (slightly) and matted them onto one sheet of dusty blue cardstock, leaving an 1/8" edge. I then matted it again onto chocolate brown cardstock leaving a 3/16" edge. I left head space and footer space above & below the vertical photo. I did my journaling in the footer space and added a chocolate bar sticker to the header space and accented both spaces with some brown pen-ink stitching.

I had a piece of printed chocolate brown & floral pattern pattern and cut a strip to measure the width of my photo block by 3/4" in height. I then used my "fringe edge" scissors and cut a fringe along the one long edge. I used my glue dots runner to attach the fringe strip of paper to the bottom edge of the photo block and then attached the entire thing to the background paper.

Using my Cricut and the Everyday Font Cartridge...I cut out the words The Hershey Story (name of the museum) using the F4 font style and the #2 size setting from chocolate brown cardstock. I put the letters through my adhesive machine and then placed them underneath the photograph block. To finish up, I had three leftover Hershey Kiss stickers and added them on the left-side of the page to frame out the photo block.

This page took me about 45 minutes to make...most of that time spent with cutting out my letters using the Cricut and then running them through my Xryon. Total cost (for all of you frugal scrapbookers was about $2.50 for the page. Yay!

Note: All photos are clickable. Click on each one and it will open up in a new window & in an enlarged size, so that you can view all of the smaller details up close.

Tuesday, August 9, 2016

Fall Family Fun - Scrapbooking Page Layout Idea

I'm so far behind on my scrapbooking projects and I'm desperately trying to get caught up! Last Fall we took our grandchildren to a local farm for some fun Autumn festivities. Our beautiful 6 1/2 year old granddaughter got to feed some farm animals, climb on hay bales, go through a corn maze, drive a tractor, go on a hayride and then we went pumpkin picking in their pumpkin patch. It was a lot of fun!

This scrapbooking layout is done in the classic 12x12 format size and features a fun and easy Fall layout idea.

The background is a solid sheet with a texture piece of cardstock in olive green. I slightly cropped down my 3 photographs and then matted them onto dark orange and dark olive green cardstock, leaving an 1/8" edge around each of the mats.

I cut a strip measuring 3 1/2" by 12" in size from a piece of plaid print scrapbook paper. It's in fall colors and ran that towards the bottom of the layout. Along each long-edge of that strip I ran printed self-adhesive ribbon, also in an autumn print. It just finishes off the edges of the paper strip nicely and adds some texture to the page.

I used my Cricut to cut out the acorn and leaf design you see running across the top of the page. It's a design in their design gallery and I used chocolate brown and medium orange cardstock to make it. I then used small alpha letters (stickers) to spell out the name GIA and put that on one of the acorns and spelled out the year 2015 which I placed on top of the second acorn.

The only other embellishments that I added to the page are located towards the bottom. I had a self-adhesive leaf embellishment (one of the jelly-stickers) that I placed on the right of the photo and then on the left of the bottom photo you'll see a chipboard dark red maple leaf that I layered onto dark orange and olive green cardstock squares. I used decorative edge scissors around both square's edges.

To finish up, I used the same alpha stickers that I used earlier to spell out the word "Autumn" and the word "Fall" and placed those words near the embellishments on the bottom of this Fall & Autumn Scrapbooking Page.

Note: All photos featured in this blog post are clickable. If you click on each one, it will automatically open up in a new browsing window and in an enlarged size. This will allow you to see all of the smaller details close-up. Visiting my Scrapbooking board on Pinterest to see hundreds more FREE scrapbooking layout designs.

Sunday, July 31, 2016

Autumn - Fall Scrapbooking Page Layout Idea

Last Fall we took both of our grandchildren to a local farm for some fun autumn festivities. My grandson was only 5 weeks old, so he didn't get to participate, but he was there. My granddaughter who was 6 1/2 years old got to climb hay bales, go through corn mazes, go on a hayride, drive a tractor, feed some of the animals on the farm and so forth.

This 12x12" scrapbooking page features two 4x6" photos that I took that day. These 2 photos turned out so pretty and I wanted them to be the main focus on the page, so I opted to keep my papers, colors and embellishments simple, so that they didn't distract from the photographs.

My background is a sheet of chocolate brown cardstock. Layered on top is a sheet of printed scrapbooking paper done with a distressed texture and a muted print in shades of brown, dark red, dark orange and dark yellow on a teal green background. I cut that down to measure 11" square, so that you can see the chocolate brown cardstock peeking out on all four sides.

Each of the two photos are matted onto dark orange and chocolate brown cardstock with an 1/8" border around each mat. I had a piece of printed paper that had an all-over fall leaf pattern on it and decided to use my small & sharp scissors to cut around 2 large leaves and 2 smaller leaves. I then took a glue stick and glued them onto my background as you see in the photo. The two smaller leaves stick out onto a little bit of the brown cardstock to add dimension and all 4 of them are peeking out from underneath the photos

To finish up, I decided to use small clear alpha sticker letters to spell out words to describe that Fall & Autumn fun day, instead of doing a journaling block or tag which I thought would distract from the two beautiful photos of my grandchildren. I simply spelled out both of their names, the date and a few other words related to Fall and placed those words around the page.

Overall, I love how simple this page is. Because I opted to go with simple embellishments, no journaling block and no page title, those two photos of my grandchildren are the main focus of the page! Yipppee! I accomplished what I wanted!

Note: All photos in this blog post are clickable. Click on each one and it will open up automatically in a new browsing window and in an enlarged size. This will allow you to see all of the smaller details up close. You can find additional scrapbooking page layouts & ideas right here on my crafting blog.

Monday, July 11, 2016

Grandpa and Me Scrapbook Layout Idea

Last Fall we took our then 6 1/2 year old grand daughter out on a date. For our "play date" she selected a game of Miniature Golf and then pizza after we were done. During this outing with her, I got 2 great photos of her with her grandpa that I wanted to add to my scrapbook. For the page, I didn't want an overly-cluttered page and I wanted it to be neutral in it's design. I wanted to keep anything girly to the minimum and this is what I came up with.

The page is done in your classic 12" by 12" size and it features two 4" by 6" photographs that were matted onto chocolate brown cardstock with a 3/16" border. The background is a sheet of printed olive green cardstock in a vine and swirl pattern. I used chocolate brown ink and inked around all four edges. Layered on top is a sheet of similar printed cardstock paper that measures 11" square. I inked around all four edges and attached it with a glue stick.

The title of this page is "The Two of Us" which is spelled out with brown chipboard alpha letters. The word TWO and the word US is in all capital letters, because I wanted to show emphasis on those two particular words. I made my own title block out of matching printed paper cardstock (matches the background sheet) and I inked around all four edges. I then matted it onto chocolate brown cardstock, used my paper trimmer and left a 3/16" edge. I attached this title block to the right upper top of the page using 2 chocolate brown brads.I ran the chipboard letters through my Xyron and attached them to the title block.

I then got into my scrap box to pick out some embellishments. I've been trying to use up all of my bits & pieces that I have leftover from other layouts and this was a good page to use them on! I used 2 silk flowers in a muted olive green color to accent each photo. I then used some gel bubble stickers along the left edge of the top photo on the left (FUN, Flower and LIFE). Under that photo I used a vellum sticker that says Grandpa & Me. The photo on the bottom right was accented with another vellum sticker that says FRIENDS. 

To the left of the photo on the bottom you'll find various word & phrase stickers that talk about family, memories, fun, etc. To accent those stickers (the corner was still looking too plain) I used some flower & vine rub-ons that I had in chocolate brown.

Overall, I like how the page turned out. The green & brown color scheme works well for outdoor photos & mini golf, plus the page doesn't look overly feminine since I only used 2 silk floral accents. I tend to go for the "uncluttered" look on my pages while others really like to go over-board with their embellishments. You can click on each photo in this scrapbooking blog post and it will open the photo up in a new browser window & in an enlarged size, which will allow you to see all of the smaller details.

Friday, July 1, 2016

Scrapbooking: Fall Scrapbook Layout Page Idea

If you love quick and easy scrapbook layouts that aren't full of a lot of clutter and are inexpensive to make, you'll appreciate this FALL scrapbooking page idea. All of the embellishments used on the layout were made with the Cricut and free patterns from the Cricut design studio online.

The layout is in the 12x12" size. The background is a sheet of dark mustard colored cardstock. We used a sheet of olive green, sage green, dark red, dark orange and dark brown (skinny stripes) scrapbooking paper to make the border strip you see on the left of the page and as a mat around all three photos and the journaling block.

We used a sheet of dark red cardstock as the inner mat around two of the photos and around the journaling block, leaving an 1/8" edge. The top right photo was cropped down and placed in an oval shaped cardstock photo frame that has straight outer edges. Using the Cricut, we cut out 3 leaves from dark green cardstock and used one of the leaves as an accent on the oval photo frame and the other 2 leaves as accents on the journaling block.

Instead of using a title...I opted to use the Cricut to cut out the embellishment that runs across the top of the layout from the Design Studio online. You'll need brown, orange and green cardstock to make one like the one that I made. I used glue dots to adhere it to the page.

To finish up the layout...I ran a piece of orange & brown vertical striped ribbon along the edge of the border on the left. I took another piece of ribbon (cream with a autumn leaf print) and tied that into a satin ribbon bow. The bow is accenting the top of the journaling block. I opted to do the journaling in my own handwriting because I think it's important for future generations to see what your handwriting was really like.

I like the simplicity of this Fall & Autumn scrapbooking layout. It only took me about an hour to make and I was able to use up my cardstock scraps to make the top border, journaling block and accents. You can find additional Scrapbook Layouts right here on my craft blog.

Note: You can click on each photo in this blog post and it will open up in a new viewing window and in an enlarged size. This will allow you to see the details up close.

Tuesday, June 21, 2016

Newborn Baby Boy Scrapbooking Page Idea

Looking for some easy newborn baby boy scrapbooking page ideas? If so, you'll find over 100 easy-to-make scrapbook page ideas right here on this blog! You can find them all in my scrapbooking category.

The scrapbook layout idea that I'm featuring today utilizes two 4x6" photos and inexpensive embellishments. This page takes less than 1 hour to make. Frugal and cute!

Newborn Baby Boy Scrapbooking Page Layout Idea

The background is a solid sheet of pale blue cardstock. The 4" by 12" border (on the left of the page) was cut from a printed piece of scrapbooking paper. The ABC print is on a cream-colored background and the ABC's are accented with animals. To finish off the edge of the border, I cut a 1/4" by 12" long strip from lime green scrapbooking paper and glued it down the right edge.

I matted the two photos on the same lime green colored scrapbooking paper, to give the page that cohesive look. I used lime green printed chipboard alpha letters to spell out BABY JAXON and added them to the page using small glue dots.

I had two gel-type self-adhesive glossy stickers and I added one that says "A Little Bundle of Joy" to the right of the word BABY at the top of the page. I added the second gel-type self-adhesive sticker to the right of the bottom photo. It says 2 Cute 4 Words. Right above that is a little pair of yellow mittens that I had leftover from an embellishment sticker pack. To the left of the top photo are the matching little yellow baby hat and yellow baby booties. Cute!

The color scheme for this newborn baby boy scrapbooking page was lime green, pale blue, yellow and cream. I love those four colors together for newborn baby scrapbook layouts. If you're doing a baby girl page, you could substitute pink for the lime green and that would look equally as nice!

Note: You can click on the images in this post to open them in a new browser window and in an enlarged size. This will allow you to see the details up close.

Saturday, June 11, 2016

Scrapbooking - Newborn Baby Boy Layout Idea

Back on September 5th, 2015 I was blessed with the birth of my second grandchild, a baby boy! My daughter named our new little prince Jaxon and the name suits him well. He has the cutest little smile, gorgeous thick dark hair and pretty eyes! He's so handsome!

A few weeks ago I finally had some time to sit down and work on some newborn baby boy scrapbook pages. Over the next few weeks, I'll be sharing those scrapbooking layouts here on my craft blog. You can also find previous baby girl layouts by looking in my scrapbooking category.

Newborn Baby Boy Scrapbook Layout Idea

For this particular layout I had three 4x6" photos which I slightly cropped down so that all three photos were the same size. I matted two of them onto a strip of pale blue cardstock, leaving an 1/8" edge around the photo strip and then matted them again on yellow cardstock, leaving a 3/16" edge.  I repeated this for the third photo.

I used a piece of pale blue printed scrapbooking paper as an additional photo mat and overall, it measures 11 1/2" by 9 3/4" in size. I centered that piece onto another piece of printed scrapbook paper (blue with pale lime green & yellow polka dots) which was the 12x12" background paper. See photos.

At my daughter's baby shower they had blue baby footprint confetti on the tables which I saved. I added the confetti to the page by using tiny glue dots...just scattered them around the page.

I had a bunch of baby themed embellishments leftover from other layouts and I wanted to try to use some of those up on this page. I placed a BABY BLOCK 3-dimensional cardstock sticker under the photo on the left. Beside that one is a 3-d sticker embellishment of a stork. Above that same photo I used a gel sticker that says Precious Little Baby and a 3-dimensional cardstock sticker that features baby balloons. Those balloons say "Welcome New Baby" on them.

To finish up...I found some alpha stickers in my stash that perfectly matched the colors of this layout. The alpha stickers are round with the letter inside. I matted them onto yellow cardstock squares measuring 2" square and then inked around all of their edges with seafoam green ink. I spelled out the word BOY with them and added them to the page using adhesive foam dots.

I like how this newborn baby boy scrapbook page turned out. It only took me an hour to make, I used up all left-over supplies from other pages and it's cute. It doesn't have a slew of clutter on the page. I left the three photos pretty much shine & speak for themselves.

Note: You can click on the photos in all of my posts which will open up each image in a new window and in an enlarged size. This will allow you to see the details up close.

Friday, February 5, 2016

Beach Summer Vacation Scrapbooking Layout

Last week I finally had a chance to sit down and do a little bit of scrapbooking. I am really behind on my crafting and trying to get caught up. The pages I am currently working on are from our summer vacation last year. Sigh....I really need to get this scrapbook done!

I am a traditional crafter so this layout is done in the 12 x 12" format and totally made the good old-fashioned way. I know some people love digital scrapbooking but personally, I don't.

The background is a sheet of pre-printed scrapbooking paper in a medium turquoise color. I really like the distressed tone-on-tone color pattern with this paper. I used a cardstock boarder that says "How I Spent My Summer Vacation..." and matted that onto a lighter shade of turquoise cardstock and left an 1/8" edge around it. I have it running down the left side of the page.

I used my Cricut to cut out the letters to spell "At The Beach" from patterned paper that had a turquoise and off-white plaid pattern. I used the 1 3/4 setting for the "At The" and the 2 1/4 setting for the "Beach". I then used the shadow effect and cut the letters out again from solid dark turquoise cardstock. I layered them together and placed them down the left side of my page. On each end of my title I used vellum sandcastle stickers as accents.

I used 5 photos on this page and all 5 were cropped down. The 3 on the left are square shaped and the 2 on the right are slightly rectangular. I matted them onto a sheet of darker turquoise colored cardstock and then again on light turquoise cardstock. I left a 3/16" border around the inner mat and a 1/4" border around the outer mat.

To finish things up I matted 2 adhesive stickers. One says "Warm Sand" and the other one says "Ocean Waves". I then added a little gold metal flip-flop charm to the one and a gold metal starfish charm to the other.

I really like this page because it's not LOUD, CLUTTERY or has a bunch of bold colors. I stayed within one color family...turquoise and just used multiple shades of it. I think it turned out nicely!

Saturday, January 30, 2016

Outdoors in Nature Scrapbooking Page Layout Idea

Last fall we took a trip up to State College in Pennsylvania. During one afternoon we headed over to Centre Hall (10 minutes away by car) and visited Penn's Cave and Wildlife Park. If you have never visited, we highly suggest that you do! It is one of the prettiest and best caves/caverns that we have in Pennsylvania.

During our visit I took many photos of the inside of the caves and the surrounding property. I decided to pick out a few of them and whip up 3 scrapbooking pages so that we could remember this awesome place! You can find the other 2 pages that I made here on my craft blog in the scrapbooking section.

What is really cool about this nature inspired scrapbook layout page is that I didn't purchase any embellishments! Everything that you see on that page was made with my Cricut and cardstock from my scrapbox. What a great way to use up some of my paper scraps!

My bottom border is from the Cricut cartridge Paper Dolls. It's an older cartridge and yes, I use my old Cricut more than my Explore. I selected the cattail border because the cave that we toured is all done by small motorboat and is a water cave. When you come out the back side of the cave there is a small lake with tons of cattails lining the shore. I used the #5 size setting and pieced 2 of them together to get the look that I wanted.

I used that same cartridge to make the wooden hiking trail sign and simply used my silver gel pen to right the word Boats and an arrow on it. There were signs all over the place guiding you to the cave opening where you boarded the tour boat. I used a different Cricut cartridge to cut out four branches onto dark green textured cardstock. I placed 2 of them down in my cattail border and 2 of them are above the word CAVE. I then used my Cricut to cut out the 2-toned bird from cardstock.

I did the tree branches and bird because we visited this place during the middle of October and most trees had already dropped their leaves. You saw a ton of naked trees and tree branches every where, so that is why I selected those elements.

To finish things up I used some leftover cut-out letters from a camping alpha pack that I had and matted those tiled letters onto chocolate brown cardstock squares. I used them to spell out the title of my page which is Penn's Cave. Oh yeah, I added 2 small pine cone photo corners onto the images too. I almost forgot about those!

Quick, easy and frugal nature-inspired outdoor scrapbooking page layout idea! You can click on each image in this post to enlarge the photo so you can properly see the details. You can find more quick and easy scrapbooking page layout ideas right here on my blog!

Monday, January 25, 2016

Book Review: The Complete Photo Guide to Cardmaking

The Complete Photo Guide to Cardmaking is the ultimate resource on card making. All paper-crafting techniques that can be employed for card making are thoroughly explained, including a comprehensive description of paper types available, folding options and techniques, coloring and image transfer methods, and adding embellishments. Inside, you'll also find methods for using a computer to design and print cards. Enjoy a gallery that gives you lots of ideas and inspiration to create cards of your own, using the techniques you've learned.

Book Title: The Complete Photo Guide to Cardmaking
Author: Judi Watanabe
ISBN: 978-1-58923-882-4
Publisher: QuartoKnows.com

Expert paper crafter Judi Watanabe provides you with a one-stop reference for making cards for any occasion. This book includes step-by-step photographed instructions for a wide range of techniques, as well as projects to accompany each area of card making. Full of gorgeous cards, The Complete Photo Guide to Cardmaking explores a wide range of techniques and end products, making it a valuable reference for any crafter. So, when the mood strikes, you can use the artistry you've learned to create personalized greetings for everyone you know!

My Thoughts: I'm a big-time scrapbooker and paper crafter and I'm always looking for new and fresh ideas. This book is specifically made for those who are into cardmaking but the techniques and designs you learn from it...can be used in other paper crafting mediums too!

Within the pages of this book you'll find more than 800 full color photos and step-by-step instructions on how to make each card that is featured. There are variations included with most of the designs too. I love that the author gives you a supplies list with each project so that you'll know what supplies you'll need ahead of time. All of the supplies are readily available too!

There are projects for beginners, intermediate and expert cardmakers, definitely something for every skill level and design-taste. The author covers all different kinds of handcrafted greeting cards, from window cards, folded cards to money/gift cards and everything in-between. It's quite extensive and I love that she didn't forget about anything!

I'm super happy to have this book in my library collection. I'll be learning some new design skills and will be applying them to my cardmaking and scrapbooking projects. It my opinion, it's a definite must-have book if you're into cardmaking and/or scrapbooking.

Disclaimer: Shelly was provided with a complimentary copy of this book to review on her craft blog. No monetary compensation was received. Regardless, Shelly's thoughts, opinions and words are 100% her own. Your opinion may differ.

Wednesday, January 20, 2016

Beach Vacation Scrapbooking Page Layout Idea

A couple of weeks ago I was shopping at one of our local Dollar stores and found a great buy on some scrapbooking embellishments. If you are a frugal crafter or scrapbooker, make sure you check out local Dollar Stores for crafting supplies.

I picked up several vacation and beach scrapbooking embellishments on this particular trip. Each package had several different embellishments inside it and only cost $1.00 per package. That's a steal compared to similar products selling in craft supply stores for $4.00 and up per package.

As a traditional scrapbooker...I created this layout in the 12 by 12 format. It's not digital and although I know people are into digital layouts...they just aren't my thing. I love paper and being creative with it. My background is a sheet of blue sky printed paper. 

I used four photos on this layout. I slightly cropped down all four of them to fit onto the page and in a grid-style pattern. I matted them (as shown in the photo) onto one sheet of white cardstock. I then trimmed that sheet down to make a big rectangular photo block and left a 1/16" edge. I then matted that onto a sheet of medium blue cardstock that had embossed polka dots (they are tiny but there). Along the top edge of this block I used my wavy edge scissors to resemble water waves. I cut a strip from white cardstock measuring 11 3/4" long by 1 1/2" wide. I used those same scissors to make a wavy edge along one long end and then glued the strip to the top of my photo block.

The title for the page is "Picture Perfect Vacation". The rub-on glitter letters make-up the Picture Perfect and the chipboard glitter VACATION word was from one of the embellishment packs that I purchased. The glitter sunglasses and clear rhinestone jewels above the title came from that same embellishment pack. From a separate pack that I bought during that shopping trip to the Dollar Store I used the cardstock surfboard and circle embellishment that flank the title block. From a third pack of embellishments from that same trip is the cardstock 3-D sticker that says "Your Best Vacation" which sits in one area of the photograph block. The seashell embellishment on the left was leftover from another project.

I think it's important to show off your own handwriting so I did a little bit of journaling underneath the photograph block along the bottom edge of my page. Overall...I think the layout turned out nicely and I love that it has just enough embellishments without looking too cluttered. This is an easy beach scrapbooking layout that shows you that you can mix & match your embellishments and get decent looking ones at the Dollar Store.

Friday, January 15, 2016

First Dance Wedding Scrapbook Layout Idea

Today we are back again with a quick and easy wedding scrappbook layout idea for all of you. This particular page features 4 photos from the "First Dance" at the wedding that the new bride and groom shared together.

The background sheet is a printed piece of scrapbooking paper done in a soft blue with white floral print. The bride cropped down the 3 photos on the left and matted them on one strip of royal blue cardstock. She used an edger punch to add a fancy edge to the bottom of the strip and added a soft blue ribbon bow at the top of the photo strip. At the very bottom is a "First Dance" sticker embellishment in white with silver wording.

She slightly cropped down the photo on the left and left it unmatted but added four royal blue cardstock corners. Below that is a sticker embellishment that says "Dance with Me" and underneath that is another 3-D embellishment of pennants that spell out "Mr. & Mrs." that are really cute. Above that photo are three more embellishments. One says "Just Married", another says "LOVE" and the final one is a bird cage with two love birds inside it.

This is a great layout for those of you who want something quick & easy that doesn't cost a fortune to make. This page cost around $2.50 and took less than 1 hour to complete. Now that is what I call frugal scrapbooking for sure! You can find more bridal and wedding scrapbooking page ideas right here on my blog!

Tuesday, January 5, 2016

Quick and Easy Swimming Pool Scrapbook Layout Idea

I love to sit down and scrapbook my family's memories. With that said, I'm what you would call a "frugal" scrapbooker. I don't believe in putting $10 + dollars into one page and I don't like a gazillion things all over the page which really distracts from the photos & the people in them. On top of that, I'm a paper crafter and dislike digital scrapbooking.

Recently I through together this swimming pool themed scrapbooking page in less than 20 minutes. I wanted to see how quickly I could do a page and with as few embellishments as possible. Some of us love to scrapbook but don't have 6 hours to spend making just one page!

This layout was done on a piece of 12 x 12 white cardstock. The two photos were cropped and matted onto bright yellow and then bright orange cardstock with an 1/16" edge. Underneath the two photos are 6 strips of blue patterned paper each measuring about 1/2" by 8" in length. I took sharp scissors and fringed the edge of each strip which you can't see in the photo...to just add a little texture.

Along the bottom I put a textured cardstock border sticker which features waves. Right above that is a chipboard word that has glitter (SPLASH) which I used a liquid glue pen to add the letters onto the page. Running down the right side of the page are 3 textured cardstock stickers in a swimming theme. The wave border and those 3 stickers all came from a sticker pack that I got on clearance for $1.00. I still have several stickers left to use on another page. Great buy!

I decided to not add a journaling block or tag. I did the journaling around both photos and around two of the stickers on the right side of the page. I think it's important that future generations read YOUR OWN handwriting on some of your pages. Personally, I love seeing handwriting but I do like to see it clearly printed and in small letters.

This swimming pool scrapbooking page layout goes to show you that you can put together a page in less than 30 minutes and do so inexpensively. I also like that it's not overly cluttered and your eyes immediately go to the two photos and not to a slew of embellishments. Just my 2 cents!