Showing posts with label Holiday Ornaments. Show all posts

Saturday, January 19, 2019

Kid's Crafts: Painted and Glitter Seashell Christmas Ornaments

During our beach walks my grandchildren will collect hundreds of seashells that wash up onto the beach. We collect them in our mesh bags and then wash/dry them once we return from vacation. So, what do you do with all of those seashells the kids collected? Turn them into fun Christmas and holiday ornaments with just a few basic craft supplies! For this project we used small clam shells which worked perfectly for the project! 
Kid's Crafts: Painted and Glitter Seashell Christmas Ornaments

Kid's Crafts: Painted and Glitter Seashell Christmas Ornaments

Clean Seashells
Acrylic Craft Paints
Paint Brush, Water Dish, Paper Towels
Clear Fishing Line
Scissors
Clear Acrylic Spray Sealer with Glitter
All-Purpose Craft Glue
Sheets of Old Newspaper

Lay newspaper down on your work surface. Let the kids paint their seashells in solid or multi-colors. They can paint elaborate or really simple designs. We opted to paint our's in a solid color using 2 coats of acrylic paint. Left them dry for 30 minutes and then used acrylic paint to add a simple "polka dot" design. Let them dry for 45-60 minutes.

While the paint is drying you'll want to make hanging loops for all of your new ornaments. We used clear fishing line. Cut a piece that measures approximately 4 1/2" to 5" in length. Tie it into a loop and knot the ends together. Trim ends if needed. Set aside.

Take 2 sheets of newspaper outside. Lay them onto the newspaper. Lightly spray a coat of clear acrylic sealer with glitter onto the painted side of the shell. You don't need a lot! This sealer will protect the painted surface and add a shimmer to it thanks to the fine-grade glitter inside it. Let them dry for 1 hour.

Bring them back inside. If the clam shell has a tiny hole in the end (some do, some don't) you can add your hanging loop through the hole. If not, you can glue the hanging loop to the backside of the shell. Let dry for 2-3 hours. That's it, you're done!!!  

You can hang them on your Christmas tree or use them as holiday package toppers. A great way for kids to use up some of those seashells that they collected during summer vacation. 

Friday, December 21, 2018

Craft Project: Scrabble Tile Personalized Christmas Ornaments

Craft Project: Scrabble Tile Personalized Christmas Ornaments
We enjoy making our own Christmas tree ornaments and giving them away to family & friends during the holiday season. This year we decided to make these super-easy Scrabble Tile Personalized Christmas Ornaments! You will only need a few craft supplies to make them.

Once completed you can attach them to your holiday packages (as gift toppers), use them as place settings on your holiday table or just hand them out as your classic Christmas tree ornament.

Craft Project: Scrabble Tile Personalized Christmas Ornaments

Wood Scrabble Tiles
Wood Glue
Satin Ribbon
Scissors
Metal Eye Hooks
Drill with Small Drill Bit

You will need to use a drill to put a small hole in the top of a Scrabble Tile. You will want to do it with the First letter tile of the word that you're spelling. You will then screw in the metal eye hook into that hole. If it doesn't fit tightly, you can add a tad of wood glue into the hole. Let dry.
Craft Project: Scrabble Tile Personalized Christmas Ornaments

Lay out your tiles in the order that you need them for each of the words that you're spelling. Glue them together with just a tiny amount of the wood glue and lay them flat to dry. I laid mine out on an old cookie sheet that I then threw away. You want to lay them down onto a surface that they won't stick to if the glue oozes out. A sheet of aluminum foil would work well too. Let them dry.

Once they're dry use scissors to cut satin ribbon in a length of 6" long. Use that ribbon to make a bow around the metal eye hook. You can cut another length of satin ribbon and thread it through the eye hook if you want to make a hanging loop. I opted to not do that as I like the look of just hanging them onto the tree with an ornament hook.

You can decorate them even further by adding tiny seashells, artificial flowers, rhinestones, faux jewels, etc. That's entirely up to you. Easy project!

Sunday, November 4, 2018

Kid's Crafts: Penguin Popsicle Stick Christmas Ornaments

These cute Penguin Popsicle Stick Christmas Tree Ornaments are a big hit in our family and we've been making them for over 20+ years with the kids. I think every generation (at least for the past 4 generations have made them at one point or another). They're really easy to make and you only need a few general craft supplies to make them.
Kid's Crafts: Penguin Popsicle Stick Christmas Ornaments

Kid's Crafts: Penguin Popsicle Stick Christmas Ornaments

Wood Craft Stick
Wood Popsicle Stick
Black Acrylic Paint
White Acrylic Paint
Orange Acrylic Paint
Paint Brush, Water Dish, Paper Towels
2 Small Orange Pom-Poms
Red Satin Ribbon
Scissors
Quick-Drying Craft Glue
Clear Fishing Line

Paint the wood craft stick with 2 coats of black paint. Paint the wood popsicle stick with 2 coats of white paint. Let dry. Once they're dry, glue the white popsicle stick onto the black craft stick, leaving space above to form the penguin's head. Let dry for about 30 minutes.

Have the kids paint a white oval-shape on the black craft stick to form the penguin's face. While it's drying they can glue the 2 small orange pom-poms on the bottom of the craft stick to form his feet. Cut a 5" long piece of fishing line and tie it into a loop, knotting the 2 ends together.

Add 2 black dots onto his face to form the eyes and a triangular shaped orange beak. Dot white paint in the center of each eye to form the inner eye. Let dry. Tie a piece of satin ribbon around the penguin's neck to form the scarf. Glue the hanging loop onto the back of the craft stick. Let dry.

Your finished Penguin Popsicle Stick Christmas Ornaments are now ready to be hung onto the tree or used as holiday package toppers.

Note: You can double click on the photo in this post. It will automatically open up in a new browsing window and in an enlarged size.

Friday, February 10, 2017

Star Wars Felt Holiday Christmas Ornaments

Star Wars EWOK Christmas Ornament from Felt
My husband has been a HUGE Star Wars fan since the very first movie came out. He's in his 50's now and has been collecting Star Wars items for over 35+ years! Wow, can you believe that the franchise has been around that long? Time flies!

Over on my main blog - The Classy Chics, I received a complimentary Star Wars Collectible Felt Characters Craft Kit to review and feature. You can visit my other blog to check out my official review, purchasing information and to see additional photographs. 
Star Wars Collectible Felt Characters Craft Kit

Since receiving the craft kit, I've made 4 of the Star Wars characters. One of the things I love about this craft kit is that everything you need is included in the kit and all of the sewing and embroidery is done by hand. So, if you don't own a sewing machine or don't want to mess with one, you don't need one to complete these adorable characters!

I've been working on them one-by-one and hoping to have them all completed by the end of the year. We have a little 4 foot tall Christmas tree that we decorate in a Star Wars theme every holiday season, so I'm turning all of these felt characters into Christmas tree ornaments!
Star Wars Handmade EWOK Ornament from Felt

After I get done making a set for my husband, I want to work on additional ones and use them as toppers & ornaments on Christmas packages for the kids in our family. What's really cool about this kit is that once you run out of craft felt, go to your local craft supplies store, buy felt in the colors that you need and you can make as many as you want since the patterns & instructions are included in the kit and you can re-use them over & over again.

You can visit my main blog for the official review on the craft kit that I received. Since my readers on this blog didn't see the original review, I wanted to mention it over here too!

Sunday, December 18, 2016

Kid's Crafts: Christmas Candy Trains

Kid's Crafts: Christmas Candy Trains
Looking for a super-easy and quick Christmas craft to make with the kids? Got a church youth group, school classroom or Girl Scout Troop and looking for an easy project? If so, these adorable Christmas Candy Trains work up super quickly and are adorable!

To save money, we buy the majority of our supplies at our local dollar-type of discount store. You can find the glue dots that you need at your local craft store in the scrapbooking section.

Kid's Crafts: Christmas Candy Trains

Rolls of LifeSavers
Packs of Bubblegum (stick variety)
Bag of Hershey's Miniatures
Bag of Hershey's Kisses
Bag of ROLO Chocolate Candies
Bag of Mary Jane Candies
Bag of Peppermint Candies
Box of Large-Sized Glue Dots
Kid's Crafts: Christmas Candy Trains

When purchasing the candies, make sure that they are individually wrapped! You'll be adhering all of the wrapped candies together using the large glue dots.

Start by adhering the LifeSaves to the pack of gum using three to four large Glue Dots, as shown in the photos. Then use the Glue Dots to add on the train's wheels and then add the rest of the pieces to form the train. Some of the candies you'll need to use one Glue Dot and other's you'll need to use two, depending on the weight of the candy.

If you want to use them as edible Christmas tree ornaments or as package toppers, you'll need to purchase a roll of hanging metallic string or satin ribbon. Cut a piece 5 to 6" in length and tie it onto the train to form a hanging loop. That's it, you're done!

Sunday, November 20, 2016

DIY Coastal Seashell Christmas Ornaments

DIY Coastal Seashell Christmas Ornaments
Every year I decorate a 6 foot tall Christmas Tree in a beach and coastal theme. I decorate three trees for the season, but I admit...my coastal Christmas Tree is my favorite.

Last week at our local Dollar Store I picked up some craft supplies to make my own Coastal Seashell Christmas Ornament Balls. I love frugal holiday crafts like this and I'm pretty pleased with how they turned out. Here's how to make them!

DIY Coastal Seashell Christmas Ornament Balls

Clear Plastic Ornament Balls
Sand
Bag of Seashells
All-Purpose Craft Glue
Raffia
DIY Coastal Seashell Christmas Ornaments

Note: I purchased all of the supplies at my local Dollar Store.

Remove the top from each ornament ball. Fill the ball 2/3 of the way full with purchased craft sand. Place small seashells down into the ornament through the hole at the top. Your ornament will be semi-heavy, so they are best for the bottom branches of your tree. Since they are semi-heavy, I used all-purpose craft glue to glue the top back into place...just for added extra-strength, so that the little prongs on the cap don't pull out.
DIY Coastal Seashell Christmas Ornaments

Cut a 6" to 8" long piece of natural-colored raffia and tie it through the top for the ornament's hanger. If desired, you can make a loopy bow out of the raffia too. I kept mine pretty simple. I like the calming neutral tones, so I kept to those, but you could certainly use colored sand or small dyed (or painted) seashells too. Super simple to make!

I made a total of 8 of them and they will be hanging this year on my bigger, bottom branches on the Christmas Tree. If I can find smaller ornament balls and even tinier seashells, I would like to make some smaller ones too! Fun!

Friday, November 20, 2015

Kid's Crafts - Ribbon Christmas Tree Ornaments

Last weekend my little 6 1/2 year old grand daughter was over for a visit. Every time she comes we always sit down for a few hours and work on some craft projects together. It's a great way for her to explore her creativity and for us to bond together doing something that we both love to do.

One of our recent projects were these adorable Ribbon Christmas Tree Ornaments! This project has been around for many years...I can remember making these myself when I was a child. Furthermore, you only need a handful of inexpensive supplies and they work up really quickly. Each ornament took us less than 30 minutes to make.

Kid's Craft Project - Ribbon Christmas Tree Ornaments

Twigs 5" to 6" Long
Scissors
Brown Yarn
Various Colors of Satin Ribbon
All Purpose Craft Glue
Decorative Buttons
Hanging String or 1/8" Wide Satin Ribbon

When selecting twigs from your yard...you want to make sure they are primarily straight and no thicker than a 1/4" in diameter. Make sure they are dry and bug-free before using them.

Place a dot of glue at one end of the twig and wind a piece of brown yarn around the entire length of the twig, securing it at the other end with a dot of glue. The entire twig should be covered with the yarn. This serves as the trunk of your tree.

Starting 1" up from the bottom end of your tree trunk starting tying ribbons onto the trunk. The ones you start with first should be longer pieces than the ones you'll use last. Don't worry about specific lengths right now because you'll use scissors at the end to trim them up and to shape the tree. Ours are mostly the same length as you can see in the photograph above. Continue tying ribbons on until you reach the top. Please note...keep your "knots" all in the same direction which helps your tree to look nicer and more polished.

Once you've reached the top...lay the ornament down onto the table. Use a pair of scissors and trim all of your ribbons into a triangular shape to form your finished tree. The ones at the bottom will be longer than the ones at the top.

Take a piece of string or a piece of 1/8" sating ribbon and tie it into a hanging loop. Add a spot of glue at the top of your ornament and place the knotted end of the hanging loop into the glue. Add another spot of glue on top of that and add a satin ribbon bow and decorative button on top of that. Let your ornament air dry for approximately 4 hours.

This easy Christmas craft project is great for kids to do! The ornaments work up quickly and are inexpensive to make. A nice project for scout groups, classrooms or church youth groups too. They can be used as package toppers, hung onto a Christmas tree or placed all over the home to add some holiday cheer!

Thursday, November 5, 2015

Rustic Wood Gingerbread Man Ornaments

Last week we sat down at church with a group of 6-8 year old kids and whipped up these adorable wooden Gingerbread Christmas tree ornaments. It's a great little project for kids to do because it lets them paint and get creative.

All of the supplies we got at our local craft store and/or had them on hand. For each gingerbread ornament, here is what you will need:

Wooden Gingerbread Christmas Tree Ornaments

1 unfinished gingerbread man wood cut-out
jute or thin gauge rope
scraps of homespun fabric
buttons
1/4" diameter unfinished wood heart
bottle all-purpose craft glue
brown, pink, white and black acrylic craft paint
paint brush
paper towels

* Each unfinished gingerbread shape measures 4" to 5" tall.

Lay some newspapers down or an old plastic table cloth. Let the kids paint their gingerbread wooden shapes however they would like. (The one shown in the photo was done by an 8 year old girl). Once all of the paint is dry let them glue on ribbon, fabric bows, buttons or whatever else you have to decorate them. Let the paint and glue dry completely before hanging.

Note: Some of the kids decided to not glue on hanging loops and instead glued on magnets on the back and turned them into refrigerator magnets.

Tuesday, October 20, 2015

Kid's Crafts: Clothespin Airplane Christmas Tree Ornaments

Twice a month I hold regular arts & crafts play dates with my 6 1/2 year old grand daughter. Just like her grandmother (me) she loves to sit down and be creative! It doesn't matter what kind of craft project it is...she always enjoys doing them.

A few weeks ago we sat down and she made some really cute Clothespin Airplane Christmas tree ornaments! You only need a handful of craft supplies to make them and they work up really quickly.

Kid's Crafts: Clothespin Airplane Christmas Tree Ornaments

Acrylic Craft Paint - Variety of Colors
Paint Brush
Water Dish & Paper Towels
Wooden Clothespins (1 per plane)
Craft Sticks - Popsicle Sticks (we used 2 different sizes, 3 per plane)
6" to 8" String or Ribbon (per plane)
All Purpose Craft Glue
Newspaper

Lay newspaper or an old plastic tablecloth down on your work surface. We use acrylic craft paints and I use an old plastic lid from a butter tub as her painting palette. Just squirt a quarter size per pain color onto the plastic lid as it dries fast!

Let the kids paint the craft sticks and popsicle sticks one color and the wooden clothespin should be a different or contrasting color. Acrylic paint dries quickly and our's were completely dry within 30 minutes. 

Use all-purpose craft glue (or a hot glue gun with adult supervision) to glue on the craft sticks as airplane wings. Let dry. Once it has completely dried have the kids tie a hanging loop onto the center of the wooden clothespin so that it can be hung up on the Christmas tree.

Tip: The hanging loop needs to be tied around the 'center' of the plane so that it hangs correctly. If you tie it on in other areas...it hangs tilted. 

Monday, January 5, 2015

Kid's Crafts - Penguin Christmas Tree Ornament

In early December my grand daughter's school class held a crafting session and they made these adorable craft stick penguin Christmas tree ornaments that I wanted to share with all of you today. This ornament is a great project for kids 5 years old and up. You only need a handful of craft supplies.

Penguin Christmas Tree Ornament

black acrylic paint
white acrylic paint
paint brush
wooden craft stick
wooden popsicle stick
craft foam sheets in: black, white, medium blue, light blue and orange
1/8" satin ribbon
scissors
craft glue
paper pattern
pencil
paper towels and water (for rinsing paint brushes)

The teacher told me she drew out the shape for the penguin's wings, two head pieces, the beak, scarf and hat onto paper and then made her own paper patterns. She photo copied the paper patterns and had the children cut them out, trace them onto the foam sheets and then cut out the foam pieces.

The kids painted the wooden craft stick a solid black and the wooden popsicle stick solid white. These two wooden sticks were then glued together to form the body. They used the end of their paint brush to dot polka dots with white paint onto the foam scarf. They layered the white face shape onto the black face shape using glue & then glued the beak on top. They used the end of their paint brushes to dot on eyes with black paint.

They layered the foam hat pieces together using glue and glued it off-center onto the penguin's head. They cut a piece of 1/8" by 5" long satin ribbon and tied it into a loop and then glued it behind the head so that it can be hung on the tree after it has dried.

The shapes the teacher used are very easy to make and she free-handed them onto paper and to scale to work with the wooden penguin body. I am sure you can come up with something similar to these too. The entire class loved making these Penguin Christmas tree ornaments.

Tuesday, December 30, 2014

How to Make Peace Sign Holiday Ornaments with Beads

I know I am a little late with this blog post but I still wanted to show you what the kids made two weeks ago at Girl Scouts during one of their "craft" sessions. The girls made these adorable Peace Sign Holiday Ornaments using pipe cleaners, ribbon and beads. They then gave them to their parents and grand parents to hang on our Christmas trees.

They used the instructions on how to make a peace sign holiday ornament from ----> HERE. As you can see, the author provides great step by step instructions along with photographs. Once you make one of them, you will be able to breeze through multiples in rapid fashion. What a great little project for school kids, scouting groups, etc.

The only changes the girls made was instead of using tri-beads like the author suggested, the girls decided to use pony beads because they were on-sale at our local craft supply store. The girls made them in tradition red, green and clear/white. You can use any color combination that you would like.

Very cute and easy Christmas ornaments that the kids can make and you only need a handful of crafting supplies and scissors! Use them as holiday ornaments on the tree or as cute little adornments on your Christmas packages. Enjoy!

Wednesday, December 10, 2014

Craft Project - Faux Pearl Snowflake Holiday Ornaments

Last year our local dollar store had packages of white plastic snowflake Christmas tree ornaments on sale (after Christmas they were two packages for $1.00) so I snagged several packages for future crafting needs. While I was there, I also purchased two packages of silver metallic pipe cleaners and a bottle of tacky glue. I threw everything into a bin and finally got busy crafting some ornaments.

These faux pearl, beaded and plastic snowflake ornaments are really easy-to-make. If you have older children, they can help you with them and each one will cost about $1.00 to make once finished. Here is what you need and some instructions.
Faux Pearl Snowflake Christmas Tree Ornaments

2 pkgs. White Plastic Snowflake Ornaments
1-2 pkgs. Silver Pipe Cleaners
Small Oval White Faux Pearls
Small Round Colored Pearls
Small Round Faceted Beads
Satin Ribbon Roses (for the center)
Bottle of Tacky Glue or Glue Gun
Scissors or Wire Cutters

Note: For our project I used white faux oval pearls, round mint green faux pearls and clear round faceted beads. You can use any shape or color of beads or pearls that you have on hand.

Use scissors or wire cutters to cut down your pipe cleaner into sticks that are shorter than the snowflake. We simply glued them onto the plastic snowflake to add color and dimension to the ornament. Let dry. Slightly bend each end and glue on a faux pearl or bead. Let dry and then bend the little arm (pipe cleaner) back into place. You can also glue them on before affixing them to the snowflake but we preferred doing it the other way. Each pipe cleaner end should get a bead or faux pearl. To finish them up, we simply glued a large bead, satin ribbon rose or other small items onto the center of our snowflakes. For some of them, we glued fancy metallic buttons into the middle which really jazzed them up. Use whatever you like and have on-hand.

As you can see, they look a whole lot nicer than just slapping those cheap plastic snowflake ornaments all over your Christmas tree. You can really decorate those things a slew of different ways and it is a great way to use up some of your left-over crafting supplies. Enjoy!

Saturday, December 21, 2013

Handpainted Glass Snowman Snowball Ornaments

A friend of mine knows I love decorating for the holidays in a snowman theme and every year one of my small Christmas trees is decorated in a snowman theme. For that particular theme tree, I hang all of my various snowmen ornaments onto it.

Last week she brought over these 2" diameter glass ball ornaments that she had made for me in the cutest snowman design. I am NOT a decorative painter but the design is simple enough I think I could make some of these too!

She purchased 2" diameter white glass Christmas ornament balls and then painted them by hand. She simply painted on a red hat, black eyes, black coal mouth and an orange carrot nose. She used some of that white textured snow paint to paint the faux fur trim around the snowman's hat.

After they dried, she sprayed each ornament with a thin coating of clear acrylic spray sealer to seal in the paint which helps it to resist fading, cracking and chipping. She then left them dry a second time for a full 24 hours before bringing them over to me.

I think they are the cutest little things and now I got an entire dozen of them hanging on my snowman theme Christmas tree! A cute, simple & quick Christmas tree ornament project!

Tuesday, December 17, 2013

DIY Seashell Christmas Tree Ornament Craft Project

This year I have finally put up my coastal theme Christmas tree and I am pretty excited about it. I went out and got a 5 foot pre-lit artificial tree which I just love...it looks realistic and is the perfect size for my dining room.

When we were on vacation down to the Jersey Shore back in September I found these seashells in a local shop on clearance for .15 cents each. I picked up a dozen of them at that time and now I wish I would of gotten more!

I brought them home and washed them up. I then hit each of them with a coat of clear acrylic spray sealer with a glossy finish. I sprayed one thin coat on each side and then sprinkled some iridescent glitter onto them...very fine glitter! I then left them dry.

Instead of using gold cording or satin ribbon to hang them onto my tree...I decided to use those ball & chain style key chain hangers which worked out fabulously! You can pick them up at your local craft store and I got 24 of them for only $2.00.

You could lay the glitter on them heavier than what I did but I like them with just a tad of the very fine glitter as I wanted the seashells to just be classically plain in nature...like the way they are found on the beach or floating in the water without a bunch of decorations on them.

I love having them on my coastal theme Christmas tree and think they look fabulous! Next year when we go back I am going to get some more but in different styles, sizes and shapes to add to my tree next year. A quick, easy and affordable coastal theme Christmas seashell ornament!

Friday, December 13, 2013

Handpainted Clam Shell Santa Claus Christmas Ornaments

For the first time in many years I am putting up a beach and coastal theme Christmas tree. Matter of fact, it is almost done! It is a 5 foot pre-lit artificial tree which is the perfect size for a theme tree and its currently sitting in my dining room in front of our large bay window.

A friend of mine who is an artist made me some of these adorable clam shell Christmas tree ornaments and she handpainted Santa Claus onto them. I love that each one is different and unique thanks to the shape & size of each clam shell. 

She did a great job with painting them and she really added some texture and depth to them by trimming out Santa's hat with some of that white textured snow paint that you can find at craft stores across the country. 

Each one took her less than 45 minutes to paint and then 2 to 3 hours of drying time. Once dry, she sprayed each one with some clear acrylic sealer to help preserve the paint from getting scratches or from chipping off. She said she used 2 coats and on some she did it with a matte finish and on others she did a shiny finish. Totally up to you on what you like. 

She then used a glue gun and glued a satin ribbon hanger on the back so I could hang them up on my tree. I think they turned out great and she used the clam shells that I collected down at the beach (Wildwood NJ) and brought back home. Cost...just the paint, sealer and the ribbon. A great affordable coastal beach craft for all of you!

Monday, December 9, 2013

Handpainted Sand Dollar Holiday Ornaments

I decorate my home primarily in a beach and coastal theme. This year we decided to put up an extra Christmas tree and did it in a coastal and beach theme. It stands 5 foot tall and is pre-lit. We really love the slender shape to this artificial tree and it looks very real.

For the past few years I have been purchasing coastal and beach ornaments and finally have enough to decorate a full tree. Although its not as "full" as I would like, I am sure between now and this time next year...I will accumulate even more coastal ornaments.

A friend of mine does a lot of hand painting and is a great artist! She took some genuine sand dollars and handpainted beach scenes onto them for me. She did a fabulous job and I like how she did the painted design across the entire front of each 4" to 5" diameter sand dollar. I am not a great decorative painter but as you can see...she is!
For those of you who are talented in the decorative painting arena...I am sure you can get some ideas from the two sand dollar ornaments that my friend Jill made for me. Now I did show her a few of my vacation photos from back in 2006 to give her some ideas on what design I would like and she did a great job at figuring that all out.

Each ornament has a satin ribbon to hang it up onto the tree and she does have a clear protective coating painted over the top of each sand dollar to protect the painted surface from chips and scratches. Cute, Cute, Cute!

So for those of you who have access to some sand dollars and who can do some decorative painting, these would be a great project for you to do. Enjoy!

Thursday, December 20, 2012

15 Creative Ideas: Recycling Holiday Greeting Cards


During the Holiday and Christmas Seasons, we all get an abundance of Holiday Greeting Cards. Once the holiday has passed, what do you do with them? Don't throw them away!

I have 15 creative ideas to share with you, on how you can recycle and reuse those Greeting Cards.

1. Holiday Place Card Settings. Cut down your greeting card to a 4" high by 3" wide size. Fold and score the card in the center, making a 'tent' shape. You can write the guests name inside the card.

2. Postcards. Cut the back off. Use the front side as a postcard.

3. Beverage Coasters. Cut your card to a 4" square size. You now have disposable beverage coasters for your next party. If you would like permanent coasters, seal the design in clear contact paper.

4. Refrigerator Magnets. Cut out pretty designs from the front. Seal the design with clear contact paper. Glue a small magnet on the back.

5. Coat and Sweater Pins. Cut out some small pretty designs from your cards. Glue a 1" pin closure onto the back.

6. Recipe Cards. Cut down your card to measure 3"x 5" in size. Write your favorite holiday recipes on the blank backside. You can hand them out at your holiday party or at your cookie exchange party.

7. Wall Decorations. You can mat and frame your greeting cards.

8. Scrapbooking and Cardmaking. To make your items archival safe, lightly spray them with Archival Mist.

9. Bookmarks. Cut your card to a 1 1/2" by 7" size. Use a hole punch to punch a hole near the top edge. Attach a ribbon or tassel through the hole.

10. Gift Bag and Package Tags. Cut down to a 1" by 3" size. Hole punch a hole in the left upper corner so that you can attach the tag to the package with ribbon.

11. Tree Ornaments. Cut out 3" and 4" diameter designs. Hole punch a hole near the top center. Use ribbon to make a hanger.

12. Jar Lid Toppers. If you are making gift mixes to give as Holiday gifts, cut out a circle design to fit the top of your jar lid. Glue to the jar lid using all-purpose crafting glue or a scrapbooking glue stick.

13. Holiday Placemats. Cut a sheet of poster board to desired placement length. Glue card fronts onto poster board. Seal both sides of poster board with clear contact paper.

14. Charm Tags. Cut out 2" diameter circles. Hole punch a hole near the to center edge. Using a key chain finding, insert chain through hole. Instant way to dress up your purse, backpack, and key chains for the holidays.

15. CD/DVD Jewel Case Covers. Dress up those holiday self-made DVDs and CDs by making your own jewel case covers. Cut down greeting cards to fit inside the case, using the case as a template.

I hope these 15 crafty ideas have inspired your own creative ideas. Remember, Don't throw them away. It's time to Recycle and Reuse those greeting cards!
Article Written by Shelly Hill ~ Owner of Passionate About Crafting Blog.

Wednesday, December 7, 2011

Kid's Craft Project | A Christmas Angel Your Own Little Angel Can Make

A Christmas Angel Your Own Little Angel Can Make by Denise Willms

Here is an easy Christmas craft your preschooler can make with a little help and supervision. Even if your preschooler isn’t always an angel, she can still help you decorate a Christmas tree with beautiful paper angels.

What you need:

Construction paper (any color)
Scissors
Pencil
Cotton ball
Items to make large and small circle patterns (plate, coin, lid)
White paper
Glue

What you do:

First, use a large circle pattern and draw a large circle on the construction paper. Cut out the circle and fold it in half. Then cut the circle in half, along the fold. Bend the half circle into a cone. Staple or glue the cone together. This will be the angel’s body.

Fold the sheet of white paper in half. Place a small circle pattern on the paper so that the edge of the circle is touching the fold. Trace the circle and cut it out. Do not cut across the fold. When you unfold the paper, you want to have two attached circles. This will be the angel’s face.

One of the small circles, draw a face. Glue a cotton ball on the other small circle for the angel’s hair. Glue the bottom of each circle to the top of the angel’s body (the cone).

Now fold another piece of construction paper in half. Draw a wing that touches the fold, so that when it’s cut out you will have two wings joined together. Cut it out, unfold and glue the wings across the angel’s back. A stapler might work better.

Decorate your angel with paper doilies, glitter, or anything else you have on hand. You can put it on top of the Christmas tree, or attach a string to the angel’s head and hang it from a branch on the Christmas tree.

Denise Willms is a homeschooling mom of two, and owner of WAHM-Articles.com. You can find more information on homeschooling at http://www.learnhowtohomeschool.com


Friday, December 2, 2011

Pipe Cleaner Candy Cane Ornament – An Easy Preschool Christmas Craft

Pipe Cleaner Candy Cane Ornament – An Easy Preschool Christmas Craft by Denise Willms

No Christmas tree is complete without those red and white Christmas confectionary delights – candy canes. But if you’d rather keep the extra sugar out of the house and away from your preschoolers, here’s an easy and fun Christmas ornament your children can make.

What you need:

Red crepe paper or red ribbon
A white pipe cleaner
Scissors
Glue

What you do:

First, bend the pipe cleaner into a candy cane shape. Then cut a thin strip of the paper. Wrap the strip of paper around the pipe cleaner, leaving enough space so some of the pipe cleaner shows.
Glue the ends of the paper or ribbon to the pipe cleaner. When your candy cane is complete, you can hang it on the Christmas tree or attach it to your wrapped presents. Experiment with different colors to make your Christmas tree festive.

Denise Willms is a homeschooling mom of two, and owner of WAHM-Articles.com. You can find more information on homeschooling at http://www.learnhowtohomeschool.com

Tuesday, January 25, 2011

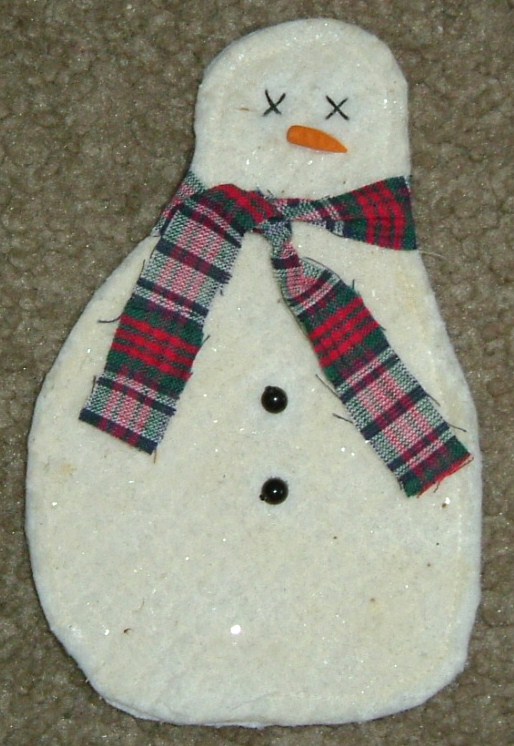
How To Make A Primitive Snowman Holiday Ornament or Refrigerator Magnet Pattern

Love snowmen? Like to decorate your home with snowmen during the entire winter season? If so, I have a really easy snowman project to share with you today. This project is easy enough that even a beginner crafter can master making one...or several of them in just one afternoon.

You will need just a handful of basic sewing and craft supplies that can be purchased at your general craft supply store. I used a sewing machine to make mine but you can certainly hand stich him together too!

Here are the supplies you will need to make one.

Warm 'n Natural Cotton Batting (natural off-white color)
Black Embroidery Floss
Orange Fimo Clay (just a tiny pea sized amount)
2 Plastic 4 MM Round Beads
Scrap of Homespun Cotton Fabric (measuring 1/2" by 7" in length for scarf)
Sharp Fabric Scissors
Sewing Machine and Basic Sewing Supplies
Clear Drying Modge Podge (decopauge medium)
Clear Crystal Glitter (fine grade)
Foam Stenciling Brush
Pattern

To Make Your Pattern: Hand draw a snowman shape onto paper that measures approximately 6" tall by 4 1/2" wide at his widest point. Cut out your shape and use as your pattern template.

Use your paper pattern and trace around it onto two pieces of cotton batting. Cut out the pieces. In a plastic cup or throw away bowl, pour 5 tablespoons of Modge Podges into the bowl along with 5 tablespoons of water. Stir until combined. Sprinkle in 1 to to 2 teaspoons of the glitter and stir again. Using your foam stenciling brush, brush the mixture across both pieces of your batting. Let air dry. (takes about 1 hour to completely dry).

Using six strands of black embroidery floss, stitch two X's onto his face to resemble his eyes, fasten off in the back so your ends and knots don't show on the front. Using a pea sized piece of orange Fimo clay, roll it out in the shape of a carrot for his nose. Bake the nose in the oven according to the package directions on your clay pack. Using three strands of black embroidery floss, attach your two round plastic beads onto the snowman's belly to resemble is black coat buttons, fasten floss off in the back so knots don't show on the front.

Using your sewing machine, place wrong sides together and straight stitch 1/8" in from the edges, leaving the bottom of the snowman open for turning. Once done, turn him right side out and finish the bottom edge stitching by hand. Cut a piece of homespun cotton fabric into a strip that measures 1/2" by 7" in length and tie it around his neck to resemble his scarf.

Variations: If you want to turn it into an ornament, thread a piece of white floss through the top to hang him on your tree or packages. If you want to turn him into a refrigerator magnet, glue 2-3 magnet disks onto his back side with hot glue or craft glue.