Sunday, November 30, 2014

2 Quick and Easy Wedding Scrapbook Layout Ideas

My daughter got married back in early September of this year. She has hundreds upon hundreds of photographs from her wedding day and we have been spending some time together scrapbooking them.

Today I am sharing with all of you 2 quick & easy wedding scrapbooking layouts that are great for beginners or for the person who doesn't like a lot of clutter or frills on their pages. I am not going to go into a lot of detail with this post because seeing the photos should suffice.

The photo above shows the "It's Time" scrapbook layout which features 3 photos that were slightly cropped down, matted onto royal blue cardstock and placed onto a printed background paper in a floral design. She used some royal blue fibers to decorate the page, black alpha letters for her title and some cardstock wedding heart stickers for embellishments.

The second page (shown above) coordinates with the first page (both are on the same floral printed background paper). This page features one 5" by 7" photo of the new couple which was matted onto white and royal blue cardstock (double mats). She used my Cricut to cut out her title letters from royal blue cardstock and used glue dots to affix them to the page.

The bottom is a piece of very expensive satin ribbon with dangling white pearls leftover from a wedding reception decor project that she had made. She wanted to incorporate that "scrap" into her layout. She then finished up my adding two cardstock stickers (embellishments) to the page, one on each side of her photo.

Like I said, these are 2 quick and easy wedding scrapbooking layouts that don't take a lot of time, hard work or money to make. Some people enjoy "frugal" scrapbooking and don't want to invest an arm & a leg into their layouts. Enjoy!

Tuesday, November 25, 2014

Here Comes the Bride Scrapbooking Layout Idea

Our daughter got married back in early September and I am finally getting around to scrapbooking a few wedding pages for her. When I do her pages, I don't make them too cluttered or too elaborate as she really likes the simplistic look when it comes to her scrapbook pages.

This particular bridal and wedding page would be a great one for a beginner or for someone who enjoys the simple look just like her. The page features 3 wedding photos of her dad walking her down the aisle to say her "I Do's".

The background is a sheet of dark blue 12" by 12" piece of cardstock. On top of that is a piece of 10" by 10" floral print scrapbooking paper. Framing that smaller 10" sheet is 1/2" wide by 10" long silver satin ribbon which was applied using glue dots.

All three photos were cropped down slightly and matted onto dark blue cardstock with a 3/16" edge and then applied to the page with double-sided stick tape. You could place your three photos any where on the page that you would like.

The title is a piece of pre-printed vellum that says "Here Comes the Bride" which was framed up using dark blue cardstock. I added a tiny silver metal star for the i in Bride to just jazz it up a bit and a sheer white ribbon bow accents the right corner of the title block. The only other embellishment is a white 3-dimensional heart sticker with a texture to it and I accented that with a 1/4" diameter faux half-pearl. I used a foam adhesive dot to place it onto the page.

The scrapbooking layout is a lot prettier than what my photo shows because my digital camera flash kept lightening things up and causing flash-back! Ugh! As I work on her wedding scrapbooking, I will post additional layouts as I complete them so keep checking back for more. Some will be simple in design (like this one) and others will be more elaborate.

Thursday, November 20, 2014

Quick and Easy Christmas Scrapbooking Layout Idea

It is hard to believe but another Christmas holiday is quickly approaching and I am still scrapbooking my photos from 2013. I guess I really need to pick up the pace and get caught up so I am ready for Christmas 2014.

Last week I sat down and made this really quick and easy Christmas Scrapbook Layout which took me less than 1 hour to make. Plus, I had all of the supplies on-hand and left-over from previous layouts that I had made. I guess you could say, it is a "frugal" layout and great for beginners.

My background is one sheet of holiday printed paper from Paper Pizazz - Hot off the Press called Corner Ornaments. It is done in your traditional red, off-white and green color scheme accented with blue and gold.

I had 4 photos which I cropped down. The 2 larger ones are the same size and the 2 smaller ones are the same size, arranged in a grid. I matted them onto dark green cardstock and then red cardstock leaving an 1/8" edge around all mats.
The title of my page is "Presents for Me" and I picked that as my title because my little grand daughter kept saying "is that a present for me?" all day long. She was so cute! I used Alpha Letter Stickers in red for my title and used 3 tiny green holly stickers to accent the letter P, the letter o and the letter E in the word ME.

In the top right corner I used a 3-dimensional ornament embellishment (forget which brand) which I applied to the layout using foam dots. I used some gold metallic cord to hang them and taped the ends down on the back of the page. I stamped the words "Merry Christmas" onto off-white cardstock using red ink. I then matted my words on green and red cardstock and attached it to the page using foam dots. I decided to not do any journaling as I don't like my pages too cluttered up.

Over the next couple of weeks I will share a few more holiday scrapbook layouts with all of you as I get them completed. Thanks for reading my craft blog!

Saturday, November 15, 2014

Traditional Christmas Scrapbook Layout Idea

Since we have moved into our new house I haven't had too much time to scrapbook or craft like I used too. We have been super busy remodeling every inch of this home and finally, I am starting to see the light at the end of the tunnel. I am pretty excited that in Spring of 2015 my craft & sewing room will be getting a complete remodel!!! Yay!!!

Anyway, I am finally sitting down to tackle some of my Christmas photos from 2013 and came up with a really easy Christmas Scrapbook Layout that would be great for beginners or for those who don't want to put a lot of money or time into their page. This scrapbooking layout was done in the 12 x 12 format size.

Craft Tip: We save all of our greeting cards that we get. I then recycle them and use them as embellishments on my scrapbook pages or in other paper projects. This layout I recycled 2 different Christmas greeting cards. The stack of "presents" embellishments was cut from the center of a card. The "Gifts of the Season" wordage from the same card. The other 3 words "The Best", "Time of Year" and "Merry Christmas" were all from the second card. I matted them onto red and green cardstock and used glue dots and 3-D foam dots to add dimension to them.

My background is a sheet of 12 x 12 scrapbooking paper with a holiday print along the right bottom corner. From another sheet of printed holiday paper I made my top border strip which measures 1 1/4" by 11" in size. I then matted that with red cardstock and green cardstock and ran it across the top of my scrapbook layout.

I used 3 photos of my little grand daughter opening up her Christmas gifts on Christmas morning. I cropped them down to "almost" square size but not quite. I matted them onto green cardstock and ran the photo strip down the left side of my page. Along side that, to the left you will see a poinsettia sticker border which I added for color and design. I then cut a round holiday paper doily into thirds. I slid the one third of it underneath the photo strip with some glue dots with just about 1" of it sticking out. It has a poinsettia print on it with a scallop edge. Alongside the photos I did some tiny journaling in my own handwriting.

The greeting card embellishments I spoke about earlier are all arranged on the right side in my layout. I did add a 3-dimensional poinsettia flower made out of foam embellishment to add texture to that mix so that not everything was paper. To finish things up, I added 3 large satin finish embellishment stickers to the bottom which are holiday ornaments done in red with metallic gold & silver accents.

Overall, I am pleased how it turned out since I used mostly paper scraps, embellishments I had on-hand leftover from other projects and so forth. This page took me about an hour to make.

Tuesday, November 11, 2014

4 Generations Scrapbooking Layout Page Idea

Recently my daughter got married in a beautiful outdoor ceremony. Her wedding was absolutely gorgeous and she made for a beautiful bride. To remember her special day, we had the photographer take two photographs featuring 4 generations of family members. These photos include my 66 year old mother, myself, my 29 year old daughter and my 5 1/2 year old little grand daughter.

For the scrapbooking page...I wanted it to be simple and uncluttered as I wanted the two photos to speak for themselves. I think I accomplished that nicely with a simple scrapbooking layout.

The background is a sheet of silver metallic scardstock 12" by 12" size. There is a texture to that piece of cardstock and I like that it is shiny, but not overly so. I slightly cropped down both photos and matted them onto royal blue cardstock, leaving an 1/8" edge.

I used my Cricut to cut out my title letters...a number 4 and the letters to spell out the word Generations. I also used my Cricut to cut out my flourish at the top of the page, all from royal blue cardstock. I matted the number 4 onto a piece of silver cardstock and then matted it onto the royal blue. I did do a little inking around the edges. I added 2 tiny rhinestones to the curls in the flourish to glam it up just a bit.

For embellishments, I made my own bouquet of flowers from royal blue silk flowers, tied them together with royal blue satin ribbon and then added a light blue ribbon bow with a tiny pearl in the center to jazz it up. On each side of that are heart shaped cardstock stickers applied with foam dots. I enhanced the hearts with tiny adhesive-back rhinestones.

I love how clean and uncluttered this scrapbooking layout looks! The photos really do speak for themselves and I am glad we got the photographer to take these two photos for us.

Wednesday, November 5, 2014

Beach Lover Scrapbooking Layout Idea

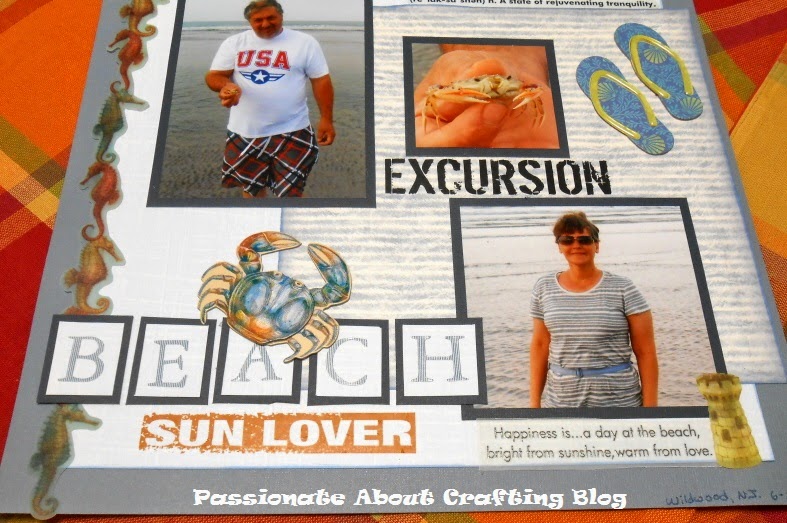
A few weeks ago I sat down and came up with this very easy Beach theme'd scrapbooking page. This layout is done in the 12 x 12 format and features 3 photos with numerous embellishments. The photos were ones I took while we were on vacation down at the Jersey Shore back in June of 2014. Hubby and I love to walk the beach and do it twice a day, every day we are there.

My background is a sheet of muted blue 12 x 12 piece of cardstock. I then took a piece of light pale blue and white destressed scrapbooking paper and cropped it down to 10" by 10" in size. I centered it on top of the blue cardstock. I then took a sheet of 8" by 8" pale blue & white striped scrapbooking paper and inked around the edges and placed it on top but off-centered (see photo).

All 3 photos were matted onto dark blue cardstock with a 3/16" edge. The one photo on the left of my hubby is showing him holding a crab. To the right of that one is a smaller square-shaped photo showing the crab close-up. The bottom photo is me standing on the beach at sunset.

The seahorse border strip is a vellum strip from K&Co. as well as the blue crab cardstock sticker that accents my BEACH title. To make my title, I simply placed Alpha letters onto light blue paper and matted them up with dark blue cardstock. The words "Sunburn", "Sun Lover" and "Excursion" are all rub-ons. Can't remember who makes them.

The "Relaxation" quote sticker and the "Happiness Is" quote sticker are left-overs I had from another project so I can't remember who made those either. To finish up the layout, I added a thick chipboard sticker of blue Flip-Flops and a vellum Sandcastle sticker to the page.

This is a really easy page design and would be great for a beginner or someone who doesn't want to spend a lot of money or time doing one scrapbooking page. I am pleased with how it looks!

Sunday, November 2, 2014

Turtle Conservation Scrapbooking Layout Idea

A few months ago my family and I took a tour at the Wetlands Institute in Stone Harbor New Jersey. This institute is really big on turtle conversation and preserving the natural coastal habitat of the Jersey Shore.

Last month I showed you all the coordinating page in this 2-page layout and today is the second page. This one goes nicely with the first one and is in the 12 x 12 format.

The background is a sheet of printed cardstock in a muted green and light sand colored print. I had 4 photos and I cropped 2 down into rectangular shapes and 2 down into square shapes. I matted them onto a solid piece of olive green cardstock (see photo above).

I had 2 turtle themed embellishments and I placed one in each square to fill out my photo grid. There are 2 titles on this page "Turtles" which I used my Cricut to cut out the cardstock letters from olive green cardstock and the "Cowabunga" which is a cardstock 3-dimensional cutout adhered to the page with foam dots. I accented that with a small felt butterfly sticker right above the letter C.

I did add a K & C palm tree cutout to just add some interest because this is a coastal area and I wanted something tropical looking on the page.  I ran a 1/4" by 12" piece of tie-dye green fiber along the top and bottom of the photo strip using glue dots. To finish up everything, I used some clear gel adhesive words on the layout in various places.

Overall, I like the layout. I didn't want it to be too cluttered as I wanted the focus to me on the turtles and the tour that we took. The coordinating page to this one has my journaling and other embellishments on it along with how the Wetlands Institute is involved in turtle conservation. You can find that layout and story right here on my blog in the scrapbooking section.