When it comes to decorating my holiday tree, I am a big fan of handcrafted holiday ornaments...especially ones that feature adorable little snowmen!
For this project, you will need your basic crafting supplies and some batting and fabric scraps. You can hand sew or machine sew him together in less than 10 minutes. The really fun part comes when its time to decorate them. Mine are pretty plain and simple but I am sure with your imagination, you could fancy them up even further.
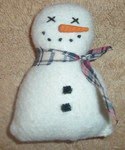
Sam and Samantha Felt Snowman Ornaments
Supplies Needed
pattern
cotton batting (Warm 'N Natural works great) or cotton felt
small amount of poly fill stuffing
black embroidery floss
scraps of a black pipe cleaner
scrap piece of homespun fabric
fabric hats or crochet hats (optional)
orange Sculpey Clay
gold metallic cord for hanging
all-purpose crafting glue
off-white sewing thread with a sewing needle
scissors
Pattern: I made my own by just free-handing a basic snowman shape that measures approximately 5" tall by 3 1/2" wide. My pattern reminds me of a bowling pin shape.
Carrot Nose: I made my own with Sculpey Clay. You will need a piece that measures about the size of a green pea. Roll it into a small ball and then into a carrot or tear drop shape. I used a toothpick to indent lines onto it to give it texture. I then baked it in my toaster oven on 200 degrees for 5 minutes to get it to harden.
Step 1: Trace your pattern onto a double layer of cotton batting, but reserve the cutting for later. Using black embroidery floss (3 strands), hand stitch two X's to resemble eyes and five french knots to resemble the mouth. Glue on the clay nose. (see photograph for placement of stitches and nose).
Step 2: You can hand sew or machine sew on your pattern line, just make sure that the right sides are together. Trim your fabric to within 1/4" of the sewn line. Once completed, cut a small 2" slit in the back of the body and turn the snowman inside out so that the front side is now on the outside. Lightly stuff him with poly fiber fill and hand sew the turning slit closed with thread.
Step 3: Snip off two small pieces from your black pipe cleaner and glue them onto the belly to represent buttons. Cut a piece of homespun fabric that measures 1/2" by 5" in length and tie it around the neck for the scarf. Trim the ends if they are too long.
Step 4: You can make your own little hats out of felt, yarn (crochet/knit) or purchase them pre-made from your local craft supply store. For my project, I used a crochet-style hat on my female and no hat on my male. Just my personal preference.
Step 5: Cut a piece of gold metallic cord that measures 5" in length and thread it through the top of your snowman for the hanging cord. That's it, they are now ready to hang on your holiday tree.

This pattern/instructions is copyright 2009 by Shelly Hill, All Rights Reserved. You make link to this post from your web site/blog but can not directly copy my instructions to your site. Thanks!


No comments:
Post a Comment
Thank You For Leaving Me A Message! Happy Crafting :)