Anyway...I searched and searched for some coastal style window well coverings and couldn't find any. All the ones that I found that would work were plain ugly white ones and I didn't want that. So, the crafter in me got busy and I made my own coastal style window well coverings. Here is how I made them.
Coastal Window Well Coverings Supplies List:
Plywood, Tape Measure and Saw
Sea Shells in various colors, sizes and shapes
White Primer Spray Paint
Clear Acrylic Spray Sealer
Clear or White Adhesive Glue
Sanded Grout with Grout Spreader
Faux Sea Glass (We used Colored Glass Stones)
** Tip - You want to use sanded grout and not regular grout!!! The sanded grout will give the appearance that the shells & faux sea glass are floating in the sand which is the look you are trying to achieve.
Step by Step Instructions:
We measured 3" beyond our window well and made a pattern in the shape of an arc. We then drew our pattern onto the plywood and hubby used his saw to cut it out. You do not need to use a sander since you are covering it up with your mosaic masterpiece. Spray paint all sides of the plywood with white primer...I believe we used Kilz. Let it dry for at least 8 hours.
Spread the adhesive onto small sections of the plywood, spreading it to about 1/8" thick. Press your seashells and sea glass (glass stones) into a random pattern...ours are close together but not too close since you will be filling in those gaps with grout. Keep repeating this step until your entire board is covered. Let everything dry for 24 hours.
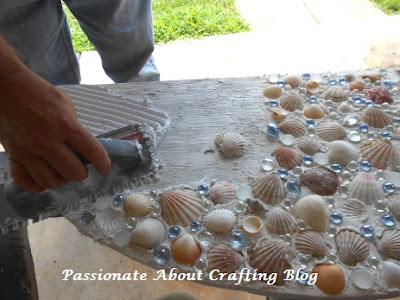
Follow the instructions on the sanded grout package and mix it up with the required amount of water. Spread the grout onto your board filling in all of those crevices. You need to work quickly and work in small sections. We used a garden hose and a cotton cloth to rinse off the grout from the seashells and sea glass as we didn't want it on those! Once all of your grouting is done...let it dry for 24 hours.
The final step is to spray clear acrylic sealer all over the top and sides of your design. Let it dry overnight and the next day you want to hit it with a second coat and let it dry for 24 additional hours. Once it is fully dry, you can play your new cover over your window well.
I think ours turned out fabulously! We have done 2 so far and have 1 more to go and that project is on our to-do list next month. Each window well cover took us several days to complete and that is mostly the drying time for the paint, grout and sealer. Enjoy!


No comments:
Post a Comment
Thank You For Leaving Me A Message! Happy Crafting :)