Showing posts with label Home Decor. Show all posts

Monday, September 9, 2019

Pallet Wood Seashell Covered Seahorse Wall Art

Last month I made this adorable seashell covered seahorse by using pallet wood and seashells that I've collected from the beach. It stands a little over 2 foot tall and is now hanging on the wall in our sun room. It took my husband one afternoon to do the wood portion and it took me 3 days to do the seashells.

If you're interested in learning how I made it along with assembly tips you'll want to check out my post over on my other blog TwoClassyChics.com. The Coastal Craft: Seashell Covered Seahorse Wall Art has become one of my most popular posts over on the blog, so I wanted to mention it over here too.
Pallet Wood Seashell Covered Seahorse Wall Art

Living at the beach or traveling to the beach often has its perks! I used over 250+ shells to make it. You'll need to collect a lot of tiny, small and medium-sized seashells if you plan on making one. The pallet wood was FREE (hubby gets those at work, brings them home, tears them a part) and we use them in various craft and landscaping projects around our home.

I love the coastal and beach lifestyle, so I'm always making new projects that work with that home decor theme. Since completing the seahorse, I'm already working on a dolphin, whale and mermaid tail one too. They're easy to make, but do take several days to complete. My only expense was a few nails, screws, wood glue, E6000 adhesive glue, clear acrylic spray sealer and a sawtooth hanger on the back so that I could hang it up. That's about it!

Wednesday, August 7, 2019

Kid's Crafts Painted Seashells Beach Vacation Memories

This past June we took both of our grandchildren down to the beach for summer vacation. The kids enjoy playing in the sand, jumping waves in the ocean and collecting seashells from the beach. Over the years I've taught them to ONLY collect the un-occupied shells and to put occupied shells back onto the beach.

Like most kids...they love collecting seashells and when we got home we had 3 bags of shells that we could use for crafting and home decorating. We decided to paint on a few of the larger clam shells that we collected that measure at least 5" in width. Before you paint on them you'll want to wash them really well with liquid dish soap and water. Let them dry for out in the sunshine until completely dry. It's important to remove the debris, sand, and the smell.
Kid's Crafts Painted Seashells Beach Vacation Memories

You can use acrylic craft paints and paint brushes or you can use acrylic paint pens or markers. My 10 year old granddaughter made the one shown in the photograph using ONLY acrylic paint pens that we purchased from Amazon. They're great if you want a no-mess craft project to do with the kids, plus they dry quickly.

The Princess painted a beach scene featuring glistening, golden, sandy beach, waves crashing onshore, the Atlantic Ocean in the background with sea gulls flying above. I think she did a really nice job! On the back of the shell she wrote her name and the date. To protect the painted design we sprayed them with 2 coats of clear acrylic spray sealer and left them dry overnight.

Painting on seashells that you collected while on vacation is a great way for children to preserve those beach vacation memories. Plus, it's a frugal craft and will cost you less than 50 cents to make (paint supplies), since the seashells are free!

Saturday, October 20, 2018

12 Easy-to-Make Seashell Craft Projects

I love the beach and coastal lifestyle, so obviously I love to collect and craft with seashells. My current seashell collection has over 150+ specimens and growing. I like to use my leftover seashells in various craft projects and to decorate my home.

Besides the Passionate About Crafting Blog, I also own another blog called Two Classy Chics, which is a mom & lifestyle blog. It's my largest and most popular blog. With that said, I've been posting the majority of my seashell craft projects over on the TCC Blog and wanted to highlight them here on Passionate About Crafting. 
12 Easy-to-Make Seashell Craft Projects

Here are 12 Easy-to-Make Seashell Craft Projects

* Seashell Windchime - Made with clam shells, paint and clear fishing line. This one will take you a few hours to make and you'll need a lot of smaller-sized clam shells to make it.

* Tropical Fish Seashell Yard Art - Made with a large clam shell, scallop shell and craft paint. 

* Seashell Soap Dish & Trinket Dish - I love making these and giving them out as gifts along with a bar of handcrafted soap.

* Painted Clam Shells for Summer Yard Art - You can use stencils or free-hand your own summer designs onto large clam shells. 

* Patriotic Design Painted Shells - These are fun to display in your flower beds, on your front porch, around the swimming pool or to decorate your table during summer picnics. 
Painted Patriotic Seashells

* Painted Puppy Dog Seashells - My grandchildren loved making these adorable puppy dog seashells. Fun to display if your a dog owner and love dogs! 

* DIY Coastal Style Flower Pots - You can easily paint your own terracotta flower pots and then decorate them with your favorite seashells. 

* Seashell Crabs Yard Art - You can make these adorable red crabs with large clam shells, pipe cleaners, acrylic craft paint and some glue. A fun way to decorate for summer! 

* Home Decor Metallic Painted Seashells - Use metallic paints in bright colors to paint some of your seashells, toss them into a larger shell or basket to decorate your home.
Vacation Beach Memories in a Glass Memory Block

* Displaying Beach Vacation Memories - Collect sand and seashells while on vacation and then display them in a glass memory block. 

* Seashell Refrigerator Magnets - I like to turn my smaller shells into refrigerator magnets! A quick and easy project that also makes a great little gift. 

* Panda Bear Painted Seashell - My granddaughter loves panda bears and made this adorable Panda Bear by utilizing a large clam shell for his head and 2 smaller shells for his ears. Cute! 

If you enjoy crafting with seashells you'll want to check out all of my Seashell Craft Projects by visiting my Two Classy Chics blog. You'll find over 100+ craft project designs! 

Friday, January 20, 2017

DIY Memorial Memory Wreath

DIY Memorial Memory Wreath
Last October we lost my mother-in-law to cancer. She had a beautiful and wonderful life up until 1 month before her death. She was the anchor in my husband's family and we all miss her very much. During the last month of her life, HOSPICE was coming into her home to help with her care. After she passed, HOSPICE invited the family to a DIY Memorial Memory Wreath craft event that they hosted at their local office.

Today, I wanted to share that easy-to-make craft project with all of you, as it's a great way to remember a loved one. In addition, most of the supplies used are items from your loved one.

DIY Memorial Memory Wreath

1 metal wire wreath form
1 cotton, flannel or fleece clothing item
fashion jewelry (can be whole or broken/missing pieces)
scissors
hot glue gun and glue
sheer ribbon 3" wide by 24" long
artificial flowers & greenery
old photographs
buttons and beads
DIY Memorial Memory Wreath

You'll want to cut the article of clothing into 1" by 4" strips. Tie each of these strips onto your metal wreath form, covering it and making sure that it's full, so that no metal areas show. We used a piece of my MIL's flannel pajama pants. Once you have all of your strips onto the wreath, you'll want to get busy decorating it.

We used several pieces of her fashion jewelry on the wreath...pins, pendants and earrings all work well. Use the hot glue gun to glue them into place. We then cut up some of her artificial flowers that she had in a vase and glued a few of those at the base of our wreath. You can opt to glue on old buttons, beads and even photographs of your loved one. You can get really creative with them, but the point is to use small items & trinkets that belonged to them!

Once you have your items glued on...take the ribbon and tie it into a bow. Glue it at the top of your wreath. You can leave the bow as-is or glue a piece of her jewelry in the center of it, like we did. Our wreath turned out really nicely and we thank HOSPICE for sharing this craft project with us.


Thursday, July 21, 2016

Coastal Beach Seashell Candle Holders

Last month we took an extended vacation down to the Jersey Shore. We spent 2 1/2 weeks at the condo and had a wonderful time. Every time we go down...I go shelling and pick up all of the seashells, sand dollars and star fish that I find. In addition, I always bring home a small zipper closure baggie full of beach sand. I like to use these things in various craft projects & home decor projects around my home.

Last week I whipped up 6 of these very easy-to-make beach seashell candle holders to sit out around our deck and near our swimming pool for an upcoming party that we are hosting. Here's how I made them.

Coastal & Beach Seashell Candle Holders

Colored Glass Mason Jars
Battery-Operated Votive or Tealight Candles
Beach Sand
Pebbles & Seashells
Jute Rope
Glue Gun & Hot Glue

I found the colored glass mason jars at my local craft supply store for $1.00 each on sale. I also picked up battery-operated tealight candles and a roll of jute.

You can fill your jar up with beach sand, smooth pebbles that you found on the beach and small seashells. Whatever you found on vacation...use it in the jar, including small pieces of driftwood. You can fill your jars up as far as you would like. Since I am using small tealights, I filled my jars up pretty full.

I then took hot glue and glued jute roping around the neck of each of my jars...I think 6-7 rows of it. I then glued small clam shells on top of the jute roping to finish them off. You can decorate the neck opening of the jar however you would like.  You can make them simple & plain like mine (that's the way I like them) or fancy them up. You can make them all the same or vary the design & fillings to suit your own taste.

These look so pretty sitting on the tables and our deck railing during the day and at night...they look even prettier with the candlelight glow.

Tuesday, May 10, 2016

4 Easy Ways to Display Your Beach Vacation Treasures

I decorate my home in a beach & coastal style and I'm always looking for quick and easy ways to display my collected beach vacation treasures. These beach vacation keepsakes include things such as: seashells, starfish, sand dollars, beach sand, drift wood, sea glass, coastal bird feathers, coral, sea pebbles and other things that I personally collect from the beach and ocean.

Today I'm going to share with all of you some simple ideas on how you can display your collected beach vacation treasures around your own home. All of these ideas are quick, easy and inexpensive!

For the first project...I took an empty & clean pasta jar with a wooden lid and filled it up with a slew of my beach treasures, including a dollar bill that hubby found in the sand. I took a white chalk paint maker and wrote "Beach Treasures" on the wooden lid and tied raffia around the pasta jar to finish off the look.

I took an older glass coffee or tea canister with lid and removed all of the labels from it. After I had it cleaned it...I placed all of my collected pebbles and smooth rocks inside it. I've been collecting these from one particular beach in New Jersey and hoping to have it completely filled up after our next Jersey Shore trip. Once filled, I'm going to tie some raffia around the neck of the canister to give it some pizzazz and will probably glue a small sand dollar on it.

I had an empty large glass vase that I picked up at the flea market for .50 cents and decided to make a seascape inside it. The sand that you see is sand that I brought home from vacation in a small zipper closure baggie. I used a low-temp glue gun to glue natural colored twine (thin-gauge rope) around the base to make it look a little bit rustic. I laid a chunky piece of white coral inside it along with various pieces of driftwood, sea shells and pebbles. I'm hoping to find myself a small sand dollar or starfish the next time I hit the beach to complete the look.

Finally, I purchased this white wood shadow box at my local craft supply store (A.C. Moore) and used a coupon to get it 50% off. I believe it cost me $10.00. It holds a combination of photographs and treasures...so I placed four photos of my family at the beach inside it and then filled up the remaining 5 cavities with my treasures: seashells, driftwood, sand dollar and a star fish. Now that I'm done with it, hubby is going to hang it up onto the wall for me next weekend.

I like simple things when it comes to coastal & beach decorating and I like them in soothing neutral tones. You can make these items even fancier and more colorful than what I did. You can whip them all up in one day and do so very inexpensively if you're on a budget. In the coming weeks, I'll share some additional coastal and beach craft ideas with all of you.

Thursday, September 10, 2015

Kid's Craft Project: Ceramic Tile Beverage Coasters

I love sitting down and doing craft projects with my 6 year old grand daughter when she visits me. Matter of fact, I put all of my various "scrap supplies" into one big box so that when she is visiting...we have a variety of supplies to work with.

A few weeks ago she was over and we decided to make some ceramic tile beverage coasters which were really easy to do. Hubby had several of these tiles left over from a bathroom remodeling project and we put them to good use!

Kid's Craft Project: Ceramic Tile Beverage Coasters

4" by 4" Ceramic Tile
Sharpie Markers
Clear Acrylic Spray Sealer
3 3/4" by 3 3/4" Piece of Felt
All Purpose Craft Glue
Newspaper

Lay down newspaper onto your table surface. We simply got out the Sharpie Markers and left her create any design that she wanted. It's important to let kids be creative on their own and to NOT instruct them on what to draw! She decided to make a design for her mom. Once she was done using the markers we left the coasters sit and dry for 2 hours.

Take the ceramic tiles outside and lightly spray the top side with clear acrylic sealer. Let dry for an hour or two and then repeat with a second coat. We did NOT coat the backside at all. Once the coaster is dry bring it back inside and use craft glue to attach a square piece of felt onto the back. Let dry overnight. The piece of felt needs to measure shorter than the size of your tile and it will help to protect furniture from scratches. That's it...you're done!

These ceramic tile beverage coasters would be cute ideas for kids to make for Valentine's Day, Easter, Mother's Day, Christmas...any time you need a quick, easy & crafty gift!

Wednesday, June 24, 2015

Kids Crafts - Clothespin Flower Planter

A few months ago my little grand daughter made these adorable flower plants at school. All you need are a few simple supplies (you probably around have them on hand) and within 30 minutes, a new little flower or garden planter.
Kid's Crafts - Clothespin Flower Garden Planter

1 empty tuna fish can (clean and dry)
14-18 wooden clothespins
washi tape or decorative self-stick ribbon
scissors
Make sure the tuna can is clean and thoroughly dry. Have your child clip on the clothespins going around the entire circumference of the can. You want to use clothespins that are new or fairly new (nice tight ones). Once done, let them decorate their new planter!

She used decorative Washi tape but you could use self-adhesive ribbons, lace, etc. If you really want to keep them occupied let them paint the clothespins different colors with acrylic paint and let dry before clipping them around the empty tuna can.

An inexpensive & quick kid's craft project that is perfect for the classroom (school), church youth groups, daycare centers, girl scout groups, etc. You can find the wooden clothespin at the Dollar Store to keep costs down.

Wednesday, June 17, 2015

DIY How to Repaint Metal Patio Chairs

Finished New Patio Chair Set
We picked up two black wrought iron patio chairs at the flea market for $5.00 each. They were in great condition but I didn't like the black color since I decorate in a beach and coastal theme. I brought them home and decided to give them a nice paint job and paint them white!

I hosed them down with our garden hose and towel dried them. I left them sit out in the sun for a good 2 hours to make sure they were 100% dry. I picked up 3 cans of white outdoor spray paint that included primer at my local Lowe's store.
Re-Painted Chair - Black to White
I lightly sprayed one coat on the chairs and left them dry for 12 hours. The next day I hit them with a second coat and left them dry for 24 hours. I also picked up 2 cans of a clear outdoor sealant and sprayed a coat of that on each chair to protect the paint finish and left them dry for another 24 hours.

At my local Christmas Tree Shop I picked up 2 round coastal print bistro chair pads which I just love! If you have never shopped that store, I highly recommend it! I get all kinds of beautiful home decor items and garden items for an affordable price every time I go in there!
New Patio Coastal Chairs!
Overall, I am very pleased with how my DIY re-painting patio chairs project turned out. For less than $40.00 I got brand new looking (and sturdy) patio chairs and chair pad cushions! Like the bird bath? Well, check back in a few weeks to see how I turned that into a patio table!!!

Wednesday, June 3, 2015

DIY - Turn an Old Bird Bath into a Patio Table

A few weeks ago we went down to the local Flea Market and I picked up a 2-piece heavy cement bird bath (used) for $5.00. This bird bath had some wear & tear since it had sat out in the elements (unfinished) for the past 2 years. Regardless, I thought it was a "steal" for $5 bucks!

My original plan was to refinish it and put it out into the yard as your typical bird bath. However, my plans quickly changed and I decided to turn it into a small patio or porch table. The reason I decided to do this was two things: it's on the smaller side and second...it has a flat bottom (in the bowl portion) which makes it a great table!

DIY - Turn an Old Bird Bath into an Outdoor Patio Table

We hosed it down and took some scrub brushes & bleach to it to remove all of the debris and moss/mold that was growing on it. We left it sit out in the hot sun for 24 hours to thoroughly dry. While it was drying, we headed over to one of my favorite stores...Lowe's.

At Lowe's I picked up 2 cans of outdoor spray paint that has that textured rocky finish to it in a natural color. I forget the brand but it's really nice spray paint at $10.00 a can. I also picked up 1 can of clear acrylic sealer at $7.00 a can.

When spraying your projects don't stand too close to the item when spraying or you will get drip & run marks. Make sure you stand back a bit and spray lightly!!! We covered both pieces of the bird bath with one can and then waited to the following day to add the second coat with the final can. It did indeed take BOTH cans!

We left the pieces dry for 24 hours out in the sun and then sprayed them with the clear acrylic sealer. I only used one can of sealer because the new bird bath table will be sitting under large front porch where it is partially sheltered from the elements. If you are sticking it out into your yard, I would suggest adding 2-3 coats of the clear sealer to it.

Since it has a flat bottom (in the bowl portion) I can use it as-is as a small patio side table. However, I decided to order a piece of thick clear glass cut into a round shape and I will be placing that glass on top of the table once it arrives. I am also thinking about adding some beach sand, seashells, sand dollars, coral and a star fish underneath the glass top to give it that coastal and beachy feel.

I will update this blog post once my glass top arrives and let you know how I decided to finish off the look...in other words, I might just add the glass top or I might add the glass top & the beach accessories underneath it. Overall, this was a fun project to complete!

Monday, May 18, 2015

DIY Coastal Beach Treasures Glass Display Jar

I love anything and everything that has to do with the beach. As soon as you put your foot on our property or inside our home...you will see my love for the beach, surf and sand. While I do buy a lot of our coastal home decor...I also try to make a lot of it too. After all, it is much cheaper to make it myself and I can get a truly customized one-of-a-kind piece.

Today I am sharing with all of you how I made my own coastal beach treasures glass display jar. It's very easy to make and even if you don't have a crafty bone in your body...you can make this!

Before I get started...I want to talk to you about a product that I used to make this project. It's called a Chalk Ink Marker and I used the Chalk White color. These markers have been out in the retail marketplace since 2005 and come in at least 30 different colors. They are water-resistant, blendable markers that leave no powder residue and dry super quickly. You can use them on any non-porous surface (think metal, glass, plastic, chalkboards, etc.). The color wipes off easily with water or an ammonia-based cleaner. They are smear-proof, non-toxic, food-safe and 100% guaranteed.

DIY Coastal Beach Treasures Glass Display Jar

1 large glass pasta jar (this one is an old one that held dry pasta)
3 pieces of dried raffia or roping
1 Chalk Ink Marker - Chalk White
scissors
beach treasures that you collected

I bought some dry pasta years ago and kept the jar because it was so large and had a wooden lid. I pulled it out of storage for this project and washed it up. I used 3 different colors of raffia and just wound them around the neck of the jar and knotted the pieces to give it a rustic feel. The raffia reminds me of dried sea grass so that is why I opted for that. Fill up your jar with your collected beach treasures. We spend a lot of time at the beach & I am always collecting my finds so inside my jar are various seashells, pieces of sea glass, sand dollars, starfish, etc.

I then used the Chalk Ink Marker in Chalk White to simply write the words "Beach Treasures" on the wooden lid. You can use the Chalk Ink Markers in whatever colors that you like to write & decorate the lid or the body of the glass container. I liked the simple look for my beach treasures jar. Super quick and incredibly easy!

Mine is displayed on our covered porch/patio and I have it sitting on my birdbath table that I created a few weeks ago. You can find that DIY project here on this blog too! Enjoy!

Disclosure: I received 2 complimentary Chalk Ink Markers to use in this project. Please visit the company's site to learn more about this product and to grab ideas on other projects that you can make. No monetary compensation was received.

Thursday, May 7, 2015

Craft Project - Metal Sand Bucket DIY Garden Planters

When it comes to decorating the inside and outside of my home I am all about the coastal and beach look. If you have ever shopped for coastal home decor, home accessories or even beach garden yard art...it can be quite pricey! Instead, I try to make my own items as much as possible like this one that I am sharing with all of you today.

Before I get started...I want to talk to you about a product that I used to make this project. It's called a Chalk Ink Marker and I used the Chalk White color. These markers have been out in the retail marketplace since 2005 and come in at least 30 different colors. They are water-resistant, blendable markers that leave no powder residue and dry super quickly. You can use them on any non-porous surface (think metal, glass, plastic, chalkboards, etc.). The color wipes off easily with water or an ammonia-based cleaner. They are smear-proof, non-toxic, food-safe and 100% guaranteed.

DIY Metal Sand Bucket Garden Planter

1 Metal Sand Bucket
1 Plastic Liner
Chalk Ink Marker in Chalk White with 6MM Wet-Wipe Tip

Note: I picked up my metal sand bucket for $3.00 at one of those dollar-type of discount stores. I also picked up a white plastic planter liner for $1.00 at the same store that fits down inside the metal bucket.

Wash and thoroughly dry your metal bucket to make sure all debris has been removed. Shake up your Chalk Ink Markers and use them to paint designs on the outside of your bucket. For me, I like the simple look so on one side of my bucket I wrote the word "Beach" and on the other side I wrote the word "Seashells". You can draw pictures, write words or decorate your buckets with squiggle lines, circles...whatever it is that you like.

The Chalk Ink Markers dry within minutes. I made mine on a very warm day and they were completely dry within 5 minutes.

You can place a real plant or faux plant down in your new garden planter. For myself, I will be placing some ornament sea grass in mine as soon as it comes in at the nursery (I ordered some Citronella plants to keep the bugs away). Super quick and easy project!!! (post updated, see below).

This would also be a great craft project for kids to do over the summer. Just get some metal buckets and a few of the different colored Chalk Ink Markers and let them design their own! (Great birthday party kid's craft project idea too).

Disclosure: I received 2 complimentary Chalk Ink Markers to use in this project. Please visit the company's site to learn more about this product and to grab ideas on other projects that you can make. No monetary compensation was received.

Monday, March 2, 2015

Coastal Beach Treasures Glass Display Canister

I love the beach...everything and anything that has to do with the beach! Luckily for me, we live 3 1/2 hours from the Atlantic coast and also have a summer house at the Jersey Shore. Since I love the beach, I decorate the inside and outside of my home in a coastal decor.

Every time we are down at the Jersey Shore I spend quite a bit of time walking on the beach and collecting beach treasures. Over the years I've gotten some beautiful seashells, sand dollars, starfish, sea glass and other found treasures from the mighty Atlantic Ocean.

For years I placed these treasures into a large wicker basket and just stored them. The past few months I have been getting them out and decorating my home with them. I've got large shells, sand dollars, star fish, driftwood and other items on shelves, tables and in curio cabinets.

With that said, I needed a way to display all of those tiny shells, sea glass and tumbled smooth beach stones. After all, these little items are just as beautiful as the larger shells that people collect.

I went to the flea market a few weeks ago and found a large glass canister that measures 14 1/2" tall. I wanted something that was clear glass so that the inside contents could be seen from all four sides. I picked it up and paid $1.00 and was happy as a clam (pun intended). I brought it home and gave it a good overall cleaning.

I filled it up with all of my little beach treasures that I've personally collected over the years. If you look closely at my photos you will see small pebbles, smooth rocks, several pieces of beautiful sea glass and some very tiny seashells. Aren't they pretty? I think so!

Next week I am going to go out to the craft store and purchase some 1/4" diameter white rope and tie it around the neck of the canister. I am then going to attach a real 2 1/2" diameter sand dollar that hubby found on the beach for me 2 years ago. I brought it home and preserved it myself. I am going to glue that sand dollar onto the center of the white roping. I will post an updated photo of it completely finished one day next week.

So, as you head off on vacation this Spring and Summer...don't forget to walk the beach and collect all of those tiny pieces of stones, seashells and beach glass. Bring them home and display them in a nice glass canister for the world to see!

Monday, October 6, 2014

DIY - Instant Chalkboard for Your Pantry

** Product Samples Were Received **

My pantry was a royal mess until I decided to reorganize it. I bought plastic bins, new shelving, labels and all kinds of other things. Now when I walk into my kitchen pantry, I can clearly see everything that I have and everything is in its place.

With that said, I wanted an easier way to keep track of what we used (ran out of) from the pantry so that when grocery shopping day arrived, I could quickly add pantry items to my shopping list. After all, grocery shopping and list-making, are not my favorite things to do!

Recently I received a complimentary package of Scotch Tapes to help me get better organized. When I saw that roll of Scotch Chalkboard Tape, I knew immediately what I was going to do with it. Along with that tape, they also sent me a roll of the Scotch Dry Erase Tape, a box of colored chalks, a dry erase marker and an eraser.

So, let's get back to my project.

I decided to use the Scotch Chalkboard Tape to make a chalkboard inside my kitchen pantry! I got a ruler and figured out how wide and how long I wanted my chalkboard to be. I then cut strips of tape from the roll and applied them directly onto the back (inside) of my door. This took me less than 2 minutes from start to finish.

I then used a sticky plastic hook beside my new board and attached a small basket. That basket holds the box of chalk along with the eraser. Now when my family takes the last item out of the pantry to eat or drink, they write down the name of that item on the chalkboard. When grocery day rolls around, I open up the door, take a look at the list and add all of the items to my shopping list! Yay!

Over the next few weeks I will share some additional quick and easy projects with all of you that I have been doing around my home to get better organized thanks to the great folks over at Scotch! You can learn more about the new Scotch Dry Erase Tape and the Chalkboard Tape by visiting their web site online. Plus, you can pick up some fun project ideas too!

Disclaimer: Shelly Hill has personally reviewed the product listed above. Shelly was not compensated for her review but did receive a free product to evaluate for all of her blog readers here on the Passionate About Crafting Blog. Please read my Terms of Service Policy & Disclaimer Policy for additional information. My opinions stated in this product review are honest and unbiased. Your thoughts & opinions might differ from my own. Information contained on this blog is copyright 2014, All Rights Reserved.

Wednesday, August 6, 2014

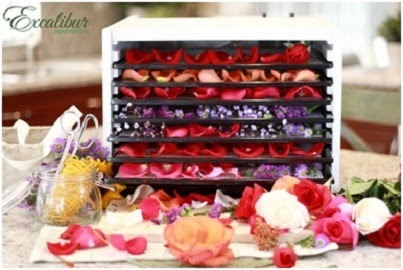
How to Make Homemade Potpourri

How many of you have ever made your own homemade potpourri? Making your own potpourri is a very easy process when you own a food dehydrator. The great folks over at Excalibur Dehydrators sent over step by step instructions and photos on how you can make your own potpourri. It is a great way to get your own home smelling great and it makes for a heartfelt gift to give to others. The instructions and photo is courtesy of Excalibur Dehydrators.

While completing crafty projects at home, Excalibur Dehydrators offers commercial-grade results. The units are equipped with patented Parallex™ Horizontal Air Flow and Hyperwave™ Fluctuation Technology for the most efficient heating and drying combination on the market.

Gerry's Lavender Potpourri

1 cup lavender blossoms
2 cups lemon verbena leaves
2 tsp orrisroot powder
1 cup pink rose petals
1 cup white carnation petals

Dry petals in dehydrator at 95°F/ 35°C until crisp. Lightly mix flowers in a bowl and sprinkle with orrisroot powder (a preservation). Store in jars for 1 month in a cool, dark place. Then place in decorator jars.

Spicy Potpourri

1 quart dried roses, mixed colors
¾ cup dried lavender flowers
1 tsp powdered cinnamon
1 tsp nutmeg
1 tsp allspice
1 tsp cloves
1 T. dried rosemary
1 T. benzoin (preservative) or 1 T. orrisroot powder
10 drops oil jasmine

Lightly mix all ingredients, add oil of jasmine for a long-lasting fragrance and store.

About Excalibur Dehydrators: Since 1974, Excalibur Food Dehydrators have changed the way people all over the world prepare and preserve food. Compact enough to fit on your kitchen counter, the Excalibur Dehydrator replaced sun drying, solar drying, and oven drying. The electrical dehydrator created a more predictable dehydration method that allowed people to dry 24 hours a day, come rain or shine. Excalibur Dehydrators are the only home appliance that incorporates the Parallexx™ Horizontal-Airflow Drying System for best performance, thermostat adjustability, speed, durability, clean-ability and versatility. Dehydrate fruits, vegetables, meats and fish for jerky, herbs and nuts in the comfort of your home. Excalibur Dehydrators are up to 10-times faster than common round dehydrators, and are available in a variety of sizes, including commercial and non-commercial grade units. www.ExcaliburDehydrator.com.

Disclosure: This is a guest post. No compensation was received.

Tuesday, January 14, 2014

Make a Scissor Holder Using a Potholder - Craft Project Idea

Looking for a last minute gift idea? These are great little no-sew projects that work up in a few short minutes. They make great little gifts for the holidays, for Easter, Mother's Day and/or for Birthdays. You can buy your supplies at a local dollar store to save money.

Scissor Holder Using a Potholder Craft Project

1 large square shaped pot holder w/hanging loop
1 tube fabric glue
1 full-size pair of scissors
2 clothes pins

Note: If kids are doing this project use liquid fabric glue. If adults are doing them, you can use a hot glue gun with glue sticks.

Lay your square shaped potholder down onto the table in a diamond shape with the hanging loop to the right. The ones we used are solid color on one side and have a print on the other side. The solid color is facing up and the print is facing the table.
Fold the pot holder in half with the edges over-lapping one another. Squirt a thin layer of fabric glue down the one side and sandwich the other edge on top. We used two clothes pins to hold them together until the glue dried. 

Once the glue has dried you can tuck your full-size scissors inside. We have a little hook on the side of our refrigerator where our scissor holder is hanging which keeps my kitchen shears in easy reach. I also keep one hanging on a wooden knob in my sewing & crafting room. I always know where my scissors are and they are always within my reach!

Thursday, December 26, 2013

7 Crafty Ways to Use Leftover Christmas Gift Wrapping Paper

The Christmas holiday is now over and instead of throwing away all of that used gift wrap and scrap pieces of your holiday wrap...its time to put them to some good crafty use!

I am a frugal crafter and every year I bag up that torn gift wrap and toss it all into a bag with my small scrap piece. Then throughout the winter when I am stuck inside...I get into my bag and make some new crafty items for the next holiday season.

Here are 7 craft project ideas that you can do to use up all of that Christmas gift wrapping paper instead of tossing it away!

* Homemade Bookmarks - Takes those scraps and turn them into holiday bookmarks! Cut from cardboard or cardstock rectangular shapes that measure 1 3/4" by 6" in length. Use a hole puncher and punch a hole on one end. Cut the paper to measure the width and length of the cardstock and glue one piece onto each side. Use yarn or ribbon and thread through the hole to make a bow or tassel.

* Decoupage Vase - Save old clear glass vases and jars. Rip the scraps into odd shapes measuring no large than 3" in size. Use decoupage and adhere them to the outside of a glass vase or jar. Let dry and then cover with a top coat of the decoupage medium, let dry for 24 full hours. You now have a holiday vase or container for next year! If using jars, save the lids and use them for gifts in a jar!

* Gift Tags - From cardboard or cardstock cut pieces that measure 4" in size. Cut from gift wrap a piece that measures 4" in size. Use quick drying glue and a foam brush to adhere the paper to one side of the cardstock. Let dry. Fold the square in half or using a scoring tool to score it down the center, fold. Use a hole punch to turn it into a gift tag. Use scraps of ribbon or yarn through the hole so you can attach your new tags to package boxes or onto gift bags.

* Gift Bags - Purchase solid color gift bags at your local party supply store. Cut shapes and designs out of your scrap gift wrap and glue it onto the bags using a quick drying glue and a foam brush. Let dry for several hours. You can place your design just on the front of the bag or continue it around all four sides.

* Cardboard Boxes - Save all of your small and medium sized boxes along with their lids. Cut shapes and/or designs out of the gift wrap and glue them onto all sides and the lid of the box in a pleasing design using quick drying glue and a foam brush. Let dry. You now have pretty gift boxes for next year all ready to go!

* Tall Glass Candle Holders - Recycle or buy clear glass cylinder candle holders at your local dollar store. Use decoupage medium and a foam brush to glue on shapes, designs and patterns from the gift wrap onto the glass candle holder. Let dry. Use the decoupage medium to add a top coat across your design and let dry for 24 hours. You now have pretty holiday candle holders for next year.

* Scrapbooking & Cardmaking - Purchase a bottle of archival mist and lightly mist your scraps of Christmas gift wrapping paper. Let dry for 24 hours. You can now cut up those scraps and use them safely in your scrapbooks or use them in your cardmaking to make scrapbook layouts or new holiday cards.

Hope you enjoy these project ideas! If you have any other frugal craft project ideas or Trash to Treasure craft project ideas that you want to share with me and my readers, please feel free to leave me a comment below & I will contact you. Enjoy!

Wednesday, September 25, 2013

Duct Tape Decor: New Fall Looks with Easy & Affordable Craft Ideas from Country Woman

As the trees change hue this autumn, it’s the perfect season to turn over a new leaf when it comes to your home goods and accessories.
No need to spend a fortune on this fall makeover. Country Woman magazine has unwrapped some excellent ideas for an easy, innovative Duct Tape Craft Party. We’re not talking about those boring, gray tape rolls—an array of today’s brightly colored, vivid patterned duct tape as well as newer Japanese paper tape (washi) and fabric tape is all you’ll need to update everything from your picture frames to your glasses.

Here’s how to craft this party that’s sure to stick in your guests’ memories:

·         Have each friend bring several rolls of tape, along with an object to revive. You provide more tape, rulers (for measuring), scissors, an X-acto knife, disposable gloves, and a table or other clean, flat surface to work on. 

·         Before you get started, take pictures of each guest and their item. That way you’ll have something to compare the “after” shots of your guests’ completed duct tape crafts to.

  • Set the mood with the right music and play songs like “Stuck Like Glue” by Sugarland, “Let’s Stick Together” by Bryan Ferry and “Stuck on You” by Elvis Presley.

  • Keep up the theme with your party treats! Try delicious, slightly sticky snacks like Honey-Glazed Snack Mix, Confetti Caramel Corn, Banana Sticky Buns or Rhubarb Sticky Buns.

  • And of course the crafts:
    • Easy Embellished Frame: Updating your picture frames has never been easier. Simply add a variety of colored tapes to give them a brand new look!
    • Mirror Makeover: Add patterned tape to a mirror’s frame to give it a stylish, seemingly textured façade.
    • Glammed up Glasses: More fun than glass charms, washi tape lets you individualize your cups for any occasion.
    • Fashionable, Wallet-Friendly Purse: Use duct tape as the “fabric” for a bright and sturdy purse. 
You can find these ideas and more by visiting http://www.countrywomanmagazine.com/food-entertaining/entertaining/duct-tape-crafts-party-ideas/ We would like to thank Country Woman Magazine for sharing these crafty ideas with our Passionate About Crafting blog readers. Enjoy!

Monday, August 26, 2013

FREE Singer Sewing Project - How to Add Embellishments to Towels

Here is a free project idea for those of you who are are looking to add some cute embellishments to your bath towels, hand towels or even dish towels. This free project idea, photo and instructions is from our great friends over at Singer. Enjoy!

Add a colorful fabric band accent to a towel for a one-of-a kind gift or to coordinate with your household color scheme.

Shopping List:

Plain Towel
Small Fabric Scraps
Pins
Scissors
Thread

Measuring Fabric:

1. Measure the width of the towel from edge to edge. Add one inch to this measurement.
2. Decide how high the band should be for the towel (two to three inches is usually a good height). Add one inch to this measurement.

What to Cut:

3. Cut a piece of fabric the width and height from the measurements taken in steps 1 and 2.

How to Assemble:

4. Fold under ½" on each raw edge of fabric to the wrong side. Press.
5. Position fabric band onto towel, pinning in place to secure.
6. Insert the appropriate needle for the fabric to be sewn.
7. Set your machine for a straight stitch.
8. Thread the top of the machine and bobbin with all-purpose thread in a color that matches or blends as closely as possible to the color of the fabric band.
HINT: If trying to choose between two colors, opt for the darker color which will usually blend in better than a lighter color.
9. Carefully stitch close to folded edge on all four sides of the fabric band. Be sure to remove pins as you sew. The presser foot will help you guide the fabric evenly while stitching.
NOTE: The more slowly you sew the more control you have guiding the fabric while stitching.
10. Backstitch at the beginning and end of the stitching to help secure the thread in place.
NOTE: What is backstitching? Backstitching secures the machine stitching so the threads do not become loose and pull out. It is done by reversing a few stitches on top of or just next to those machine stitches at the beginning or end of a line of machine sewing. How to backstitch: Position needle about ½" from top edge of fabric. Stitch in reverse almost to the raw edge. Change to forward and stitch to the end of the fabric. Reverse and backstitch about ½".
11. Remove the towel from the machine. Trim the thread tails.

SINGER and the Cameo “S” Design are exclusive trademarks of The Singer Company Limited S.à r.l. or its Affiliates. ©2012 The Singer Company Limited S.à r.l. or its Affiliates. All rights reserved.

Disclosure: I was not compensated for this post. The photo, project idea & instructions are courtesy of Singer.

Sunday, August 25, 2013

What to do with Broken Hair Brushes? Turn Them Into Candle Holders!


Here in our home we are really big on recycling and reusing items instead of sending them to the local landfill. When an item breaks or if its a left-over item that I think can be repurposed in a new or unusual way...I toss it into my Rubbermaid bin for another day.

Well...a few weeks ago my Conair hairbrush handle busted off. This was a paddle style hair brush which I just loved! I love how you can get pretty hair brushes these days and I couldn't part with the busted handle. I tossed it into my "craft" bin and went about my day.

Last week I had a brainstorm on what I could do with that hair brush handle! I decided to turn it into a candlestick to hold a votive and/or tea light candle! We do a lot of entertaining outdoors and I needed one to hold some citronella votives that I had just purchased. Here is how I made it.

Broken Hairbrush Candles Holder (Candlestick)

Supplies Needed:

Broken Hair Brush Handle (ours is from a Conair Paddle Brush)
Gorilla Glue or E600 Perm. Liquid Glue
Glass Votive Holder (we got ours at the dollar store)

Directions:

If your handle didn't have a clean break...file it down with a little sand paper. Add a generous amount of liquid glue onto the broken edge and sit your glass candle cup on top. We poked a hole into an empty cardboard tissue box and then put our candlestick down into the hole to dry...this way it stayed upright. You will want to let it dry overnight or for at least 8 hours.

What is really surprising is that it doesn't tip over and it really is a nice balanced candlestick holder. We have been using ours outdoors and love it! If you have kids or pets around...I would NOT use something like this for fear of it getting knocked over and starting a fire...so please use caution around them!