 Every year during the holiday season, I always make sure that I take a lot of photograph's of our family's festivities and the 2010 Christmas Holiday was no exception! Once the holiday was over and things calmed down, I was able to spend some time in my craft room scrapbooking some of our holiday photo's.
When it comes to scrapbooking, you don't have to pour a lot of money into your page layouts, nor do you have to spend 2 hours working on each of your pages. I like nice, clean layouts that don't take a lot of time.
Today I would like to share with you 2 Christmas Holiday layouts that I recently completed.
Photo Above:
For this particular page I used a muted red 12x12 sheet of scrapbooking paper for my background and at the bottom of the page is the word Merry Christmas so that is my title. We gave our little grand daughter the Little Tikes Crazy Coupe Car for Christmas and she immediately fell in love with it! Matter of fact, she wanted her pappy to push her around in it all day long!
I took a sheet of 12x12 beige paper that had a printed holly and berries design on it and cut it in half and affixed it to the center of my background paper. I then took 1/4" wide sheer red ribbon and glued it along each edge of the holly & berries paper to add a little interest to the layout.
I cropped my 3 photos, rounded their corners and mounted them onto red cardstock leaving a 1/8" edge and rounded the corners again. See photo for placement of photographs. I had some holly leaf and red heart rub-ons and rubbed them onto my page above the top left photo. Underneath that photo is a sheer vellum sticker that says Special Delivery and under that is a smaller photo of my grand daughter getting into her car for the first time.
I had a nice holiday greeting card that had Jingle Bells music notes and wording on it and I cropped that down to size and sprayed with archival mist spray to make it safe for the scrapbook. I then mounted it onto red cardstock and cropped it leaving an 1/8" edge. I had a satin ribbon bow with a white flower in the center of it and attached it to the Jingle Bells cut out. I then affixed that to the top right of the page. Underneath that I added my third photo.
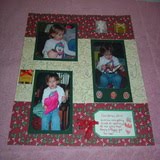 Photo Above:
For this layout I used 2 sheets of printed 12x12 scrapbooking paper. One is a holly and berries pattern on red paper and the other is a beige paper with a holly and berries pattern. They coordinate well together. I cut the beige one in half and affixed it to the center of the red paper. I had 3 photo's I wanted to use so I cropped those down and mounted them onto dark green cardstock leaving a 1/4" edge on them. On that third photo on the right, I left a 1 1/2" edge on the bottom so that I could mount my red snowflake printed brads onto it to add interest to the page. (see photo for placement of photographs).
I had a beige tag and inked the edge of the tag in dark green. I used a red marker and did my journaling onto the tag and inserted a sheer red ribbon as my tag holder and then affixed it to my page. I had 2 Jolee's 3-D embellishments that are package shaped and attached them to the top of my page above the right photo.
As you can see...I didn't spend all day long making these 2 pages and they didn't cost me a fortune to make. I think both pages came out beautifully!
No comments:
Post a Comment
Thank You For Leaving Me A Message! Happy Crafting :)