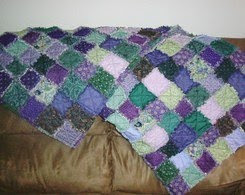
 When it comes to quilting, one of the easiest quilts to make is a Rag-Style Cotton Quilt. Unlike traditional quilting, these type of quilts are quilted as you make them and they have exposed outer seams which you snip after you are done sewing them to make it fringe. After laundering, it rags which leads to your quilts country charm.
For this particular quilt, I chose to work in the purple and green color scheme and I used solid and print fabrics. All of the fabrics used are cotton as they rag and fray the best. You don't want to use polyester or nylon-blend type of fabrics in these type of quilts.
These type of quilts are reversible...one side will be raggedy like shown in the photo below:

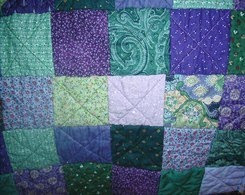
The other side of your quilt will look like a traditional quilt, like shown in the photo below:

Supplies Needed:
Approximately 8 Yards of Cotton Fabrics
2 Packages Warm and Natural Cotton Batting
Scissors
Fiskars (tm) Rag Quilt Snipping Scissors
Sewing Machine and Basic Sewing Supplies
Rotary Cutter, Mat and Ruler

Picture of Rotary Cutter, Mat and Ruler That You Will Need.
Seam Allowances: I used a 3/4" seam allowance while making this rag quilt.
Finished Throw Quilt Size: 15 rows by 19 rows. (In other words, I have 15 squares in my horizontal rows and 19 squares in my longitude rows).
Fabric Preparation: Wash and dry your fabrics before starting. If necessary, iron them if they become wrinkled.
Cutting Fabric: I cut my fabric down to 4" sized squares using my rotary cutter. Try to make the squares an accurate 4" in size. You will need a total of 570 squares which will make 285 blocks. (2 fabric squares make up 1 block).
Cutting The Cotton Batting: You need your batting squares to be smaller than your fabric squares, mine measure 3" square. You will need one batting square for each fabric square so you need a total of 285 cotton batting squares.

Step 1: You need to make your fabric squares by layering a piece of cotton batting between to fabric squares. The right side of your fabric will be facing out and the batting will be inside. Use your sewing machine and sew an X through each square. You do this by going from the top left corner and down to the bottom right corner. Then flip your square and do the other side. It should resemble an X pattern on the center of your square. I leave 3/4" of an inch un-sewn at each corner. You will do this for all 285 squares.
Step 2: Clear off a large table or use a clean floor. Lay out all of your sewn fabric squares in a pattern or design that you like.
Step 3: Using a 3/4" seam allowance, so your squares together in horizontal rows to make long strips consisting of your squares.

Step 4: Using a 3/4" seam allowance, sew all of your horizontal rows together. As your quilt increases in size, it becomes a little bit difficult to hold and pull through your sewing machine...if needed, work it in 3 sections and then sew the 3 sections together to make it more manageable.
Step 5: Once you have all your rows together, you will have a rectangular throw quilt. You need to load it back into your sewing machine and go around all 4 sides with a 3/4" seam allowance. Finally...all your sewing is completed.
Finishing Your Throw Quilt: To finish your rag-style throw quilt, you need to snip all of your seams...you need to be VERY careful to not snip through any of your sewn lines/seams. If you don't own a pair of the Fiskars (tm) rag quilt snippers, I highly recommend that you get a pair as they are easier on your hands than scissors. (however, you can use regular sharp fabric scissors too). This next snipping step for will take a long time, so sit down with a cup of coffee and put a movie on. Using snippers or scissors, you need to snip/clip all of your seams to make the fringe. I like to clip mine every 1/4" and the closer together you clip them, the more your quilt will fray and rag when you launder it. You will do this on all of the seams and around the outer edges of your quilt.
Washing The Quilt: Now its time to make it all raggedy. I wash and dry mine 2 complete cycles. Put your quilt into the washer with a little laundry detergent and some fabric softener and wash it on the normal cycle. Once it is done, dry it in the dryer and then repeat the washing and drying again.
IMPORTANT NOTE: Your quilts will shed a ton of threads and lint during the washing and drying process for the first few cycles. You need to clean your lint traps frequently, especially while drying them. I set a timer and check my dryer lint trap every 10 minutes as I don't want to catch anything on fire. After they have been laundered a few times, the shedding will stop.
The more you wash and dry your raggedy quilts, the softer they will become.
If you don't have time to make your own raggedy-style country throw quilt, you can contact me about custom ordering one from me. I make them in any color combination and can make them in just about any size that you desire. You can email me at Ravish30(at)aol(dot)com

Enjoy your new quilt!
Thank you for the post. I've been wanting to make a rag quilt
ReplyDelete