Tuesday, October 30, 2012

Scrapbooking - Tiger at the Zoo Scrapbook Layout Idea

Back in June we took a trip down to Cape May in New Jersey and one of the things we enjoy doing while down there is visiting the lovely Cape May County Zoo. When we go to their zoo, hubby loves to visit Rocky the Tiger and this time around, Rocky was up and running around his enclosure! He put on quite the show for us that day!

I did this layout in the 12x12 format. My background is a solid black sheet of cardstock. For contrast, I used a tiger print piece of furry felt that came in a 12x12 sheet which I trimmed down to measure 7" by 12". I used a liquid glue pen to attach it to the black cardstock. I found that glue dots, glue sticks and double-sided tape did NOT work well for this felt sheet. The liquid glue pen worked perfectly. I love the "felt" as it has a nice furry hand to it and really adds color and depth to my background.

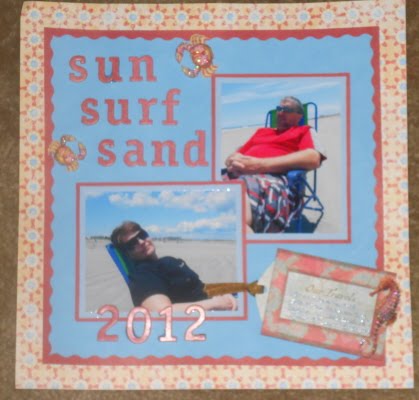
I had 2 photos that I wanted to use so I slightly cropped them down and then matted them onto orange cardstock with an 1/8" border and matted them again onto black cardstock with a 3/16" border. I made my own title by using my Cricut to cut out the letters to spell ROCKY first from orange cardstock and then again from black cardstock. I inked around the edges of the orange letters with black ink and then used a black fine tip marker to draw my own black tiger stripes. I layered the layers together and used a liquid glue pen to attach them to the background sheet, running them vertically down the right side of the layout. I used the Cricut on the #2 size setting.

I accented the bottom photo with an orange floral made from chipboard and used a glue dot to attach it to the right side of the bottom photo. I made my own journaling block from orange cardstock & black cardstock and added a bow at the top of it using some orange fiber. I did the journaling in my own handwriting.

A quick and clean looking layout that doesn't cost a fortune to make. I am going to get some more felt sheets in prints and animal prints and use them again in some additional layouts I have planned. Enjoy!

Thursday, October 25, 2012

Scrapbooking | The Sandy Beaches in Wildwood Scrapbook Layout Idea

Hubby and I went to down to North Wildwood in New Jersey back in June for a one week vacation and had a fabulous time! It was the perfect vacation (just the two of us) with gorgeous summertime weather!

Hubby and I went over to the beach one morning and were just walking the beach & having some fun. It was chilly out at 7am so we thought it was weird that we were on the beach with jackets and knew that later that day we would be sweating in our bathing suits. Anyway, I wanted to scrapbook these 2 photos of us sitting on the sand dunes watching the beautiful sunrise!

My background is made up of 3 sheets of cardstock. The 12x12 piece (1st background) features a tonal print of swirls. The smaller square sheet (2nd background) is a piece of textured cardstock in a sand color and the third smallest square is a sheet of printed cardstock in a sand color with brown texture pattern. I trimmed the 2nd and 3rd sheets into squares by removing 1" from all sides and then layered them onto my background to add interest, depth and texture.
I used a medium dusty blue piece of textured cardstock for my border strips that go around all 4 edges of each background square. I have them at 1/4" width and used a fine tip glue pen to place them along the edges of each background sheet.

My 2 photos were trimmed down into square shapes and matted onto the medium dusty blue cardstock, see photo for placement. The 3-dimensional sea gulls, Vacation Bliss title sticker, 3-dimensional lighthouse and boat stickers are all from Jolees. The bottom vellum seashell border is from K & Co. I did the journaling in my own handwriting by using a medium blue glitter gel pen and wrote what I wanted to say around the inner border of layer #2.

Overall, I am pleased with how the layout came out. I am a "unstructured" and "uncluttered" scrapbooker...I like simple, clean but yet interesting layouts. Enjoy!

Saturday, October 20, 2012

How to Price Your Scrapbook Layouts for Maximum Profits

When figuring out how to price your scrapbooks, DO NOT under value your work. Besides your time, cost of supplies, revisions, etc. don't forget your talent. Remember, your creativity and what makes your service unique is valuable. Another thing to consider is if you price your work higher, clients will equate it with quality. Whether or not that is true, it is a common perception. On the flip side, cheap=cheap.

Theme Pricing
Theme pricing can be done in several ways. You can charge per album, per page, or per spread. Theme scrapbooks can be individualized for a specific person or event. You can charge per basic album and then charge additional for extra pages.

Charging Per Side
Charging per side is one way to increase your revenue. Set up some basic prices and then allow your clients to add additional pages for an additional price. The more artistic and professional the page, the more you can charge.

Charging Per Style
Offer different styles from a more basic page to a page that contains more embellishments and techniques. Adding more embellishments requires a higher cost, while technique requires more time. Some clients may prefer a simpler album or one that puts the focus on the photos. While another client may like the "artistic" approach with more added.

The Importance of Interviews
Conducting interviews with your clients before you give them a price is very important. You should have a feel for the kind of person who is receiving the scrapbook. Asking in-depth questions will help you understand your client and their wants better. You don't want to charge a set price and many revisions later are still trying to please your client. These revisions cost time and money and your profits just went out the window.

Key Questions
Interview questions should include things such as room for additional keepsakes, design ideas, layout preferences, and any extras the client wants. By discussing all of these things upfront, you are less likely to have to make changes later on. For best results create a questionaire to be filled out by your client or you asking them, for better results.

Little Things That Can Make A Difference
Paying attention to details can make a difference in the quality of your work and in your profits. Double-check spellings, dates, etc. Recognize your clients likes and dislikes when they are looking at your sample album. If they don't like a particular color, embellishment, style or technique, make note of it and don't include in their album.

How Generic Layouts Can Help You
Generic layouts can help you in many ways. They can be sold individually; provide a blank slate for your client; and help you in your pricing strategy. Probably the most beneficial is generic layouts will cut back on time needed to create and therefore increase your hourly profit margin.

Custom Scrapbooks
Custom scrapbooks allow you to create extremely personal gifts. When custom scrapbooks are used along with basic theme albums, the customer can see that the possibilities are endless.

What Makes Your Service Different from All the Rest?
Highlighting unique qualities about your service will set yourself apart from your competitors. Offer quality work and customer support and then set your prices to reflect this. Remember, people believe in the saying, you get what you pay for.

What Sets Your Product Apart from Others Like It?
Make your products stand out to your customers. Tell and show your customers how your items will solve a problem or make life easier for them. Consider offering a little something extra to really stand out and provide excellent customer service.

The above tips will have you confidently pricing your work for maximum profits. Don't undervalue your work. Set a price you feel comfortable with and stick with it!

Dawn Stegall is dedicated to helping you succeed with your scrapbooking business. You can find more scrapbook business tips along with a free eCourse and scrapbook business roadmap at http://www.ScrapbookBusinessTips.com.

Monday, October 15, 2012

How To Clean Acrylic Stamps & Stamping Blocks

For decades the only type of stamps you could purchase as a crafter were the cumbersome rubber stamps. Even though rubber stamps have their place in the crafts market, most crafter's and scrapbookers are using the new and modern clear acrylic stamps with their crafting projects.

The acrylic stamps and acrylic stamping blocks will last a crafter many years if they are properly taken care of it. Today, let's take a look at how you should be cleaning them and how you should be storing them.

Cleaning Acrylic Stamps & Acrylic Stamping Blocks:

When cleaning inks off of acrylic stamps it is best to purchase a cleaning product that is made specifically for acrylic stamps. You do not want to use household cleaning products to clean your stamps as those products are too harsh and can cause damage to your stamps.

Many different companies make acrylic stamp cleaners and while their ingredients may differ, all basically work the same way. You will want to clean your acrylic stamps while they are still on your acrylic stamping block and immediately after you are done using them. If you let the ink dry on the stamp, they will be harder to clean.

Apply the liquid cleaner onto the stamp and then use a soft cotton cloth or microfiber cloth to rub the liquid into the stamp. Once the ink has been removed, use another damp cloth to remove any residue and light towel dry. Do not use any scrubbing brushes to remove stubborn ink stains as those brushes can cause scratched and damage your stamps.

If your acrylic stamp is losing some of it's stickiness, apply 1 to 2 drops of liquid dish soap onto a dampened cotton cloth and wipe the cloth over the acrylic stamp. This will help your stamp to get it's sticky properties back.

The acrylic stamp block can be cleaned with acrylic stamp cleaner or you can clean with it with some mild liquid dishwashing soap. Once it has been cleaned, towel dry or air dry before putting it away.

Storing Acrylic Stamps and Acrylic Stamping Blocks:

Crafter's all seem to have different ways of storing their acrylic stamps and you can find a variety of products out in the marketplace to make it easier. For me personally, I have a big photo storage box and place all of my acrylic stamps inside it in packages that are designed to hold them. I them label them and alphabetize them for easy storage. You can also purchase 3-ring binders, storage bins, plastic envelopes, etc. that are made for acrylic stamp storage. Before putting your stamps away, always make sure they are completely dry.

The best way I have found to store acrylic stamping blocks in is a plastic mesh basket that I keep sitting on my craft shelf. I can easily see my different sized and shaped blocks inside it and get them out quickly and easily. Do not store your blocks in moisture-rich environments and protect them from extreme temperatures.


Wednesday, October 10, 2012

Learn to Crochet - Hook and Yarn Choice

Learn to Crochet - Hook and Yarn Choice
By Fiona J Sloss

Learning to crochet can be a remarkably simple process once you have taken the first step and selected your yarn and hook. This simple guide will start you off on the right track with straight forward advice on selecting the best yarns and hooks for learning to crochet.

Most important, is to choose a crochet or knitting yarn that you'll enjoy working with. When you're just learning to crochet, a DK (double knit or worsted in American terminology) weight cotton yarn in a light colour is recommended by most crochet experts. This yarn will be smooth to work with and will create loops and stitches that you will be able to see clearly. Cotton fibre holds the stitches well, doesn't tend to stretch and is relatively easy to block and finish once you have finished your crochet project. As well as pure cotton, there are great ranges of mixed yarns, particularly cotton and bamboo. Try something like King Cole Bamboo Cotton DK which comes in a great range of colours, has a smooth surface and isn't prone to splitting. For a slightly finer weight yarn (4ply or sportweight), the DMC Natura Cotton range is recommended.

Once you have really developed your crochet skills, experiment with the finer crochet threads if you like to work on delicate lace projects. There is a whole host of crochet specific yarns on the market, but you can crochet with anything yarn-like, even strips of old plastic bags, garden twine, wire or fabric! (For these kinds of "yarn", a plastic or aluminium hook should be used. Anything made of natural material such as wood or bamboo is unlikely to be strong enough for the job.)

After choosing your crochet yarn, you will need a crochet hook. Crochet hooks range in size from 0.5mm to 25mm and beyond. They come in a variety of materials from plastic, to steel, to bamboo and rose wood. A good place to start that will keep your initial outlay to a minimum while you are learning is the Pony Crochet Hook range; but if you want to treat yourself, then the colourful wooden Knit Pro Crochet Hooks are a delight to work with.

For DK (worsted) yarn, choose a 4mm hook while you are learning to crochet. As you gain in experience, you can try different hook sizes to change the tension of your work. You can also check the band from the ball of yarn that you are planning on using. Often, it will show the recommended knitting needle sizes only, but as a general rule, the yarn will crochet up well in a hook size which is 0.5mm smaller than the recommended knitting needles. By way of example, the band on the King Cole Bamboo Cotton DK recommends using 4mm knitting needles. So if we subtract 0.5mm from 4mm, we get to the 3.5mm crochet hook.

When you're starting out, the only other things you will probably need are a good pair of sharp scissors, a tape measure and a making up needle. Once you get going, there's a whole range of other tools including stitch markers, row counters, blocking pins and knitting clips, but save investing in those until you know crochet is something you're going to pursue as a hobby.

You can keep up with all my latest projects, beginners' crochet instruction and adventures as a new mum on my blog at http://fionajayne.blogspot.co.uk/ or visit us at http://www.mariashaberdashery.co.uk for all of your knitting, crochet and sewing needs.

Sunday, October 7, 2012

Scrapbooking | Sun Surf Sand Beach Scrapbook Layout Idea

I am finally getting some time to do a little scrapbooking and today's layout was done in the 12x12 format. The layout only contains 2 photos which are of my husband and I soaking up some rays on the beach in Wildwood New Jersey. (You can click on the photos in this post to enlarge them to see the details better).

My background is a sheet of printed scrapbooking paper done in yellow, medium red and sky blue. It is a print pattern of some grungy flowers that also reminded me of suns. I then trimmed down a piece of sky blue cardstock to measure 10 1/2" by 10 1/2" square and glued it onto the center of my printed background paper. I used some wavy edge decorative scissors to cut 4 strips from medium red paper that measure 10 1/2" long by 1/4" wide and glued those around all 4 edges of the blue cardstock.

I slightly cropped down my 2 photos and then matted them onto light blue and medium red cardstock. I left an 3/16" border with the light blue mat and a 1/8" edge with the medium red mat. I placed them onto my layout using glue dots and overlapped the top right corner of the bottom photo onto the top right photos.
I used chipboard letters in a pale red to spell out my title of the page which is: Sun, Surf, Sand and used the numbers from the same chipboard set to date the page which is 2012. See photo for placement.

I used two cardstock glitter crabs (3-dimensional stickers) from a K & Co. embellishment pack to accent the title of my page and then used the cardstock glitter sea horse to accent my tag holder which I did my journaling on. The tag holder and tag is also from K & Co. and is a Tim Coffey desgin.

A very simple and uncluttered layout! I think it looks summery and doesn't look too crowded! I am pleased with how it turned out!

Stay Safe with the 3M Headlight Restoration Kit at Pep Boys!

This is a Sponsored post written by me on behalf of Pep Boys. All opinions are 100% mine.
Pep Boys logo.JPG (3 documents, 3 total pages)It is hard to believe, but we are officially into Fall and already into the month of October! Summer flew by and now it's time to get ready for Fall and Winter. One of the things I dislike about Fall and Winter is the decrease in daylight and the colder winter temperatures. Sigh, I wish we lived in a part of the country were the weather was warm and sunny all year long.

October is National Headlight Safety Month, so now it's time to get our headlights in good working order. Just recently I learned about a really cool headlight restoration kit that is available at your local Pep Boys stores. This kit is for those of us who like to save money by doing our own car repairs and maintaince work.

The kit is totally portable and no tools are required! All you need is an hour of your time and a little elbow grease and you can restore your car's headlights to perfect or near perfect working order. The kit will work on all plastic lenses, including tailights! You can use it on your car, RV, camper, motorcycle, truck, snow mobile, etc! That is totally cool!3M.jpg (4 documents, 4 total pages)
The DIY kit will restore your car's headlights and get rid of that yellow haze, dull light, etc. and get them looking clean & nice again. With all of us moms and grandmoms doing a lot of driving these days, we want to be as safe as we can. (especially when our wee ones are in the car with us!).

The roads are pretty dangers in the Fall and Winter months and around here, we have snow, ice and rain to deal with a few times every month. I am the type of person who drives with my headlights on most of the time, day and night, and I want them to be as bright as possible. How about you?

I am all about DIY kits which save me money because getting our headlights restored by a professional mechanic can cost hundreds of dollars and your precious time. I don't know about all of you, but I am all about saving money and being safe!

Right now you can a nice mail in rebate by going through the link and printing it out. 

My hubby travels a lot and often times he doesn't have the time to work on our vehicles, so having easy-to-use DIY kits that anyone can use, well...that is a huge plus in my book! Now I can work on our vehicles myself and not have to bother him at all.beforeandafter.jpg (4 documents, 4 total pages)

Just check out those before and after photos, those are impressive and guess what? Us (girls) can do this project on our own...without any help from the guys! Yeah!!! I think my hubby would be impress!

It is time to get our cars ready for Fall and Winter, so head on over to your local Pep Boys Store and check out that nifty headlight restoration DIY kit!

Visit Sponsor's Site