Sunday, January 30, 2011

Cardmaking - How To Make 3 Pretty Valentine's Day Note Cards

Are you looking to make your own greeting cards for Valentine's Day? If so, I have 3 great handmade greeting card ideas to share with you. To make each of these note cards you will need just a few basic craft supplies that you can purchase at any local craft supply store. Each of these design's were made on a blank 5 1/2" by 4" card stock note card and take less than 20 minutes each to make.

Materials Needed:

5 1/2" wide by 4" high blank note cards with envelopes
2 sheets of 8 1/2" by 11" scrapbooking paper in Valentine's Day designs
1/2 sheet solid pink scrapbooking paper
1/4" by 12" long piece of pink & red print ribbon
1/2" by 5 1/2" piece of purple & pink ribbon
4 foam glue dots
sentiment rubber stamps and black or red ink pad
scalloped edge scissors and straight edge scissors
stickers and 3-d embellishments to decorate your cards
glue stick and liquid glue pen (adhesives)
cutting mat and knife

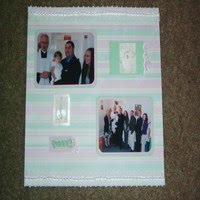
Design #1: My Heart Belongs To You (shown above)

Using a piece of patterned paper (in this case, it's a heart pattern) cut it down to measure 5 1/2" by 3 1/4" in size. Use your scalloped edge scissors to cut one long edge on the paper to make it scalloped. Cut a piece of solid pink paper to measure 5 1/2" by 1" in size. Use your scalloped edge scissors and cut on long edge on the paper to make it scalloped. Using those same scissors, cut the front long edge of your note card to make the edge scalloped. Using your glue stick, glue down the solid pink strip onto your card leaving 1/4" of the white card front showing. Use the glue stick to glue the large printed piece of paper on top, leaving 1/2" of the solid pink piece of paper showing. For this card I applied a 3-D embellishment that says Forever to the lower 2/3 of my card front. Above that I used a clear backing sticker that says "My Heart Belongs To You". I cut a piece of solid light red paper that measures 5 1/2" by 4" in size and glued that inside. I then had a rubber stamp that has a romantic saying on it and hand stamped that inside on the red paper.
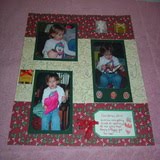
Design #2: I Love You

From my patterned heart paper I cut a block that measures 5 1/2" wide by 3 3/4" high. I trimmed one long edge with the scalloped scissors and attached it to the front of the card with a glue stick. Using a liquid glue pen or glue dots, attach your choice of ribbon 1/2 way down the card running horizontally across the front. I made my own 3-D embellishment from a heart shaped I Love You sticker that I attached to red card stock and trimmed it down leaving a very tiny red edge surrounding it. I then used 4 foam dots to attach it to the front, centering it on the ribbon. I left the inside blank on this one so that I could write my own message.
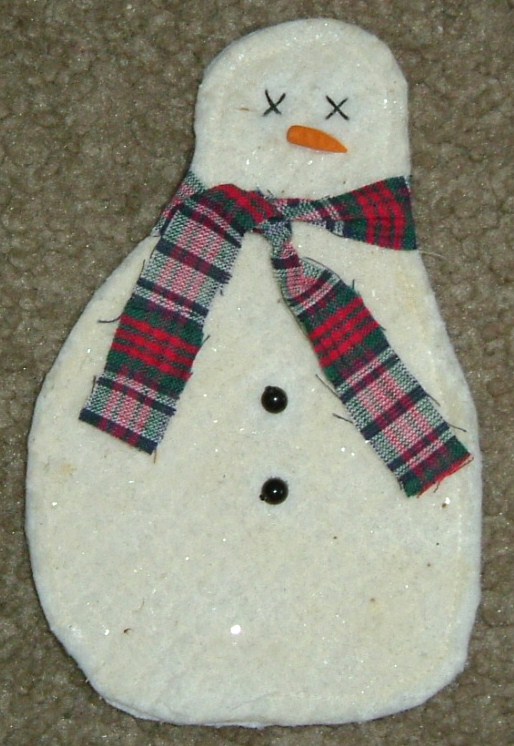
Design #3: Love Hearts

From my patterned heart paper that has the printed words of LOVE and XOXO on it...I cut a block that measures 5 1/2" by 4" to completely cover my card front. I then attached the paper to the front with a glue stick. I cut my ribbon to measure 1/4" by 5 1/2" and tacked that down near the bottom edge with my liquid glue pen. I cut another piece of ribbon measuring 5" long and tied it into a bow and tacked that onto the center of the ribbon trim with a glue dot. I had 2 heart shaped 3-D embellishments made out of red and white felt that I attached to the upper right and bottom left of the card front to add accent. Using a rubber stamp and red ink, I hand stamped my sentiment inside.

This craft project, instructions, article, etc. is written by Shelly Hill, copyright 2011, All Rights Reserved. You can not reprint this information or use my photo's without my permission nor without my official author's bio. You can obtain my permission and bio by emailing me. Please see my Terms of Service Policy for email address. Thanks!

Saturday, January 29, 2011

Beautiful 12x12 Scrapbooking Layout | Baby Girls Christening Ceremony

My little grand daughter got christened at St. Matthews Parish back in November 2010 and I just got around to scrapbooking a few pages of her Christening ceremony. This is page one that I did and it's in the 12x12 scrapbooking format. Sorry my photo's aren't fabulous but my digital camera hates photographing whites and light pastels...the flash just goes nuts!

I decided to go with pastel colors because the reception afterwards was decorated with light pink, mint green and whites...so I used those 3 colors in all of my layouts to mark the ocassion. I wanted simple and clean layouts...nothing that was too cluttery.

For this page I used a striped piece of scrapbooking paper that was done in pastel pink, mint green and white. I had some beautiful fabric lace with scalloped edges that had tiny faux white pearls that ran down the center of the lace. I cut two pieces and used my liquid glue pen to attach a strip of pearls & lace to the top and bottom of my page for borders. I love that lace! I used 2 photos for this page and cropped them down. I double matted them onto pink and then mint green cardstock, left 1/8" edges and rounded all corners. I then mounted them onto my page.
For my journaling, I made a pocket out of mint green cardstock that measures 3" by 4 1/2" and I used scalloped edged scissors for the opening edge. I then used those same scalloped edged scissors to cut out a white strip and glued that to the opening of my pocket to resemble white lace. I mounted my pocket horizontally onto the page. I cut a pink colored tag from cardstock and punched a hole at the edge and tied a sparkly bow out of ribbon thru the hole. I did my journaling on that tag and inserted it into the pocket. On the outside of the pocket I attached a 3-D embellishmet that I had which features a white sparkly heart, faux pink pearl and silvertoned wire swirl. I think my journaling pocket is adorable!
To finish up the page I added 2 embellishments to the bottom left of the page. The first one is a 3-D embellishment that features a sparkly white heart, faux pink pearl that are dangling from a silver chain. The second embellishment was a cardstock sticker that says SWEET and its on mint green paper. I mounted that to pink cardstock and trimmed it down so it had an 1/8" border. I tied a sparkly ribbon bow onto the end of the tag.


Wednesday, January 26, 2011

Scrapbooking ~ Quick and Easy Black & Pink Birthday Layout

My hubby celebrated his 49th Birthday back in October 2010 and I wanted to do a special scrapbooking page that honored his Birthday and more importantly, the special moment he shared that day with our little grand daughter Gia.

I thought about what type of design I wanted and decided to not make a manly page as Gia is totally girly! Instead, I decided to go with black, pink and white (she was wearing all of those colors) and I felt black would go good for males and pink for the girl, besides, I love black and pink together!

I decided to use a piece of white 12x12 cardstock as my base page. I then took a piece of printed paper (black with pink circles) and cut off 4" and mounted it to the center of my white cardstock. I then used my liquid scrapbooking glue and glued on pink rick rack along the long edge of the printed paper to add interest. I had 2 title stickers that I used...I added the Happy Birthday sticker to the top and the Over The Hill sticker to the bottom.

I had 2 small birthday stickers of a balloon and of a birthday hat and applied them to the top on each side of the title sticker. I used 2 photo's for the layout and cropped them down to size, rounded their corners and mounted them onto pink cardstock, rounded the corners and mounted them onto black cardstock, rounded the corners again...all while leaving an 1/8" edge.

I used my Cricut to cut out 2 balloons from cardstock and then did the shadow setting with black cardstock and attached them together along with pink satin cording for the balloon strings. I then used a black marker and wrote their names onto the balloons and used glue dots to affix them to my page. I used the Cricut to cut out a pink and black triangle for my party hat journaling block and attached a small red pom pom to the top of the hat. I had a "smile" cardstock cutout that I mounted onto black cardstock and used foam dots to attach that under the photo of my grand daughter. On the back of my layout page, I wrote in great details about the day...yes, you can journal on the back of your layouts!

As you can see, I think the layout along with the color scheme came out beautifully!

Happy Scrapbooking ~ Shelly

Tuesday, January 25, 2011

How To Make A Primitive Snowman Holiday Ornament or Refrigerator Magnet Pattern

Love snowmen? Like to decorate your home with snowmen during the entire winter season? If so, I have a really easy snowman project to share with you today. This project is easy enough that even a beginner crafter can master making one...or several of them in just one afternoon.

You will need just a handful of basic sewing and craft supplies that can be purchased at your general craft supply store. I used a sewing machine to make mine but you can certainly hand stich him together too!

Here are the supplies you will need to make one.

Warm 'n Natural Cotton Batting (natural off-white color)
Black Embroidery Floss
Orange Fimo Clay (just a tiny pea sized amount)
2 Plastic 4 MM Round Beads
Scrap of Homespun Cotton Fabric (measuring 1/2" by 7" in length for scarf)
Sharp Fabric Scissors
Sewing Machine and Basic Sewing Supplies
Clear Drying Modge Podge (decopauge medium)
Clear Crystal Glitter (fine grade)
Foam Stenciling Brush
Pattern

To Make Your Pattern: Hand draw a snowman shape onto paper that measures approximately 6" tall by 4 1/2" wide at his widest point. Cut out your shape and use as your pattern template.

Use your paper pattern and trace around it onto two pieces of cotton batting. Cut out the pieces. In a plastic cup or throw away bowl, pour 5 tablespoons of Modge Podges into the bowl along with 5 tablespoons of water. Stir until combined. Sprinkle in 1 to to 2 teaspoons of the glitter and stir again. Using your foam stenciling brush, brush the mixture across both pieces of your batting. Let air dry. (takes about 1 hour to completely dry).

Using six strands of black embroidery floss, stitch two X's onto his face to resemble his eyes, fasten off in the back so your ends and knots don't show on the front. Using a pea sized piece of orange Fimo clay, roll it out in the shape of a carrot for his nose. Bake the nose in the oven according to the package directions on your clay pack. Using three strands of black embroidery floss, attach your two round plastic beads onto the snowman's belly to resemble is black coat buttons, fasten floss off in the back so knots don't show on the front.

Using your sewing machine, place wrong sides together and straight stitch 1/8" in from the edges, leaving the bottom of the snowman open for turning. Once done, turn him right side out and finish the bottom edge stitching by hand. Cut a piece of homespun cotton fabric into a strip that measures 1/2" by 7" in length and tie it around his neck to resemble his scarf.

Variations: If you want to turn it into an ornament, thread a piece of white floss through the top to hang him on your tree or packages. If you want to turn him into a refrigerator magnet, glue 2-3 magnet disks onto his back side with hot glue or craft glue.

Saturday, January 22, 2011

Craft Project ~ Cute Felt Faux Candy In Valentine's Day Heart Box

Love to decorate your home for Valentine's Day? Are you looking for a super easy Valentine's Day craft project? If so, I got a cute one to share with you today! This craft project consists of hand sewn faux chocolate candies that are made out of your traditional craft felt. In addition to a few standard craft and sewing supplies, you will need a small heart shaped candy box that is empty and clean. This is a really cool item to use in your holiday decorating.

* note: You are basically forming boxes out of felt to make these candies.

Supplies Needed To Make The Project:

Felt: 1 sheet of dark brown, chocolate brown, white and red
Embroidery floss to match the colors of your felt
Embroidery Needle and Scissors
Small amount of fiber-fill stuffing
1 clean and empty heart shaped candy box

Paper Patterns to use as templates: On a piece of paper, draw out a 1 3/4" diameter circle, 2" square and a rectangle that measures 1 1/2" by 2" in size. Cut out these shapes and use them as patterns.

Round Chocolate Candy: Cut two round shapes out of chocolate brown colored felt, cut one strip that measures 1/4" wide by 5 3/4" long. From red felt, cut out a swirl shape that is the diameter of your circle temple by about 1/8" wide. Using two strands of embroidery floss and your sewing needle, blanket stitch the thin strip around the edges of one circle and fasten off. Using two strands of red embroidery floss, hand stitch the red swirl to one of the chocolate brown circles using tiny whip stitches, fasten off. Using two strands of brown floss, blanket stitch the remaining circle onto the other side of the skinny strip. Right before you have it completely sewn shut, insert in a little bit of stuffing inside and then finish stitching it shut.

Square Chocolate Candy: Cut two square shapes out of white colored felt, cut one strip that measures 1/4" wide by the 8 1/4" long. From chocolate brown colored felt, cut four strips that each measure 1/8" by 2" long. From red felt, cut a heart that measures approximately 1/2" in diameter. Using two strands of brown embroidery floss, sew the tiny brown strips across one of the white squares. Using two strands of red embroidery floss, sew the heart on top of the brown strips in the center of the white square. Use two strands of white embroidery floss and hand stitch the white strip around all four edges of the square. Using hand stitches, sew the other square onto the other edge of the strip. Right before you have it completely sewn shut, insert a little bit of stuffing inside and then finish stitching it shut.

Rectangle Chocolate Candy: Cut two rectangle shapes out of dark brown felt, cut one strip from dark brown felt that measures 1/4" wide by 7" long. Hand cut out of white felt a swirl shape that measures 1/8" wide by 2" long and hand sew this swirl to the top of one your rectangles. Using two strands of dark brown embroidery floss, hand sew the strip to all four edges of one of your rectangles. Sew the other rectangle onto the other side of the strip. Right before you have it completely sewn shut, insert a little bit of stuffing inside and then finish stitching it shut.

This project was designed by Shelly Hill, copyright 2011, All Rights Reserved.

Scrapbooking ~ My New Friend Scrapbooking Page Layout In Jewel Tones

A few days ago I finally had some time to do some scrapbooking and had one particular page that I wanted to work on. This page has 2 photo's of myself and my hubby holding our precious little grand daughter. Right after Thanksgiving we gave our grand daughter an early holiday gift which was this adorable Moose theme'd figural nightlight. Once we gave it to her, she dragged him around with her all day long like he was her doll baby. She kept telling us that it was her "new friend" so I decided to name my page "NEW FRIEND" to remind me of that day.

For this layout I used a hunter green 12x12 piece of cardstock for my background. I had a piece of dark mauve floral print paper that I cut down using my wavy edge scissors and then glued that piece of paper on top of my hunter green paper, leaving 2" of the green paper show along the top and bottom edges.

I had 2 photos that I cropped down and rounded their corners. I then mounted them onto light pink paper and onto black cardstock leaving an 1/8" of an edge and rounded all of my corners. I used my Cricut to make my title MY NEW FRIEND and cut it out on light pink paper. I then did the shadow effect and cut those same letters out of black cardstock and mounted them together. The black underneath makes the letters really pop!

I had 4 cardstock stickers that I used in the layout (Adorable, Cutie, Pumpkin and You & Me) and mounted them onto the page using glue dots. I also added a chipboard pink flower near the top right. Under the bottom photo is a cardstock preprinted tag that says Cutie Pie on it and I inserted some sheer pink ribbon onto it for the tag. I made a pocket on the back of this page and wrote down information about the day and the gift that we gave to her and inserted that information into the pocket.

Yes folks...you can JOURNAL on the back of your pages which I like to do often when I have a lot to say as it keeps my front side cleaner looking. I like CLEAN and STREAM LINED pages. This layout took me about 40 minutes to complete.

Wednesday, January 19, 2011

Quick and Easy Christmas Holiday Scrapbooking Layouts

Every year during the holiday season, I always make sure that I take a lot of photograph's of our family's festivities and the 2010 Christmas Holiday was no exception! Once the holiday was over and things calmed down, I was able to spend some time in my craft room scrapbooking some of our holiday photo's.

When it comes to scrapbooking, you don't have to pour a lot of money into your page layouts, nor do you have to spend 2 hours working on each of your pages. I like nice, clean layouts that don't take a lot of time.

Today I would like to share with you 2 Christmas Holiday layouts that I recently completed.

Photo Above:

For this particular page I used a muted red 12x12 sheet of scrapbooking paper for my background and at the bottom of the page is the word Merry Christmas so that is my title. We gave our little grand daughter the Little Tikes Crazy Coupe Car for Christmas and she immediately fell in love with it! Matter of fact, she wanted her pappy to push her around in it all day long!

I took a sheet of 12x12 beige paper that had a printed holly and berries design on it and cut it in half and affixed it to the center of my background paper. I then took 1/4" wide sheer red ribbon and glued it along each edge of the holly & berries paper to add a little interest to the layout.

I cropped my 3 photos, rounded their corners and mounted them onto red cardstock leaving a 1/8" edge and rounded the corners again. See photo for placement of photographs. I had some holly leaf and red heart rub-ons and rubbed them onto my page above the top left photo. Underneath that photo is a sheer vellum sticker that says Special Delivery and under that is a smaller photo of my grand daughter getting into her car for the first time.

I had a nice holiday greeting card that had Jingle Bells music notes and wording on it and I cropped that down to size and sprayed with archival mist spray to make it safe for the scrapbook. I then mounted it onto red cardstock and cropped it leaving an 1/8" edge. I had a satin ribbon bow with a white flower in the center of it and attached it to the Jingle Bells cut out. I then affixed that to the top right of the page. Underneath that I added my third photo.

Photo Above:

For this layout I used 2 sheets of printed 12x12 scrapbooking paper. One is a holly and berries pattern on red paper and the other is a beige paper with a holly and berries pattern. They coordinate well together. I cut the beige one in half and affixed it to the center of the red paper. I had 3 photo's I wanted to use so I cropped those down and mounted them onto dark green cardstock leaving a 1/4" edge on them. On that third photo on the right, I left a 1 1/2" edge on the bottom so that I could mount my red snowflake printed brads onto it to add interest to the page. (see photo for placement of photographs).

I had a beige tag and inked the edge of the tag in dark green. I used a red marker and did my journaling onto the tag and inserted a sheer red ribbon as my tag holder and then affixed it to my page. I had 2 Jolee's 3-D embellishments that are package shaped and attached them to the top of my page above the right photo.

As you can see...I didn't spend all day long making these 2 pages and they didn't cost me a fortune to make. I think both pages came out beautifully!

Sunday, January 16, 2011

How To Make Valentine's Day Chocolate Candy Magnets Out Of Craft Felt


How To Make Valentine's Day Chocolate Candy Magnets Out Of Craft Felt
Do you enjoy making handmade craft items to decorate your home with for Valentine's Day? If so, I've got a really easy craft project to share with you today. These little chocolate candies are completely hand sewn and crafted together out of your classic crafter's felt.

Once you complete them, you can add magnets onto the back side of them and place them on your refrigerator or file cabinet. If you have a little girl in your family, you can place them inside an empty clean Valentine's Day candy box so that she can use them as pretend food with her little toy dishes. No matter how you decide to use them, they are super easy to make and work up quickly.

Here is what you will need to make them:

1 sheet of craft felt in each of these colors: pink, red, chocolate brown, dark brown, white and vanilla.
Embroidery floss (to make all colors of your felt)
Small amount of poly fiber fill stuffing
Sharp Scissors, Embroidery Needle, Measuring Tape
Paper Shape Templates (use as patterns)
Round Magnets
All Purpose Liquid Quick Drying Craft Glue

To Make Paper Pattern: On a piece of paper, draw out a 1 3/4" diameter circle, 2" square and a rectangle that measures 1 1/2" by 2" in size. Cut out these shapes and use them as patterns.

Round Chocolate Candy: Cut two round shapes out of chocolate brown colored felt, cut one strip that measures 1/4" wide by 5 3/4" long. From red felt, cut out a swirl shape that is the diameter of your circle temple by about 1/8" wide. Using two strands of embroidery floss and your sewing needle, blanket stitch the thin strip around the edges of one circle and fasten off. Using two strands of red embroidery floss, hand stitch the red swirl to one of the chocolate brown circles using tiny whip stitches, fasten off. Using two strands of brown floss, blanket stitch the remaining circle onto the other side of the skinny strip. Right before you have it completely sewn shut, insert in a little bit of stuffing and then finish stitching it shut.

Square Chocolate Candy: Use your square paper pattern and cut two squares from dark brown felt. Cut a strip that measures 1/2" wide by 4 3/4" long. From white felt cut a strip that measures 1/8" by 2" and from red felt cut a heart shape that measures approximately 1/2" in diameter. Using two strands of white embroidery floss, hand stitch the white strip to one of the brown squares using tiny whip stitches. Using two strands of red floss, hand stitch the heart on top of the white strip using whip stitches. Using two strands of brown floss and a blanket stitch, attach the dark brown strip around the sides of the square you just decorated. Pick up your blank square and attach that to the other side of the strip using a blanket stitch. Right before closing, insert some stuffing inside and finish your stitching. Fasten off and hide your ends inside the square.

Rectangular Chocolate Candy: This is made just like the square but decorated a little bit differently. For this piece of candy, I used vanilla colored felt for my base. I then cut four tiny strips from brown felt and hand sewn them on top to resemble lines of icing. On top of that, I sewed on a red heart to decorate it. You will assemble this piece just like the other pieces.

Variations: You can change up the colors of your felt and make various theme'd shapes to decorate them...like little flowers, hearts, cupid's arrow, etc.

Once you are all done stitching them, you can glue magnets on the back and use them as cute holiday refrigerator magnets.

This project, instructions and idea is written by Shelly Hill, copyright 2011, All Rights Reserved.

Play Food - FREE Pattern For Felt Fish, Felt Burger & Felt Chicken Leg

For the past year I have been super busy making play food aka felt food for my little grand daughter's kitchen play set so last weekend I decided to make her a few felt dinner items. I made her a hamburger pattie, piece of fish and a chicken leg (drum stick) for her to use with her kitchen set.

I was able to make all 3 of them pretty quickly. You can hand sew them together with blanket stitches or sew the pieces together via a sewing machine...the choice is yours.

To Make The Felt Fish:

1 sheet of vanilla colored felt
vanilla embroidery floss
small amount of stuffing

I simple hand drew out a fish shape onto paper. Mine measures 5" long by 1 1/2" at the tail and 2 1/4" at the body by 2" at the head...just to give you a rough measurement. I cut out 2 body pieces and then 1 strip that measures 1/4" by the circumference of my fish. Using 2 strands of embroidery floss and a blanket stitch, I attached the strip to one body piece. I then attached the other body piece to the other side of the strip. Right before closing, I inserted some poly fiber fill stuffing. Don't over fill it or it will get too puffy on you. Finish your stitching and fasten off.

Picture shows me hand sewing the strip onto the fish body.

To Make The Felt Hamburger Pattie:

1 sheet of dark brown colored felt
dark brown embroidery floss
small amount of stuffing

I made a circle pattern by tracing around the bottom of a 4" diameter drinking glass. You will need to cut 2 circles from brown felt. You will need 1 piece of brown felt strip that measures 1/4" by the circumference of your circle. Using 2 strands of embroidery floss and the blanket stitch, attach the strip to one of your circles. Once it has been connected, attach the other circle to the other side of the strip. Right before closing, insert some stuffing to give it a puffy burger shape, then fasten off.

To Make The Felt Chicken Drumstick:

1 tan colored piece of felt and small amount of vanilla colored felt
tan & vanilla colored embroidery floss
small amount of stuffing

I drew out a chicken drumstick shape that measures approximately 5" long by 2 1/2" wide at it's widest point. I cut 2 of these shapes from tan felt. I then cut 2 bone ends using my paper pattern from vanilla felt. (see photo). Using 2 strands of vanilla floss, I hand stitched on the vanilla bone pieces onto the end of my tan piece using tiny whip stitches. You will do this for each piece (sides). Once done, place the wrong sides together (if hand sewing), use 2 strands of tan embroidery floss and whip stitch or blanket stitch the 2 pieces together. Right before closing insert a small amount of stuffing inside, finish stitching & fasten off.

There you have it...3 more pieces to your felt foodie collection. I will be posting many more FREE patterns over the next several months so keep checking back or follow my blog via Google Friend Connect to stay updated. Enjoy!


Happy Crafting!

Wednesday, January 12, 2011

How To Keep The Kids Busy On Bad Winter Weather Days

How To Keep The Kids Busy On Bad Winter Weather Days


During the Winter Season we are often hit with bad winter weather here on the North East Coast. That bad weather can consist of blizzards, snow storms, ice storms, sleet, freezing rain, you name it, we pretty much get it all here.

When the bad weather strikes, businesses, schools and daycare's close down by the thousands, leaving many children stuck at home with not much to do. When our daughter was little, we decided to make "bad weather days" our family's arts and crafts day. As I look back over the years, we made some pretty awesome things...many of which I still have today.

The first thing I recommend that you do is to make up an arts and crafts bin by purchasing a plastic bin at your local discount store. Then, you will head to the dollar store and your local craft store and pick up some supplies. You should really fill up that bin! Here is a list of general supplies that every craft bin should have.

Straight Edge Scissors, Designer Edge Scissors

All Purpose Liquid Craft Glue and Glue Sticks

Construction Paper, Watercolor Paper and 8" x 11" sized scrapbooking paper

Stickers, Rubber Stamps, Ink Pads, Magnet Backs, Wiggle Eyes

Scraps of Ribbon, Lace, String, Yarn, Feathers, Popsicle Sticks, Craft Sticks

Buttons, Charms, Beads, Faux Gems, Rhinestones, Small Silk Flowers, Jewelry Findings, Blanket Keychain Rings, Blank Hair Barrettes and Pony Tail Holders

Markers, Colored Pencils, Crayons, Water Paints, Finger Paints, Acrylic Paints and Paint Brushes

Modeling Clay and Optional Clay Molds

Paper Mache ~ Trinket Boxes, Ornaments, Photo Frames, Etc.

Coloring Books, Water Paint Books, Activity Pads

Foam Craft Sheets and Sheets of Craft Felt

A Few Project Ideas: Make refrigerator magnets, jewelry items, holiday ornaments, paintings, molded clay figures, homemade greeting cards, refrigerator art, picture frames, holiday decorations, decorate paper mache trinket boxes, hair items for girls, gifts for various holidays, keychains holders, shoe charms, etc.

Once you purchase the basic supplies which are suited for both boys and girls, you will want to keep your bin in a handy place. Once all of those "bad winter weather" days hit, you will be prepared for some Arts and Crafts fun with your children! You can visit various online web sites to get some great craft project ideas to use up all of those supplies. Keeping children busy during bad weather days doesn't have to be a stressful task so view it as a great way to have some family bonding time.

This article is copyright 2011 by Shelly Hill, All Rights Reserved.

Tuesday, January 11, 2011

Sponsored Post ~ My Knitting Career

Thanks to Lemuel Craft

I actually work from home doing different knitting projects for people all over the world. My online store sells numerous different types of knitted goods. One of my favorite things to knit are hats and scarves. I absolutely love following the changing styles and trends to come up with classic pieces that I know people will love wearing. It gives me a fantastic thrill knowing that I can make money by doing something I absolutely love. I've been knitting since I was a young girl and I just never gave it up. Many people only get hooked onto knitting for a short time, but I've been doing it for so long that I could probably even tell the professionals how to knit properly.

When I knit, I go into another world. I love knitting while sitting and watching some satellite tv. While I knit, I just go into a different mind set. The hours seem to pass by so quickly and I can't help but feel like my day is flying by as I'm quickly making hats and different other pieces that people can wear. Once done, I normally store the knitted piece into a box and list it online at my store. Some people purchase my items and compliment me on how well they are done while others just send me nice comments about how my work looks.


Saturday, January 8, 2011

How To Make An Easy Scented Sachet

A few weeks ago I needed an easy project to make with my church youth group girls and we decided to work on holiday gifts. One of the projects we made were these quick and easy scented sachets. Here is what you will need to make each one.

6" diameter circle of tulle (we used white netting aka tulle)
5" piece of white craft wire
6" piece of white satin ribbon
8" piece of scalloped edge pink lace
1 tiny pink satin ribbon rosette (flower)
craft glue
wire cutters & scissors
scented potpourri of choice

Place a small amount of potpourri in the center of your tulle circle. Thread the edge of the pink lace onto the white wire so that it gathers the lace up. Take this and carefully wrap it around the tulle filled potpourri ball to fasten it together into a sachet shape as shown in the photo. Using satin ribbon, form a bow & glue onto the front along with a little satin rosette in the center of the bow. When the sachet needs 'refreshed' just spritz with perfume or scented oils.

If you need a quick and easy scouting project, youth group project or a quick & easy party favor...these would work well. You can even decorate them much more fancier than what we did.

Happy Crafting!

Tuesday, January 4, 2011

Play Food ~ Free Felt Food Ice Cream Sandwich Pattern!

If you have been following my blog...you will have read & seen a lot of the free felt food patterns that I have been designing and making for my little grand daughters pretend play kitchen that she has. Well...today I am posting yet another FREE felt food pattern for you to enjoy.

Below you will find my instructions on how I made an Ice Cream Sandwich for her kitchen play set using craft felt. I did mine completely with hand sewn stitches but you can machine sew it together too.

Play Food ~ Felt Ice Cream Sandwich Pattern

Chocolate Brown and White Craft or Wool Felt
Chocolate Brown and White Embroidery Floss or Sewing Thread
Small Amount of Fiberfill Stuffing
Scissors & Sewing Needle

Pattern: 2 1/4" by 4 1/2" paper pattern + 1" by 13 1/2" paper pattern

Directions: From chocolate brown felt, cut 4 pieces that measure 2 1/4" by 4 1/2" in size. From chocolate brown felt, cut 1 piece that measures 1" by 13 1/2" in size, from white felt cut 1 piece that measures 3/4" by 13 1/2" in size (the white strip needs to be slightly smaller in it's width than your chocolate strip).

Place 2 chocolate brown rectangles together and using 3 strands of brown embroidery floss, hold those 2 pieces together and make random french knots on them to simulate the indents of a real chocolate wafer. You will then repeat this with the other 2 rectangles. Your next step is to use 2 stands of chocolate brown embroidery floss and blanket stitch the 1" by 13 1/2" chocolate brown strip around one of the rectangles. Once completed (attached) blanket stitch it to the other chocolate rectangle. Before closing it up to resemble a brick, insert some polyfiber fill but don't over-fill it or it will get too puffy. Finish up. At this point, it should look like a chocolate brick. Your next step is to attach the white strip around the sides of the chocolate brick to resemble the vanilla ice cream. You can blanket stitch it on using 2 strands of embroidery floss or just make simple tiny hand sewn stitches to attach it. If in a hurry, you can glue it on with some craft glue.

You have now completed your felt ice cream sandwich. The size I made is an ACTUAL size of a real ice cream sandwich but if you want to make a smaller one to fit toddler hands, just shorten the measurements on the paper pattern.

You can find more of my FREE felt food patterns ----> HERE

Happy Crafting!