Friday, December 31, 2010

Play Food - FREE Felt Food Cheese Blocks Pattern

My little grand daughter loves to snack on little blocks of cheese so I decided to make some out of felt so that she can use them with her play kitchen. This is the 94th piece of play food aka felt food that I have made for her so she has a well-stocked kitchen now! These cheese blocks are super easy to make...completely made with hand sewing and you can use up your smaller pieces of felt scraps.

I used acrylic felt for the cheese blocks in a light orange color. I did hand sewing and did a blanket stitch around all of the edges to form oblong blocks and inside I just put in some fiberfill stuffing so that they would hold their shapes.

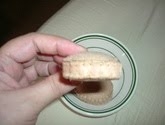
The two small ends of the block measure 1" square and the rectanular sides of the block measure 1" by 1 1/2" in size. Just use 2 strands of matching embroidery floss and blanket stitch all of the sides together to form the block! Super easy! I made 4 blocks of cheese for her play food set.

You can find more of my FREE felt food patterns ----> HERE

Happy Crafting!


Monday, December 27, 2010

Christmas Candy Santa Sleighs ~ Ornaments or Package Toppers

Looking for a cute candy ornament, package topper or table favor? If so, you have got to check out these santa candy sleighs that my sister in law made for us this year. I think they are way too cute! (although my pictures stink) LOL

She used scrapbooking glue dots to assemble them all together. The sleigh has 2 candy canes attached to each side of the sled. The sled itself is made up of a travel size candy bar (in this case a Hershey's Cookies & Creme bar) that measures 1" by 3" in length. On top of the sled she stacked 3 square pieces of wrapped candy that each measure 1" square and on top of that a wrapped Hershey's kiss. In front of the sleigh is a chocolate wrapped candy who is Santa! All of the pieces are attached to one another using scrapbooking glue dots.

These are great as package toppers or table favors or add a string to turn them into edible ornaments! cute cute cute!

Happy Crafting!

Sunday, December 26, 2010

PlayFood - FREE Felt French Fries Play Food Pattern


Here is my next installment in FREE felt food aka play food patterns for your little girl's kitchen and playfood sets. Today's installment features french fries and a splat of ketchup on the side. I decided to hand sew these together since working with skinny pieces of felt was trying my patience on the sewing machine.

Felt French Fries with Splat of Ketchup:

1 piece of vanilla colored craft or wool felt
vanilla colored embroidery floss & needle
scrap piece of red felt with red embroidery floss
Scissors

For the splat of ketchup, I just cut out a splat shape from 2 pieces of red felt. My splat measures about 2" in diameter...I made mine odd shape, not a perfect circle. I then did a blanket stitch and stitched the 2 splats together using red floss.

The french fries were a little big of a challenge for me. I decided to make the fries various sizes...after all, no 2 french fries are ever the same. From vanilla felt I cut out 2 pieces that each measure 5" long by 1 1/4" wide. You will want to vary these measurements for each french fry and each fry will take 2 matching pieces of vanilla felt. I used 2 strands of embroidery floss and just made tiny running stitches up 1 long side, across the one short side and halfway down the other long side. I then flipped it right side out and used tiny whip stitches to sew the fry shut. I didn't use any stuffing inside as the felt was the perfect bulk all on it's own. For our french fry set...I made 6 french fries.

Happy Crafting!

Tuesday, December 21, 2010

Play Food - FREE Felt Chicken Nuggets Play Food Pattern!

 Here is my next installment in my felt food aka play food patterns! I have been making felt food for my grand daughter's kitchen play set for a year now and let me tell you...she has a large collection of it!

Today's installment is for felt chicken nuggets which happens to be one of her favorite foods! You can make 2 chicken nuggets in less than an hour and there is no machine sewing. I made mine by blanket stitching my pieces together.

For each nugget...you will need to matching sized pieces for each side. Mine measure about 2 1/2" by 2" and I cut them oblong but not a perfect oval...after all..chicken nuggets are not a perfect oval. You can make yours any shape you would like or trace around an actual chicken nugget to get your pattern. I made mine out of tan craft felt.

Once I had my 2 sides cut out...I cut a strip from the felt that measures 1/4" by the circumference of my nugget. I then did a blanket stitch using 3 strands of tan colored embroidery floss to connect the strip to the side piece and then repeated it for the other side piece. Right before I had it completely sewn...I stuffed it with some fiber-fill. As you can see...pretty dang gone easy!

You can find more of my FREE felt food patterns right here on my blog by checking out my faux food and my felt project categories. Happy Crafting!

Saturday, December 18, 2010

Scrapbooking - 2 Easy Scrapbook Layouts In Neutral Color Tones

If you have been following my blog for any length of time now...you have probably guessed that I love to scrapbook...especially now because I am a first time grandma and I always have a camera beside me to capture those precious moments of our little grand daughter.

A few weeks ago I sat down and made two 12x12 scrapbooking layouts using the same photo's for each one...one page for my book and one page for my daughters scrapbook. I decided to do these 2 pages in neutral tones and I think they came out great!

Page One: Shown Above

I decided to make this page for myself as I wanted a heritage & legacy page...after all, my daughter and grand daughter are our legacy. I used a piece of scrapbooking paper that had a print on it all in neutral tones of browns & beiges. I cropped down my 3 photos, rounded the corners, mounted them onto solid beige paper, cropped leaving an 1/8" edge, rounded the corners, mounted again onto dark brown paper, cropped leaving an 1/8" edge, rounded the corners and mounted all 3 of them onto my page. I used a chipboard piece in brown with the letter H on it to stand for the initial of our last name and mounted it onto my page. I made my own journaling block using beige & brown paper (same paper I used for my photos) and attached it to my page. I wrote about our family legacy on it. I had a epoxy sticker that says Family Are Forever and placed it at the bottom of my journaling block. At the bottom of the page I attached a pale blue gross grain ribbon using 2 metal brads. On top of that is another epoxy sticker that says Our Legacy. This page took me about 40 minutes to make.

Page Two: (above)

For this page I used the same 3 photos but just mounted them onto dark brown paper. The background paper is in a neutral floral print. I had some LOVE & FUN stickers that I used & mounted them onto dark brown paper and attached to the page between the 2 left-side photos. The title block says "Near to my Heart" was mounted onto dark brown paper and attached to the page upper right side. The bottom has a sticker also mounted onto dark brown paper that says You & Me. I gave the page to my daughter for her scrapbook and she did her journaling on the backside of the page. Yes folks...your journaling can be on the back of the page :)

Happy Scrapbooking!

Monday, December 13, 2010

Play Food - FREE Felt Food Hot Dog Pattern

Here is my next installment on how to make felt food for your little girl's kitchen play sets. I think this hot dog came out really cute. It is complete with a squirt of ketchup and mustard! I was able to make this hot dog completely by hand with no machine sewing....although you can machine sew it if you want to.

Felt Hot Dog:

1 sheet of tan colored craft or wool felt
scraps of red and yellow felt
red and yellow embroidery floss
small amount of fiber-fill stuffing
scissors and needle

Pattern: piece of paper measuring 5 1/4" long by 2" wide. From tan felt, cut 2 pieces.

For the ketchup and mustard squirt, I just free-handed that from scraps of felt. I used 2 strands of red embroidery floss and hand sewed it onto one of the tan pieces of felt using tiny stitches. On top of the red squirt, I simply hand sewed on the yellow mustard squirt. Place the 2 tan pieces of felt wrong sides together and use 2 pieces of tan embroidery floss and make a running stitch up the 2 long sides. Turn the "tube" right side out and stuff firmly with fiber-fill. Using tiny stitches...gather up each end with stitches and fasten off. You want your ends to be tightly gathered up so it looks like a hot dog.

You can find more of my FREE felt food patterns ----> HERE

Happy Crafting!
Shelly

Saturday, December 11, 2010

Classic Crafts - Shrinky Dinks!!! Great for Scrapbooking too!

When I was a child (over 35+ years ago) I can remember pestering my mother to buy my brother and I various Shrinky Dink craft kits. When my daughter was little...she used to pester me to buy them for her...now that I am a grandmother, I now buy them for my grand daughter.

Shrinky Dinks have been around for many years now and they are super easy to do. You simply color in the shapes with colored pencils (usually provided in the craft kits), cut them out and bake them on low heat in your oven for a few minutes. Once they are done...you let them cool and then you can craft with them!

Shrinky Dinks can be made into holiday ornaments, refrigerator magnets, scrapbooking, cardmaking, to decorate packages & gift bags and so much more!

So the next time you head out to your local craft store...pick up some Shrinky Dinks and let your creative mind & hands create something wonderful this holiday season!

Happy Crafting!

Tuesday, December 7, 2010

Easy To Make Felt Flower Refrigerator Magnets Pattern

Does your refrigerator need a little sprucing up? If so, I have an easy refrigerator magnet pattern to share with you today. These two magnets are simply made from craft felt and all are done with simple hand sewing and embroidery techniques. If you have a pile of little felt scraps laying around your craft room...this project is a great way to use those scraps up!

Here is what you will need to make each refrigerator magnet:

felt circles each measuring 2" in diameter. (you will need 2 per magnet)
felt tear drops to fit on your circle. (you will need 5 per magnet)
felt circle measuring 1/4" in diameter. (you will need 1 per magnet)
felt strip measuring 1/4" by the circumference of your large circle.
embroidery floss (colors to match felt), sewing needle and scissors
tiny amount of stuffing
craft glue
round magnet disk

Cut out all of your felt pieces as outlined above. The 2" diameter circles and the strip should all be cut from the same color of felt. Using two strands of embroidery floss to match the color of your felt circle, hand stitch on the tear drop shapes to form the shape of a flower. Use two strands of embroidery floss and hand stitch the tiny 1/4" diameter circle in the center of the flower. Make sure all of your knots are on the reverse side.

Using two strands of embroidery floss, use a blanket stitch to attach the felt strip to your flower circle. Once it has been attached around the edges, start attaching the blank back circle until you reach 3/4 of the way around. Use a tiny bit of craft stuffing and insert it into the magnet and finish blanket stitching around. Finish off and hide the threads inside of the mini pillow that was formed.

Flip the flower over and use craft glue to attach a magnet disk to the back side. Let it completely dry for several hours and then use the magnets to decorate the front of your refrigerator.

Pattern and instructions is copyright 2010 by Shelly Hill, All Rights Reserved. This pattern can not be reproduced or published elsewhere without Shelly's permission and official Author's bio attached. Please email Shelly for a copy of it.

Scrapbooking - Using Lace, Ribbons & Paper Doilies In Your Scrapbook Layouts

For this particular scrapbooking layout, I wanted to use primarily scraps or left-overs from other scrapbooking projects...so I decided to use some self-stick floral lace, sheer white ribbon, 2 paper doilies with scalloped edges, left-over paper flowers and a few other things. I decided my color scheme would be pink, purple and white since she was wearing an outfit that evening in those colors.

The diecut poem box reads as follows (incase you want to make your own & print it out): While we try to teach our children all about life, our children teach us what life is all about. I chose this particular poem box because G is always smiling & laughing and she teaches Nanny & Pappy to lighten up & to laugh more in our lives.

For this layout I used:
1 (12x12) piece of scrapbooking paper in a lavendar, white & pink rustic background
1 (1/2" x 12") piece of floral self-stick lace ribbon (left side border)
2 (8" x 11") pieces of cardstock - pink & purple (for mounting the 2 photo's in a dbl. mount)
2 (4" round) lace edge paper doilies (the size of a coaster) mounted behind photo's with 2 1/2" of the edge sticking out the side of each mounted photograph.
2 paper flowers (1 pink & 1 purple) mounted together with a pink round brad.
Purple Alphabet Stickers (to spell out her name).
1 (1/2" by 6") piece of white sheer ribbon (for bow on top of poem box).
1 die-cut poem box about children that was mounted onto purple cardstock.
1 self-stick clear rhinestone for the center of the sheer ribbon bow.

Notes: I did slightly crop my 2 photo's, rounded their corners and also rounded the corners on the double matting...I left a 1/8" edge on the mats. Other than that, I used glue dots and 2-sided scrapbooking tape.

Saturday, December 4, 2010

Play Food - FREE Felt Food Pattern - Holiday Peppermint Candies

Here is my next installment on free felt food patterns! I decided to make a holiday theme'd food item this time for my grand daughter play food & kitchen set that I have been working on for over a year now. This little felt peppermint candy works up super quickly and you can make one using your felt scraps. If desired, you could turn this into a Christmas Tree ornament by just threading through some string at the top.

Felt Peppermint Candy:

Scraps of white and red craft or wool felt
white and red embroidery floss and needle
stuffing
scissors

For my pattern: I made mine a little bigger than a normal sized peppermint candy so that wee one could hold it better & so it wouldn't get lost as easily. Mine measures 1 1/2" in diameter, so you will need a paper circle measuring 1 1/2" diameter for your pattern.

Use your pattern to cut out 2 circles from white felt. For the red stripes/swirls...I totally winged it and just used scraps that I cut to fit. I then used 2 strands of red embroidery floss and hand stiched my 5 swirls/stripes onto one side of each white circle...remember, you want your candy to be 2-sided. I then cut out a strip from white felt that measures 1/8" wide by the circumference of my circle. I used 2 strands of white floss and stitched the strip to once circle and then stitched it to the second circle. (make sure your red patter is facing outward when placing your 2 white circles together). Right before closing, I inserted just a tad of stuffing so that it would hold it's shape or you could insert a cotton ball inside it. Finish your stitch and your done! I was able to make 3 of these in just one hour.

You can find more of my FREE felt food patterns ----> HERE

Happy Crafting!
Shelly

Thursday, December 2, 2010

Scrapbooking - Easy Christmas Holiday Theme 12x12 Scrapbook Pages

If you are a beginner scrapbooker or just looking for some quick and easy Christmas Holiday scrapbooking page ideas, I have 2 to share with you today. Both of these pages are in the 12x12 format.

Page 1: (Shown Above)
I used a piece of solid red 12x12 cardstock and a piece of green pine needle print paper. I ripped approximately 3 1/2" off the top & bottom edges of the pine needle printed paper and glued it to the center of my page. I had a rub-on transfer that had snowmen and pine trees on it so I rubbed that on up at the top of my page. I used 2 photo's for the layout which I cropped, rounded the corners, mounted onto green cardstock and rounded the corners again. I then glued them onto my page. I had a 3-D embellishment of a holiday stocking with candy canes & holly inside it that I glued onto the page. For my journaling block, I simply wrote my thoughts on white paper, mounted that onto red cardstock & then onto green cardstock. Don't forget to round the corners! I applied a sticker that says Happy Holidays at the top of the journaling block & around the sides I applied snowflakes. The bottom right of my journaling block has another pine tree rub-on sticker.

Page 2:

I found a piece of beautiful holiday paper at the dollar store that has holly greens, holly berries and a red ribbon printed onto it (right side) so I used that. I had 3 photos which I rounded the corners and mounted onto red cardstock. I had a poinsettia floral sticker that I applied to the bottom right corner area. I had a 3-D embellishment that says Jolly Old St. Nicholas that I applied to the left center area and right above that a holly leaf & berries sticker. I also had a rub-on sticker that says HOLLY JOLLY that I applied near the top. I signed & dated the page on the bottom left side.

I always believe in signing and dating my pages!!!

Happy Scrapbooking!

Wednesday, December 1, 2010

Kids Crafts: Holiday Ornaments Made From Homemade Dough

Ornament Dough Recipe by Nancy Murphy

Children's Ornament Dough Recipe

Are you looking for a new way to help your children learn “hands-on” the letters of the alphabet? Would your child like to make a gift for a relative? Are you looking for a project for a rainy day? Creating play dough letters and ornaments is a fun way for your child to do all these things.

Ingredients for the Ornament Dough Recipe:

4 Cups of Flour
1 ½ Cups of Water
1 Cup Salt

Here are the steps to follow to make the dough:

1. Preheat the oven to 350 degrees
2. Put all the ingredients in a bowl.
3. Mix them together.
4. If the dough is too stiff add more water to get a workable consistency. The dough should be easy to handle.
5. After you are done mixing, knead the dough for five minutes.
6. Next shape the dough into fun shapes and letters. Try writing your name on some of them.
7. Place your creations on a greased cookie sheet.
8. Bake at 350 degrees for 45 minutes.
9. After baking, you can paint the dough with markers or paint.

This ornament dough makes great gifts for friends and family. Just make them an ornament with their name on it, or create a fun shape. Try using cookie cutters to make your shapes.

This brings back wonderful childhood memories. I had so much fun making the ornamental dough when I was a child. My sisters and I used the dough to make ornaments with each of our names on them. Everyone had their name on the Christmas tree when we were kids.

You can find more helpful parenting articles like this at www.Blooming-Babies.com. Nancy Murphy is the owner of http://www.Blooming-Babies.com an online baby and children store. She is the proud mother of two little girls.