Wednesday, September 29, 2010
Scrapbooking Baby Girl Layout In Browns and Pinks!
When it comes to scrapbooking, I love combining chocolate brown with pink, blue or turquoise in my layouts. This layout features my little granddaughter Lil Gia and she was wearing the cutest pink jumper dress with a white shirt that had pink and brown polka dots so that gave me the inspiration for my color scheme.
I used a piece of chocolate brown cardstock for my background and I took a piece of pink 12x12 scrapbooking paper that had little pink polka dots on it and ripped off both edges and glued it onto my background paper. I had a border sticker that is in brown and pink that says Memories on it and tacked it at the top of the page.
I cropped down my 2 photo's, rounded the corners and mounted them onto chocolate brown paper (slightly different shade than my background paper), rounded the corners again and placed them on my layout as shown in the photo.
I had a tag that was done in brown, pink & whites and I applied a sticker to it that says Sugar & Spice. I attached the tag with a dark pink brad to my layout. I had a matching sticker frame (matches the tag) and put chipboard letters inside it that say GIA and attached those to my page on the left side bottom area. I then added stickers for the year 2010, two flower stitckers to accent my date and finished up with a SMILE sticker underneath the bottom photo.
I decided to do my journaling on the back of the page as I had a lot to say...there is nothing wrong with journaling on the back of your layouts :)
Thursday, September 23, 2010
Scrapbooking - Seashore Beach Theme'd Scrapbook Layout
For this scrapbooking layout, I wanted a 3-dimensial bottom border to add emphasis to the photos that we took down at the New Jersey Shore last year. If you look at the bottom photo, you will see that its me and my hubby standing on some rocks after the tide went down. I decided to make my own bottom border to correlate with that photo. I took scraps of dark olive green, light olive green and heathered gray paper and randomly hand cut them into rock shapes that are 2 1/2 to 4" in diameter. I then randomly glued them to the bottom of my page to resemble beach rocks.For my 2 photos, I simply cropped them down, rounded the corners, mounted them onto chocolate brown paper with a 1/4" border and rounded the corners again. I then glued them to my page. I had two 3-D embellishments that related to being in love and romance and put those onto my page. Simple, Quick & Clean layout that is really easy to do.
Happy Scrapbooking!
Sunday, September 19, 2010
FREE Crochet Candy Corn Refrigerator Magnet Pattern
I love decorating the front of my upright freezer and the front of my refrigerator with homemade holiday magnets. In the fall of 2008, I found this free crochet pattern online to make Halloween Candy Corn magnets.
What I really like about this pattern is that its super easy, even a beginner can crochet them...and better yet, its a great way to use up some of your yellow, orange and white yarn scraps.
I made my refrigerator magnets using acrylic 4-Ply yarn and then glued magnets on the back with some all-purpose craft glue. If you decorate your home with a little Halloween ornament tree, you could omit the magnet and add a little hanging string.
You can find the pattern for FREE on the Crochet Memories Web Site ---> HERE
Have fun crocheting!
Thursday, September 16, 2010
FREE Crochet Pattern - Turkey Butt Refrigerator Magnet
Last year (fall of 2009) I found this adoreable free crochet pattern online to make a Thanksgiving Turkey...but not your regular turkey head...a turkey butt! LOL I thought it was cute and funny all at the same time!
You can find the FREE crochet pattern to make the Turkey Butt Refrigerator Magnet by heading ----> HERE (sorry ~ The original pattern poster has removed their site which means the pattern is gone.)
You only need a little bit of chocolate brown yarn, some varigated yarn and a size G crochet hook...although I used a size F as I wanted them a little smaller. Then glue some magnet on the back of them with some tacky glue and your done.
It took me less than 15 minutes to crochet a Turkey Butt! (gosh, I love saying that!)
~ Shelly ~
Monday, September 13, 2010
FREE Crochet Plarn Snowman Refrigerator Magnets Pattern
Here is another great Trash To Treasure crafting project! This project utilizes plarn (plastic yarn made from plastic shopping bags) but you could also use 4ply acrylic yarn too. These darling little snowman refrigerator magnets work up quickly! If desired, you could omit the magnet on the back and add a hanging string and turn them into Christmas Tree Ornaments.
Click Here for a you tube video on how to make plarn.
Click Here for a web site that will teach you how to make plarn.
Here is what you will need:
1 plastic shopping bag, turned into plarn
1 round magnet
scraps of black, red & orange felt (for hat, hat ribbon, eyes & carrot nose)
all-purpose craft glue
size F or G crochet hook
scissors
To Make The Snowman Head:
With your plarn or yarn, chain 5, slant stitch into first chain to form a ring. Chain 1, then make 10 single crochets in the ring, slant stitch to first SC that you made, chain 1, then make 2 single crochets in each single crochet, slant stitch in first single crochet, fasten off and weave in your ends. (note: I made mine with plarn which is much bulkier than regular yarn).
To Make The Trims:
From black felt, cut a top hat shape and glue it onto the top of your snowman's head. I trimmed mine with a scrap of red felt on one and on the other with a scrap of ribbon. Cut a small triangle from orange felt for his nose and 2 small circles from black felt for his eyes. Glue these onto his head. You can decide if you want to add a mouth or not...either way he looks cute! Finish up by gluing a magnet disc on the back and let them dry for 2 hours.
Labels:
Crochet Projects,
Holiday Crafts,
Snowmen,
Trash To Treasure
Saturday, September 11, 2010
Halloween Crafts That Kids Can Make

When I was a little girl, I loved to sit and make various holiday crafts. Now that I am a mother, I share my love for crafting with my daughter. Every holiday season, we take time out of our busy schedules to work on some new holiday craft projects.
When it comes to crafting with your children, I think it's important to take photographs of your crafting session. After they become adults, you can dig out these photographs and reminisce about the fun time that you spent together.
If you are looking to build some crafting memories with your own children this Halloween season, consider making one of these quick and easy projects.
Pumpkin Walnut Shell Magnet
empty and clean walnut shell halves
scrap of brown chenille stem measuring 1/2" in length
orange acrylic paint and paint brush
scrap of cardboard
1" piece of magnet
all-purpose white craft glue
child safety scissors
Paint the halved walnut shell orange with acrylic paint; let dry. Lay walnut shell down on a scrap piece of cardboard (or poster board); trace around it. Cut out this 'oval' shape and set aside. Glue the chenille stem so it looks like the pumpkin stem to the top of the walnut shell. Glue the cardboard to the back of the walnut shell and let dry. Attach the magnet to the cardboard.
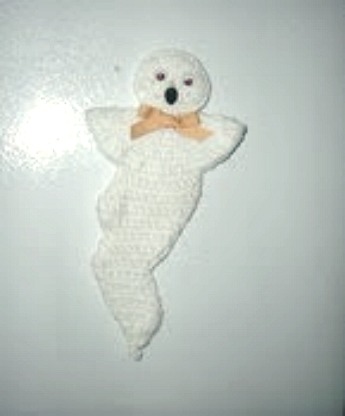
Lollipop Ghosts
1 sheet of white felt, cut into 5" squares
1 lollipop
2 (1/8" diameter) wiggle eyes
6" piece of 1/8" wide black satin ribbon
scrap of black felt, to make ghost's mouth
white tacky glue
child safety scissors
*optional* substitute an old white cotton T-shirt for the white felt
Place the lollipop in the center of your felt square. Fold felt over; secure it shut with the black satin ribbon by tying a bow. Glue 2 tiny wiggle eyes on the face. Using black felt, cut out a tiny circle or oval measuring approximately 3/8" in diameter to use for the ghost's mouth. Glue mouth on below ghost's eyes and your done!
Ghost Foam Magnet
1 ghost pattern
1 sheet of white foam
1 piece black foam scrap
2 (1/8" diameter) wiggle eyes
1 magnet
white tacky glue
child safety scissors
You can free-hand your own ghost pattern. Place your ghost pattern on top of the white foam; trace around it. Cut out your ghost. Using a scrap of black foam, cut out a small mouth (round or oval) measuring 1/4" in diameter. Glue your 2 wiggle eyes onto the ghost's face along with the black mouth. Turn ghost over; glue on a piece of magnet. Let dry.
Ghost Ornament
1 (3 inch diameter) Styrofoam ball
1 (8 inch square) of white cotton fabric
1 piece of black felt
1 (4 inch) piece of black satin ribbon, hanging cord
1 small straight pin (used in sewing)
1 (6 inch) piece of black satin ribbon
white tacky glue
child safety scissors
Center the ball on the square of white fabric; wrap fabric around the ball. Tie fabric shut by using the 6" piece of satin ribbon and make a bow. (the ball is the ghost's head). Tie the 4" piece of satin ribbon into a loop with a knot. Using the straight pin, push it through the knot and attach it to the top of your ghost's head. Add a small dot of glue to hold it into place. Using the black felt, cut out the 2 eyes and a mouth and glue onto the head. Let dry. These look cute hanging from trees!
This article is copyright 2009 by Shelly Hill, the owner of this blog. This article can not be reproduced without Shelly's permission.
Thursday, September 9, 2010
FREE Crochet Halloween Ghost Refrigerator Magnet Pattern
I love decorating my home for the various holidays through out the year with handcrafted holiday accents. A few years ago, I found this free crochet pattern online and then I lost the instructions. After some searching, I finally found Myra's great crochet blog and low and behold...she has the pattern posted there.
You can head on over to Myra's blog ---> HERE to print out the crochet ghost fridgie pattern. While you are there, check out all of her other patterns.
Now that I found her site...I will be making several more of her items. Her patterns are easy to follow and understand.
~ Happy Crocheting ~
You can head on over to Myra's blog ---> HERE to print out the crochet ghost fridgie pattern. While you are there, check out all of her other patterns.
Now that I found her site...I will be making several more of her items. Her patterns are easy to follow and understand.
~ Happy Crocheting ~
Tuesday, September 7, 2010
Scrapbooking - Easy Sea Shore Beach 2-Page Scrapbook Layout
The layout shown in the photo above was done in the 12 x 12 format. I purchased a pack of beach themed papers at my local dollar store! I believe I got 5 or 6 sheets in the pack. I also purchase a pack of summer themed stickers at the dollar store and that is where my title sticker came from aka the Summer Dreams. I made both of the tags myself from scraps of scrapbooking paper that I got from my scrap bin.
The stickers and embellishments you see on the pages are left-overs from other layouts I did in the past. All 4 photos were mounted onto dark blue cardstock and the corners of the photos and matts were rounded.
As you can see from this 2-page beach aka sea shore themed layout...it was inexpensive and was made in less than 45 minutes. So head on over to your local Dollar Store and check out their craft department...you probably can find a lot of nice items to use in your scrapbook that are only $1.00!
Sunday, September 5, 2010
Scrapbooking | Toddler Girl Layout Done in Shades of Pink!!!
This layout was done in the 12 x 12 format and done in various shades of pink! Little Gia was wearing horizontal striped pink leggings (various shades of pink) and a pink shirt with pink polka dots so I used those 2 pieces of clothing as my pattern and color inspiration in this layout.
Background: I took a piece of pink striped paper and cut it down to measure 5" by 12" and glued it to the center of my solid bubblegum pink paper. I then took a piece of pink polka dot paper and cut it down to 1/4" by 12" strips (made 2 strips) and glued those strips on the edges of the striped paper (see photo). By doing this, I have incorporated both her shirt & pants pattern/colors into my layout.
Across the top of my page I placed a border sticker that is in pink and white that says Precious Memories, Cherished Thoughts which I think is appropriate :) On the bottom solid pink portion of my layout I used some hot pink self adhesive mesh and cut it into a strip that measures 3" by 12" and tacked it down. I did this to add texture & interest to the bottom of my layout.
I had 3 photos which I cropped, rounded the corners, mounted them onto dark hot pink paper, rounded the corners again and glued them onto my layout (see photo for placement). For my journaling block, I cut from dark hot pink paper a rectangle that measures 3" wide by 4" high and rounded the corners. From light pink paper I cut a rectangle that measures slightly smaller and glued that on top. I then did my journaling & dated it. I took a piece of light pink vellum and cut it to the same size as the dark pink rectangle and rounded the corners. I used 3 hot pink staples and attached it to my journaling block. At the top of my journaling block is a pink sheer ribbon bow that is accented with a hot pink rhinestone.
I think this layout turned out fabulous...very girly and it matches little Gia's outfit that she was wearing!
Happy Scrapbooking!
Friday, September 3, 2010
Primitive Country Halloween Stitchery Pillow
I made this pillow several months ago for a dear friend of mine who loves decorating her home in the Primitive and Country Style. It took me only 2 days to make (one for the stitchery and a second day for the machine sewing).
Primitive Country Halloween Stitched Toss Pillow
Here is what you will need:
Simple Pattern From a Halloween Coloring Book
Cotton Embroidery Floss
12" by 12" piece of Tea or Coffee Dyed Cotton Muslin Fabric
1/2 yard Cotton Homespun Fabric (I used green)
Sewing Machine and Basic Sewing Supplies
Pillow Form or Fiber-Fill Stuffing
Scissors
Disappearing Ink Pen
Pattern: I purchased a child's Halloween theme coloring book. I found this cute ghost pattern in it and transfered it to my muslin fabric using a disappearing ink pen after I shrunk the pattern by 25% in my scanner.
Hand Stitching: I used two strands of cotton embroidery floss for all of my hand stitching in the colors I preferred. You can use any colors to accent the design that you choose. I then hand drew my own candy corns and the words Happy Halloween and stitched them.
Machine Sewing: From green homespun fabric, I cut four strips that measure 2" wide by the length of my muslin fabric and sewed them onto my muslin panel for a border. Then I measured my front panel and cut a back panel from homespun fabric. Using my sewing machine, I attached the front and back panel together, leaving 1/2 of the bottom unsewn. I then inserted my pillow form and finished closing up the pillow by using a blind hand stitch.
Pretty simple and easy!
~ Happy Crafting ~
Primitive Country Halloween Stitched Toss Pillow
Here is what you will need:
Simple Pattern From a Halloween Coloring Book
Cotton Embroidery Floss
12" by 12" piece of Tea or Coffee Dyed Cotton Muslin Fabric
1/2 yard Cotton Homespun Fabric (I used green)
Sewing Machine and Basic Sewing Supplies
Pillow Form or Fiber-Fill Stuffing
Scissors
Disappearing Ink Pen
Hand Stitching: I used two strands of cotton embroidery floss for all of my hand stitching in the colors I preferred. You can use any colors to accent the design that you choose. I then hand drew my own candy corns and the words Happy Halloween and stitched them.
Machine Sewing: From green homespun fabric, I cut four strips that measure 2" wide by the length of my muslin fabric and sewed them onto my muslin panel for a border. Then I measured my front panel and cut a back panel from homespun fabric. Using my sewing machine, I attached the front and back panel together, leaving 1/2 of the bottom unsewn. I then inserted my pillow form and finished closing up the pillow by using a blind hand stitch.
Pretty simple and easy!
~ Happy Crafting ~
Copyright Passionate About Crafting 2016. All rights reserved. Powered by Blogger
Blogger Templates created by Deluxe Templates. Wordpress designed by Simplywp
