Monday, June 28, 2010

Free Barbie Doll Crochet Dress Pattern with Shawl, Purse and Hat

My daughter J recently was going to throw away a box of Little G's baby socks when I happened to rescue them from her. When I got the box, I immediately saw crafting potential with them. For this project, I decided to make a Barbie Dress from the baby sock along with a crochet shawl type of wrap. You can find the hat and purse pattern here on blog under the Barbie Projects category.

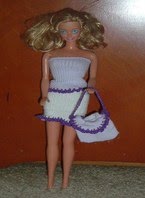
To Make The Dress: You will need one baby sock, in this case, I used a light purple one. These socks are the classic stretch knit ones. I cut the heal and toe section off so that the tube remaining measures 4 3/4" long. The top opening of the sock will be the top of the dress, the raw edge (the cut edge) will be the bottom. You will want to fold under 1/8" of the raw edge so that its hidden inside the dress. Using bedspread weight cotton and a size 4 Crochet hook, you will want to do a picot stitch trim around the hemline of the dress working through both layers so that the raw edge will be inside.

Picot Trim: Attach by single crocheting, chain 2, SC in second chain from hook, insert hook through both layers of sock about 1/8" away from your last stitch and SC, chain 2, SC in second chain from hook, insert hook through both layers of sock about 1/8" away from your last stitch...go around the entire bottom edge of the dress in this manner and then finish up by slant stitching in your first SC, fasten off and weave in your ends.

To Crochet The Shawl/Wrap: This is very simple and is done in a single crochet stitch using a size 4 crochet hook. Chain 70, SC in second chain from hook and in each chain across (total of 69 SC). Chain 2, turn and repeat by SC in each stitch across (total of 69 SC). You will do this for 8 complete rows, chain 2 and turn.

Picot Trim: This trim is worked the same way as described above for the dress, except you will be doing it in your previously worked SC stitches. At each corner, I did SC twice so that it laid flat nicer but that is up to you. I went around all 4 sides of the shawl with the picot stitch and fastened off and weaved in my ends.


As you can see...simple, easy and took me less than 90 minutes to make both the dress and the shawl/wrap.

You can find the rest of the patterns in my Barbie Projects category here on my blog. I will be posting more during the next few weeks.


Sunday, June 27, 2010

How To Make A Barbie Doll Dress From Baby Socks

My daughter J was cleaning out Little G's clothing a few days ago and was going to throw away a box of her baby socks...I of course saw crafting potential with them and snagged the box!

I used 2 of Little G's baby socks to make this cute 2-piece dress set for Barbie, the aka 11 1/2" fashion doll. It only took me 1 hour to make it including the little tote bag purse.

Here is what you will need:

Size 2 Crochet Hook
2 Baby Socks (I used one pale purple and 1 white, knitted infant socks)
Dark Purple crochet thread (bedspread weight)
Scissors
Sewing Thread & Needle

To Make The Top: I cut the heal and toe area off of the sock. It now measures 2 3/4: long. The sock opening will be the top of the shirt and the portion of the sock that you cut off will be the bottom. Using some sewing thread and a needle, fold 1/8" of the cut edge up and on the inside so that the raw edge is underneath your top. Use 2-4 stitches just to tack it up (these will be removed later).

Using a size 2 Crochet Hook, poke it through both layers of your raw edge end and attach cotton thread (bedspread weight crochet thread) with a single crochet. Now you want to do the edging which is: chain 2, SC in second stitch from your hook, poke your crochet needle through both layers of sock about 1/8" away from your first SC and SC in that spot, chain 2, SC in second chain from hook, poke your crochet needle through both layers of the sock 1/8" away from your previous SC and keep going around the circumference of your sock. Once around, join with a slant stitch in first SC, Fasten Off and weave in ends. Remove the tack stitches and your top is now done.

To Make The Skirt: The skirt is made just like the top except I used a white sock for this skirt and I also made it 1/2" longer in the length than what I did for the top.

To Make Tote Bag - Purse: I saved the toe portion from the sock that I used for her top and decided to make that into a little tote bag. I cut it down until it was 2" in length and made sure the toe seam was inside. You will do the same picot crochet trim that you used on the bottom of the shirt and skirt but this time, you go around the top of the tote bag with the stitching. Note: Remember to turn in 1/8" of an inch of the cut/raw edge of the sock to hide the raw edge inside of the tote bag so you will be crocheting through both layers. Once I was done with that I attached a tote bag - purse strap and chained 28 for that.

Simple and I was able to save 2 socks from the landfill! yeah!

You can find more frugal Barbie ( 11 1/2" Fashion Doll ) Patterns here on my blog in the Barbie Projects Category! I will be posting many more over the coming weeks so follow my blog to see them!


Friday, June 25, 2010

FREE Crochet Fashion Doll Barbie Shoulder Bag Pattern

Here is pattern #2 of the new series of Barbie aka 11 1/2" fashion doll patterns that I am working on for my grand daughter. This pattern will make a cute little shoulder bag purse and only takes about 30 minutes to make. It is super easy because its done entirely in a single crochet SC stitch.

Supplies:

Size 2 Crochet Hook
Bedspread Weight Cotton Thread
Scissors
1/4" satin ribbon rosette

Chain 11 stitches, SC in the second chain from your hook and in each chain across for a total of 10 SC. Chain 1, turn and SC in each stitch across for a total of 10 stitches. You will do 20 complete rows of SC stitches (total of 10 per row) with a chain 1 and turn at the end of each row.

When you reach the end of row #20, do NOT turn. Fold your rectangular strip in half and SC down one of the sides. Fasten off and weave in your ends. Join with a slant stitch on the other side and SC down that side, fasten off, weave in your ends. Join your thread to the top right corner of your purse with a slant stitch and 2 SC. Working just in the stitch on the front of the purse top edge, chain 2 and then SC in the second chain from your hook, skip next stitch and SC in that stitch, chain 2, SC in the second chain from your hook, skip next stitch and SC in that stitch, do this along front edge of your purse and then go around the back edge ending with 2 SC in the corner. Fasten off and weave in your ends.

As you can see, you now have a little pocket and its time to make your purse strap.

Purse Strap: Attach to one side of your purse with a slant stitch and SC in same joining stitch. Chain 25 and single crochet on the other side of your purse to connect your strap. Fasten off and weave in your ends.

Finally, use some good craft glue and glue on a ribbon rosette onto the front to add a little decoration to your new purse!

You can find additional FREE patterns here on my site and during the coming weeks, I will be adding more Fashion Doll patterns as I make them! Bookmark my site or join my blog followers list (right hand column of the page).

You can find the crochet pattern for the sun hat ----> HERE

Happy Crocheting,
Shelly

Thursday, June 24, 2010

FREE Crochet Fashion Doll Barbie Sun Hat Pattern

Now that I am a grandmother to a beautiful little girl, I have become interested in making some Barbie Doll or 11 1/2" fashion doll items for her...such as clothing, hats, purses and even some furniture which I will be posting the projects as I complete them here on my blog.

Today I would like to share with you my pattern that I used to make this adoreable crochet Barbie doll sun hat.

Supplies:

Bedspread Weight Cotton Thread (for crocheting), I used Ecru
Crochet Hook size 2
Scissors
1/4" wide satin ribbon (your choice of color)
1/4" diameter satin ribbon rosette
Craft Glue

You will start off by chaining 4 stitches and then 15 DC (double crochets) in the 4th stitch from your crochet hook, for a total of 16 DC. (first DC is your chain 3). Join with a slant stitch in the top of chain 4.

Next, DC in each DC around but add 4 DC evenly spaced around, for a total of 20 DC. Join with a slant stitch in top of first DC. For your next row, HDC (half double crochet) in each DC around (total of 20 HDC) and join with a slant stitch in the top of your first HDC. Working in your back loops, make 2 DC, chain 2, 2 DC all in your joining slant stitch. Skip your next HDC stitch and make 2 DC, chain 2, 2 DC in next stitch, skip next HDC and make 2 DC, chain 2, 2 DC in next, go completely around and join with a slant stitch in the top of your beginning DC. Finally, chain 3 and DC in each space (not stitches, but in the chain 2 spaces) around. Join with a slant stitch in the top of your chain 3. Fasten off and weave in your ends.

To finish up your sun hat, cut a piece of 1/4" wide by 12" long piece of satin ribbon. Weave this ribbon in and out of the spaces on your hat and glue the ends to secure and trim off ends about 2 1/2" to make tails. Finally, glue on a satin ribbon rosette. For my Barbie sun hat, I used mint green satin ribbon and a darker green ribbon rosette.

I will be posting the crochet Barbie Purse Pattern next and will be posting many more Barbie patterns in the next couple of weeks so bookmark my site or become a blog follower (join follower box in the right side bar).

Barbie Crochet Purse Pattern ---> HERE

Happy Crocheting!

Shelly

Wednesday, June 23, 2010

FREE and EASY Crochet Dish Scrubby Cloth Pattern


When it comes to dish washing, I am very happy to say that I own & use a dishwasher...however, there are times when I need to hand wash something and need a smaller cloth to get into all of the tiny places...such as a canning jar or drinking glass and full-size dishcloths are too big or too thick.

I solve that problem by crocheting myself a few small dish scrubbies out of cotton yarn. Here is how you can make one using a simple single crochet stitch.

Scraps of cotton yarn (I use Sugar and Cream cotton yarns)
Size D or F crochet hook
Scissors

Chain 2 and then SC (single crochet) in second chain from your hook and in each chain across. Once you reach the end, chain 1 and turn. You will want to SC (single crochet) across the entire row, chain 1 and turn again. Repeat this until you have 10 rows. Fasten Off, weave in your ends.

This little cotton scrubby is the perfect size for when you need to hand wash drinking glasses, canning jars or just to get into tight little spaces to get all of your food particles out of them. They are machine wash & dry.

Enjoy!


Monday, June 21, 2010

Beautiful FREE Crochet Angel Ornament Pattern


My wonderful friend named Darlene recently made me a beautiful crochet angel ornament and sent it to me. You can see it in the right side of the photo above, isn't she beautiful? I think so! She looks a lot prettier than what my photo shows!

My friend Darlene found the FREE pattern online ---> HERE but added the gold trim and flowers herself to make her even more pretty! I think she did an awesome job!

Now that she told me where she got the free pattern at, I think I might try to crochet a few myself as they would make great additions to my holiday gift giving but on second thought...angels are a great gift any time of the year!

They would be super cute hanging up on a large Christmas tree or used as package toppers too!

Enjoy!

Shelly

Saturday, June 19, 2010

Kids Arts and Crafts Apron Made with Simply Spray Fabric Paints


I was recently sent some fabulous fabric paints by a company called Simply Spray. I wrote up a product review for them which you can read ---> HERE

One of the projects I decided to make using the Simply Spray Fabric Paints was a childs arts & crafts apron. My niece loves to do arts & crafts and needed an apron to protect her clothing so I decided to make one for her.

I went out to my local craft store and purchased a 100% cotton canvas childs size apron in a natural color along with an iron-on decal of a cute elephant. Once home, I washed and dried the apron to remove sizing. I then used the pink Simply Spray Fabric Paint and lightly sprayed it onto the front of the apron. I left that dry for 20 minutes and then sprayed on the purple. My niece loves those 2 colors so that is why I picked those. Once it was dry, I decided to iron-on the elephant decal to the front.


I gave the apron to my niece 2 days ago and she just loved it. This was a super easy project to do and took me less than 2 hours (allowing for drying time).

You can find the tie-dye T-shirt project that I made using these fabric paints by going ---> HERE

I would like to thank the generous folks over at Simply Spray for sending me the fabric paints! I have several more projects I will be making during the next couple of weeks and will be blogging those too!

Thursday, June 17, 2010

Product Review - Simply Spray Fabric Paints Tie Dye Tshirt


A few months ago I was contacted by the folks over at Simply Spray Fabric Paints to see if I would be interested in reviewing their fantastic fabric paints and being the avid crafter that I am, I said yes!

They sent me numerous Simply Spray Fabric Paints to try out with some of my crafting projects. The first thing I decided to make was a tie-dye T-shirt for my nephew C who is really into tie-dye items.

First off let me say...I have never used this product until now and boy oh boy, I was pleasantly surprised at how easy these fabric paints are to use. You simple shake them up and then remove the protective tab and then lightly spray your fabric items. I love that the colors are so vibrant!

I went to my local craft store and bought a childs 100% cotton T-shirt that was originally white. We laid down some newspaper outside on our deck and then C scrunched up the shirt and we simply sprayed on our first color. Since it is summertime, it only took about 10 minutes to dry. Once dry, we rearranged the t-shirt again (by scrunching it up) and sprayed on our next color. We did several colors and C picked them out. Once the T-shirt was completely dry we waited 3 days and then I ironed on a decal onto the front which depicts a fisherman. (C loves to go fishing so that is the one he picked out).


As you can see...this is so much easier than dying fabrics in your washing machine. Now that I have tried Simply Spray Fabric Paints, trust me, I will be using them for additional craft projects and will be posting them here on my blog.

I highly recommend these products to you as they are very easy to use and older children can certainly use them! Head on over to the Simply Spray Web Site and check out their gallery of all of the cool craft project ideas!

You can find the apron that I made using these paints ---> HERE

Shelly

***NOTE*** I have not received any compensation for this product review. I was sent FREE products to try out and to use in a real craft setting. My personal opinion is honest and unbiased and your opinion of this product might differ from my own

FREE Country Ruffles Crochet Coaster Pattern!


If you love to crochet and are looking for a FREE and EASY coaster pattern that works up super quick then check out this free pattern over on the Around The Crochet Table Web Site!

You can crochet the coaster all in one color like she did, or you can do what I did. I used 2 different colors on one (to use up some of my yarn scraps) and on the other one, I used a vibrant rainbow yarn which I really loved that effect. The coasters will measure about 4 3/4" in size when completed. If you want them a little bigger, go up 1 size on your crochet hook, the pattern is done with a size F hook.

For best results, use a cotton yarn as they are super absorbent...if you are not worried about absorbency, go ahead and use some acrylic yarn. For one of mine, I used cotton and for the other one I used acrylic.

I love to send little handmade items in greeting cards that I mail out to friends and family and these fit right inside and make a little gift. I just add an extra first class stamp on my envelope and its just fine.


You can print out the coaster pattern ---> Around The Crochet Table

You can find additional FREE crochet patterns & ideas right here on my blog by checking out my Crochet Projects Category.


Tuesday, June 15, 2010

How To Make Felt Animal Shaped Cookies - FREE Pattern!

As part of my onoging series on how to make felt food items for your little girl kitchen play sets, I came across this FREE pattern & instructions online to make felt animal crackers...although I think they look a lot like iced animal shaped cookies. I decided to make a bunny, chick and a butterfly.

I dug out my Tupperware (tm) Spring and Easter Cookie Cutter Set and decided to make a set for my grand daughters felt foodie collection. I used the cookie cutters for my pattern of the Spring set I made 2 weeks ago.

You can find the free patterns & instructions on the Lit'l Brown Bird's Blog and she gives GREAT detailed instructions on how you can make them. You will need tan colored felt along with various colors of felt to use for your frosting.

While you are visiting her site, you can find other FREE felt foodie patterns too so make sure you check them all out while you are there!


Sunday, June 13, 2010

Free Crochet Shell Stitch Dish Cloth Pattern


I love to crochet and have been crocheting for 30 years now. One of my favorite crochet patterns/stitches in the shell stitch...it's super easy and makes really nice afghan patterns or dish cloth patterns ( dishcloth pattern ). When I make homemade crochet dish cloths, I always use 100% cotton yarn and I really like the Sugar and Cream brand of cotton yarns. You never want to use acrylic yarns!!!

Before I get started with directions on how I made the dishcloth, I want to explain how to do a shell stitch pattern.

How to do a shell stitch - Crochet

You always want to make a foundation chain in multiple of 6 stitches plus 1. For my dish cloth, I chained a foundation row of 37.

To begin a row of shell stitches on a foundation chain, thread over and insert hook in the 4th chain from your hook. Complete a DC (double crochet) and make another DC in this same stitch. This will make a half shell, the first step in a shell stitch row.

The correct order for a shell stitch row is as follows:

Beginning of row: Half shell (the turning chain 3 and 2 DC in the 4th stitch from your hook).

Repeat as often as desired: Skin 2 stitches, 1 SC in next stitch, skip 2 stitches, 1 shell (which is 5 DC in next stitch).

End of the row: Skip 2 stitches, 1 SC in next stitch.

When turning, you always want to chain 3.

Here is how I made my crochet dish cloth using cotton yarn and the shell stitch. The approximate finished size will be 8 1/4" by 7 1/4".

To make the dish cloth, I used a size 4 crochet hook. I made a foundation chain row consisting of 37 stitches. I then DC in the 4th chain from my hook and made another DC in that same stitch. I then skipped the next 2 stitches and made a SC in the next stitch, skipped the next 2 stitches and made a shell which is 5 DC in the next stitch. I did this across my row...ending with a SC in the last stitch. I then chained 3 and turned and went across again. I did this for 13 rows, not including the foundation row. You can make as many rows as desired. Once done, fasten off and weave in your ends.

You can find additional free crochet patterns here on my blog by looking under my crochet category...including additional dish cloth patterns! Please follow my blog (right hand column) so that you can see when I post new craft patterns!


Friday, June 11, 2010

FREE Crochet Hearts Doily Pattern!


If you love quick and easy crochet projects, I think you will love this Hearts Around Doily Pattern designed by Terri Kroupa.

You can find the FREE printable pattern on the Around The Crochet Table Site.

I decided to make one for my auntie as she loves to decorate during each and every holiday so I made mine in red and white so she could put it out during Valentine's Day but you can make it any color combination that you desire. The original designer made hers in rose and white colored sport weight yarn.

I was able to quickly make it, less than 40 minutes from start to finish and I think its cute...now I need to make one for myself in blue :)

So head on over to the Around The Crochet Table Site and print out the instructions so that you can crochet one too!


Happy Crocheting!


Wednesday, June 9, 2010

Free and Easy Crochet Child's Scarf Pattern


It is never too early to start working on holiday presents and my niece wants a scarf! So, I decided to get busy and make her one. This is a pattern I came up with myself and once your scarf is completed, it will measure approximately 72" long by 4" wide which makes it the perfect size for a soon to be 4 year old.

I made this scarf by crocheting it using a shell stitch pattern which I will explain below. It only took me a few hours to complete so it works up quickly.

Supplies Needed:

2 Different Colors of Yarn (I used black and turquoise)
Crochet Hook size F
Scissors
Sewing Needle to weave in the ends

Using my size F crochet hook, I chained 307 stitches which makes up the length of your scarf. I used black yarn for this and the following 2 rows.

How To Make A Shell Stitch: Shell stitches are made up when a foundation chain is in a multiple of 6 stitches plus 1, hence my chain row of 307 stitches. To begin a row of shell stitches, thread over and insert your crochet hook in 4th chain from your hook. Complete a double crochet (DC) and make another DC in this stitch. This makes a half shell, the very first step in a shell stitch row.

The correct order for a shell stitch row is as follows:

Beginning Row: Half shell (the turning chain and 2 DC in 4th stitch from hook).

Repeat as often as you wish: Skin the next 2 stitches, 1 single crochet (SC) in next stitch, skip the next 2 stitches, 1 shell stitch (5 DC in next stitch).

End of Row: Skip next 2 stitches, 1 SC in next stitch, to turn, chain 3.

Directions for Foundation Chain and Row 1: Chain 307 stitch and turn by DC in the 4th stitch from your hook along with 1 more DC in the same stitch. Skip the next 2 stitches and SC in the next. Repeat the shell stitch across for row 1 using black yarn. When you get to the end of the row, your last stitch should be a SC, chain 3 and turn.

Row 2: Still using black yarn, do the shell pattern across, ending with a SC.

Row 3: I switched to the Turquoise colored yarn and did the shell stitch across.

Rows 4 and 5: Using black yarn, do the shell stitch for both of these rows.

Row 6: repeat row 3 using the turquoise colored yarn.

Rows 7 and 8: Repeat rows 4 & 5 using your black yarn. Fasten Off and Weave in all ends.

Fringe: I cut 4" lengths of black and turquoise yarn and looped them into my ends to make the fringe. You can make this fringe full and lush by doubling up your yarns.

This scarf is machine wash/dry if you use acrylic yarn like I did and the perfect size for older toddlers. You can find more FREE crochet patterns my checking out my crochet category here on my blog.


Monday, June 7, 2010

Free and Easy - Crochet Dish Cloth Pattern


Years ago one of the very first things I learnt to crochet were homemade dishcloths (dish cloths) in a variety of easy patterns. When I crochet dish cloths, I always use Sugar and Cream cotton yarn and I prefer to use their varigated color patterns as its just...well....easier than to select solid colors. When it comes to dish cloths, you always want to use cotton yarns and not acrylics.

This pattern I came up with years ago and its super easy because it only uses 2 different stitches...the SC (single crochet) and the DC (double crochet). The approximate finished size is 7 3/4" by 7" in width.

Supplies:

Crochet Hook Size 4
Cotton Yarn (1 ball of Sugar & Cream makes 2 dish cloths)
Scissors

Using your size 4 crochet hook, chain 34 which is your foundation row.

Row 1: DC in the 4th chain from your hook, chain 1, skip next stitch, DC in next stitch, chain 1, skip next stitch and DC in next. Repeat across. Chain 1 and turn.

Row 2: SC (single crochet) in each stitch across for a total of 32 SC stitches. Chain 1 and turn.

I repeated row 2 for a total of 19 rows...you can do this row however many times you wish to obtain the size that you desire. After completing row 19, I chained 3 and turned.

Row 20: Repeat row 1 which is the double crochet, chain 1, skip next stitch and double crochet in next pattern. At the end of this row, I fastened off and weaved in my ends.

Friday, June 4, 2010

How To Make A Mini Rag Quilt Wall Hanging

If you love to sew and like country or primitive decor, I think you will enjoy this easy to make sewing project. You will need the following supplies:

8" square of homespun fabric (backing fabric)
(2) 4 1/2" squares of homespun fabric (2 front squares)
(2) 4 1/2" squares of tea stained muslin fabric (2 front squares)
(2) 2 1/2" by 4" pieces of tea stained muslin fabric (hanging straps)
7" piece of cotton quilt batting
Coordinating sewing thread
Black Metal Mini Hanger (found at craft supply stores)
2 round plastic buttons
Scissors
Sewing Machine

Place the piece of cotton quilt batting on top of your backing square. Arrange the 4 smaller squares on top (as shown in the photo). Using a 1/2" seam allowance, sew the squares to the backing and batting piece. You will use scissors to fringe all of their edges being careful to not cut through your sewn stitches.

Use your sewing machine to sew your muslin straps by sewing around 3 of the edges and then turn right side out. Finish sewing up the final short end of the strap. Fold straps in 1/2 and attach them to your mini quilt with handstitches or machine sewn stitches once you have the wire hanger placed inside them (make sure you place the hanger in there before you sew them shut. Finally, hand sew on 2 decorative buttons to add a little pretty accent to your mini wall quilt.

This mini quilt would look cute hanging off a peg shelf or cabinet knob.

Happy Quilting,
Shelly

Tuesday, June 1, 2010

Simple 5 Generations Scrapbooking Page Layout

With the birth of my baby grand daughter last year...we now have 5 living Generations in our family. I wanted to celebrate that fact by scrapbooking a quick and easy 12x12 layout with all 5 of us in the photo.

I decided to use a preprinted 12x12 piece of green scrapbooking paper that already had an imprinted left-side design consisting of purple stripes & flowers. I then used my Cricut and cut out the words "5 Generations" and attached them to the top of my layout for my title. I also used my Cricut to cut out some purple flowers and did the shadow effect on the Cricut and cut out the same flower shape on frosted vellum. I wanted 5 flowers since there was 5 of us in the photo. I then used tiny little silver brads and attached the vellum & paper flowers to my layout in random places (see photo for placement). Using a acid-free fine point marker, I wrote each of our names onto the flowers. I cropped my photo and matted it onto dark purple cardstock and put that onto my page. I finished up my dating the page in the bottom right corner.

All in all...this page cost me less than $1.00 to make and less than 30 minutes to put it together. Super fast and easy!

Happy Scrapbooking!
Shelly