Monday, November 30, 2009

FREE Pattern To Make Felt Elf Clogs - Elf Shoes


When it comes to crafting, I usually don't craft in the felt medium...however, this fall has been a different story. I got a great deal on a lot of felt and I have been looking for various holiday and christmas patterns online that utilize felt so that I can use up some of my stash.

I found this felt elf clog pattern over on the Jolly All Sorts Blog ---> HERE

You can print out the pattern and make them too. I was able to make mine by completely hand stitching them with a blanket stitch. I chose to use red felt and white embroidery thread along with blue pom-poms. (my pom-poms are actually a dark navy blue color but my camera flash lightened them).

I think the original pattern maker used wool felt...I used the regular craft store acrylic felt when I made mine. It only took me an hour to make my little elf clogs! I think they are way too cute! I have mine sitting on my end table in the living room on top of 3 Christmas story books (decorations)...but I think they would look darling hung on a holiday tree, sitting on a shelf or your mantle.

~Shelly~

FREE Crochet Gingerbread Man Pattern


If you enjoy great crochet patterns, I suggest you check out Priscilla Hewitt's web site called Priscilla's Crochet ---> HERE (I am not responsible if other bloggers & craft designers move their patterns or discontinue their web sites/blogs)

Back in November of 2007, I found a few of Priscilla's crochet patterns online and printed them off. Since that time, I have been enjoying her great patterns. You can go to her web site (see above) and purchase some of her original patterns or download and print some of her free patterns.

A few months ago, I made her Gingerbread Man pattern and found it to be very easy to follow and it worked up quickly. I think they are just too cute!

You can find free patterns on her site for: Home Decor, Christmas Items, Afghans, Baby Items, Bed and Bath and so much more!

Happy Crocheting!

~Shelly~

Sunday, November 29, 2009

Primitive Holiday Tree Stitchery Pattern By Primitive Stitches


Last month I found a fantastic web site that offers a ton of primitive patterns to make all kinds of things...such as pillows, wall hangings, candle mats, muslin tags and so much more!

The night that I found the Primitive Stitches Web Site, I swear....I spent a good 2 or 3 hours browsing Rhonda's patterns and I ended up purchasing at least 10 of them. Her patterns are easy to read, easy to understand and best of all...very affordably priced. I got my patterns delivered via email in only a few short hours.

Anyway...she has a free pattern on her web site for a primitive style holiday Christmas tree pillow that you can get free with any pattern purchase that you make. I finally had time a few weeks ago to make my very own pillow using her pattern (shown in the photo above). I think it turned out fantastic and will make a great holiday gift this season.

Over the next couple of weeks, I will be posting various pictures of primitive items that I personally made by using Rhonda's patterns so keep checking back to see what I created. I highly recommend that you check out her site if you are looking for some of the best primitive patterns on the internet.

~Shelly~

Felt Food - Faux Fried Eggs Pattern


Several weeks ago a friend of mine asked me if I could make some faux food items for her daughter. She explained to me that for Christmas this year she purchased her a kitchen set but now needed safe (nontoxic) playfood to go with it. Since I am a big time crafter, she knew I could come up with an entire bag of groceries for her.

Over the next few months, I will be posting various instructions and photo's of toy food aka faux food that you can make for your little one too. These items will be made from felt, fleece, fabric, crochet and/or fun foam.

Felt Fried Breakfast Eggs

Free-Handed Egg Pattern
White White
Dark Yellow Felt
White and Yellow Thread
Sewing Needle
Scissors
Tape Measure

Pattern: I free-handed an egg shape onto paper and then traced it onto my white felt. Mine measures 4 1/2" by 3 1/2" at its widest points. (The size of a real fried egg). My egg yolk pattern is a 1 3/4" diameter circle.

Trace your pattern onto two pieces of white felt and cut them out on the traced pattern line. Trace your egg yolk circle onto one piece of dark yellow felt and cut it out.

Place your egg yolk slightly off center (see photo) and whip stitch around it attaching it to one piece of white felt. Use tiny little stitches so that they are barely noticeable with dark yellow thread. Fasten off on the backside with a knot.

Place the top portion of your fried egg on top of a blank piece of white felt. Using white thread, blanket stitch around the entire circumference of your egg. If you don't know how to do a blanket stitch, go ahead and use a whip stitch. Fasten off on the backside by hiding the end of your thread inside the egg.

Note: If you would like a little puffiness to your yolk centers, you can add a tad of poly fiber fill stuffing before you sew them completely on the egg white.

You can find more patterns to make faux play food by checking out my Faux Food Label here on my blog.


Kids Craft Project - Beaded Felt Lollipop Holiday Tree Ornaments


When it comes to making holiday crafts with children, one of my favorite crafting materials to use is felt. These felt lollipop holiday tree ornaments are easy to make, take only a few basic craft supplies and work up quickly.

Since there is some hand sewing and beading with this project, I recommend ages 7 and up with some adult supervision.

Supplies Needed

Felt (red, white and green)
Multi-Colored Seed Beads
White Sewing Thread and Sewing Needle
4" long by 1/8" diameter Wooden Dowel Sticks
All-Purpose Craft Glue
Scissors
6" Piece Satin 1/4" Wide Ribbon

Pattern: Cut out a 4" diameter circle from paper. (We used the bottom of a drinking glass to get our circle.

Step 1: Trace your pattern onto white felt. You will need two white circles per lollipop. Trace your pattern onto red or green felt and cut out. Now using that colored felt, cut swirls into the felt (see photo for example).

Step 2: Lay your swirl colored felt design on top of one white felt circle. Using a sewing needle and white thread, randomly hand sew on colored seed beads to represent lollipop sprinkles. (make sure you knot your thread on the reverse side of the felt).

Note: As you are hand sewing on the seed beads, you are also attaching the swirl felt piece to the top of the white round circle. If desired, you can decorate both white felt pieces with colored felt swirls and seed beads.

Step 3: Using some craft glue (just a little bit), glue the wooden dowel to the other white felt circle leaving 3" hang past the circle. This will serve as your lollipop stick. Let this dry for a few minutes before proceeding to the next step.

Step 4: Place the two white felt circles together (like a sandwich). Using white thread and a sewing needle, whip stitch around the edges of both white felt circles. (you are attaching the front piece to the back piece).

Step 5: Cut off a 10" piece of white thread and double it. Thread it through the top of your ornament and tie into a knot. Take a piece of satin ribbon and tie a bow around the handle of your lollipop. You can now hang your ornament on a holiday tree.


This article, craft project and photographs are copyright 2009 by Shelly Hill, All Rights Reserved.

Easy Beaded Felt Holiday Tree Ornaments


Kids Craft Project - Easy Beaded Felt Holiday Tree Ornaments

When my nieces and nephews come to my home to spend an afternoon, they always look forward to crafting with me. I try to pick out easy projects for all of us to do together. We are able to create several of these felt tree ornaments in just a few hours.

Ages: 7 and up with adult supervision

Supplies Needed:

Green Felt
Various Round Beads (various colors and size but no larger than 4mm)
All-Purpose Craft Glue
Sewing Needle and Dark Green Thread
Wooden Dowel Sticks (1/8" diameter by 3" long)
Scissors
Disappearing Ink Marker (for tracing pattern)

Pattern: Simple triangle shape measuring 3 3/4" tall by 2 3/4" wide.

Step 1: Trace your triangles onto green colored felt and cut out. You will need two green triangles for each ornament that you make.

Step 2: Center your wooden dowel onto one piece of felt, leaving 1 1/2" of the dowel sticking out beyond the felt to resemble a tree trunk. Use a little glue to glue it into place and set aside to dry.

Step 3: Using dark green thread, hand sew various color and sized beads onto the front of one of your triangles.

Step 4: Sandwich the two triangles together (the one with the beads and the one with the wooden dowel). Using a sewing needle and dark green thread, whip stitch around the entire tree's edges, being careful to not pull the stitches too tightly.

Step 5: Use a piece of thread and attach it to the top of the tree for a hanging loop. (I like to double my thread so its a little more sturdier).

Your little beaded felt tree ornaments are now ready to be hung onto your holiday tree.

Pattern and instructions are copyright 2009 by Shelly Hill, All Rights Reserved.

Saturday, November 28, 2009

Crochet Project - Snowman With Hat And Scarf Pattern


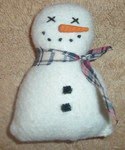
Here are the instructions on how you can make your very own crochet snowman for the holidays. This pattern was given to me by my aunt about 3 years ago. I am not sure of the original source since she photo-copied it for me. I lost the black crochet hat pattern over the years so you will have to make your own or buy one of those inexpensive felt ones at the craft supply store.

Crochet Snowman Pattern

Supplies Needed:

2 Wiggle Eyes
White 4-ply Acrylic Yarn
Red with Silver Sparkles (small amount) Acrylic Yarn
Sculpey Clay Orange Colored Carrot Shaped Nose
Poly-Fill Stuffing
Crochet Hook Size F
Tapestry Needle
Scissors

*Note* Work in continuous rounds.

Arms (Make 2)

Rnd 1: Chain 2, 6 SC in 2nd chain from the hook.
Rnd 2: 2 SC in each stitch (12 SC)
Rnds 3-6: SC in each stitch (12 SC)
Sl St in next st, fasten off.

Body (Make 1)

Rnd 1: Chain 2, 8 SC in 2nd chain from the hook.
Rnd 2: 2 SC in each sit (16 SC)
Rnd 3: (SC, 2 SC in next st) repeat around (24 SC)
Rnd 4: SC in each st (24 SC)
Rnd 5: (SC in each of next 2 st, 2 SC in next st) repeat around (32 SC)
Rnd 6: SC in eac st (32 SC)
Rnd 7: (SC in each of next 3 st, 2 SC in next st) repeat around (40 SC)
Rnd 8-13: SC in each st (40 SC)
Rnd 14: (SC in each of next 3 st, sc decrease) repeat around (32 SC)
Rnd 15: SC in each st (32 SC)
Rnd 16: (SC in each of next 2 st, SC decrease) repeat around (24 SC)
Rnd 17: SC in next 4 st, place arm next to body with right sides together, edges lined up. 4 SC through both arm and body (joining arm to the body), 8 SC across the front of the body (only in the body stitches), 4 SC to join 2nd arm, 4 SC in only the body stitches (24 SC)
Rnd 18: 4 SC, 8 SC around outside edge of arm, 8 SC across the front of the body, 8 SC around outside edge of the other arm, 4 SC (32 SC)
Rnd 19: SC decrease twice, 8 SC around arm, SC decrease 4 times across the front, 8 SC around the arm, SC decrease twice (24 SC)

Stuff the arms and body with poly-fill stuffing. I stuffed mine firmly.

Rnd 20: (SC, SC decrease) repeat around (16 SC)
Rnd 21: SC decrease around (8 SC)

Do not fasten off. Add a little bit more stuffing into the neck area.

Head (make 1)

Rnd 1: SC in each st (8 SC)
Rnd 2: 2 SC in each st (16 SC)
Rnd 3: (SC, 2 SC in next st) repeat around (24 SC)
Rnd 4-8: SC in each st (24 SC)
Rnd 9: (SC, SC decrease) repeat around (16 SC)
Rnd 10: SC decrease around (8 SC)
Rnd 11: SC decrease around (4 SC)

Slant stitch in next st, end off leaving a 8" long yarn tail. Using poly-fill, stuff the head firmly. Using the yarn tail and a tapestry needle, gather up the opening and sew shut using the yarn. Fasten off and thread in the yarn end so that it can't be seen.

How To Make The Scarf

Using a size F crochet hook, chain 50 stitches. SC in the second chain from the hook and in every chain across. Fasten off and thread in your end so it can't be seen. Tie your scarf around the snowman's neck. (I used red yarn with silver sparkles)

If anyone comes across the original pattern maker, please let me know so I can give them the proper credit for the pattern. Thanks!

Sewing Project - Free Travel Tissue Holder Pattern


A few weeks ago I was looking online for some free sewing patterns that would use up some of my fabric scraps from my fabric stash basket. (fabric left-over from other projects). I came across this free pattern to make a tissue pack cover (travel size or purse pack size) on the Craft and Fabric Links Site ---> HERE

You can print out the pattern and it's really easy to use and understand. I have been making up a slew of these and will be tucking them into our stockings this year for the holidays.

I was easily able to sew one of them up using her pattern and instructions in less than 20 minutes. A great way to use up some of your fabric scraps.


Friday, November 27, 2009

Easy Beaded Felt Wreath Holiday Tree Ornaments


Kids Craft Project - Easy Beaded Felt Wreath Holiday Tree Ornaments

This is a really easy craft project that you can do with older children and it only requires a few supplies. Since there is a little hand sewing involved, I recommend ages 7 and up with adult supervision.

I find that this is a great group project for scouts, youth groups, after-school programs etc. because they are quick, easy and inexpensive to make.

These ornaments would look cute hung off a holiday tree, garland or your holiday packages.

Supplies Needed:

Green Felt Sheets
Red 2 MM or 4 MM Round Beads
Dark Green Sewing Thread and Sewing Needle
Scissors
Red Satin Ribbon 1/4" Wide
All-Purpose Craft Glue

Pattern: You need a 3" diameter circle (I used the bottom of a drinking glass). Use a bottle cap to to make a 1" diameter circle inside your large circle so that you have a wreath shape.

Trace your pattern onto green colored felt. You will need two wreath shapes out of felt for each ornament that you make. Using some dark green sewing thread, hand sew on red beads to the front side of one wreath shape.

Place two felt wreath shapes together and whip stitch the center circle closed. Once finished, whip stitch the outer edges closed. Cut a piece of red satin ribbon that measures 1/4" wide by 5 1/2" long and tie it into a bow. Glue this bow to the top of your ornament.

Using doubled green thread, make a hanging loop and attach it to the top of your ornament. Let it dry for 20 minutes and then its ready to be hung onto your holiday tree.

How To Make A Primitive Americana Theme'd Holiday Garland


When it comes to decorating in the primitive style, it is often difficult to find Americana theme'd garlands...you can solve that problem by creating your own. This garland could be hung up all year long as there is nothing on it that 'screams' the Christmas holiday. Matter of fact, I like to hang mine up during the Patriotic Holidays on my staircase or across my mantle.

Supplies Needed

1 roll of sisal twine (2 or 3 ply for durability)
scraps of Americana print fabrics
scissors

Step 1: Measure out the length of sisal twine that you will need to make your garland. We usually do 4 to 6 feet. Cut it from the roll. Tie each end into a loop, this way when you hang it up, you can easily do it via the loops.

Step 2: Collect scraps of Americana print fabrics. We like to use 4 to 6 different prints and/or colors. You will want to cut out strips that measure approximately 1" wide by 4" long, or however long you would like. I usually cut out 50 to 75 of these strips when I make a garland.

Step 3: Lay your sisal twine out across the floor. Take your strips and lay them out in front of the sisal twine and alternate your colors and prints. You will want to tie all of the fabric strips onto the twine until your garland is filled up. There is no wrong or right way to do this. You can make your garland as full or as sparse as you would like.


Now that your garland has been made, you can decide where to hang it. I like seeing them hung on a mantle, across a doorway or up a staircase.

This post is copyright 2009 by Shelly Hill, All Rights Reserved.

Thursday, November 26, 2009

Holiday Craft Project - Mr. Sam E. Sicle Snowman Ornament


When it comes to decorating for the Christmas Holiday, I love decorating my home and my holiday tree with handmade items...especially with a lot of snowmen!

I designed this pattern last week because I wanted something a little different for my holiday tree. This ornament is a cross between a snowman and an icicle.

You can make this ornament out of Warm 'N Natural Batting or you can use regular or wool felt. If you don't want to do any hand stitched facial features, you could use black beads that you hand sew or glue on.

Mr. Sam E. Sicle Snowman Cotton Batting Ornament

Supplies Needed:

Warm 'N Natural Batting
Poly Fiber Fill Stuffing
Black Embroidery Floss
Fabric or Felt Scraps (hat and scarf)
1" Diameter Pom-Pom
Orange Sculpey Clay Carrot-Shaped Nose
Sewing Machine and Basic Sewing Supplies
Scissors and Tape Measure
Pattern
Disappearing Ink Marker
All-Purpose Craft Glue

To Make The Pattern: Cut a sheet of paper into a rectangular shape measuring 6" by 3 1/2" wide. Free hand an icicle shape. The one I drew measures 6" long by 2 1/2" wide at its widest point. It doesn't need to be a perfect shape as icicles are never perfect.

Trace your pattern onto a piece of Warm 'N Natural Batting with a disappearing ink marker. Pin two pieces of batting together. Using your sewing machine, straight stitch on your pattern line all the way around your icicle but leaving the top edge open (un-sewn). Turn your icicle inside out.

Using three strands of black embroidery floss, embroidery two X's for his eyes and use a few straight stitches to make his mouth. Using some poly fiber fill, firmly stuff your icicle and hand sew the opening at the top shut with a few whip stitches. Glue an orange Sculpey Clay carrot-shaped nose to his face and let dry.

To Make The Hat: Measure around the circumference of your snowman's head and add on a 1/2" of an inch. This measurement will be the width that you need of fabric to make his hat. You can make it as long as you would like, I made mine 5" in length. Using a sewing machine, sew the long sides of your rectangle together with a straight stitch and turn right-sides out.

Using craft glue, glue the bottom of the hat to the top of his head. Using contrast fabric, cut a piece that measures 1/4" wide by the circumference of his head. You will glue this piece around his head to act as a cuff on his hat. Using a sewing needle and a small piece of thread, hand gather the end of his hat together and fasten off. Glue the gathered end to the side of his head along with a pom-pom. From the same color of contrasting fabric that you used on his hat, cut a 1/4" wide piece by approximately 6" long to use as his scarf and tie around his neckline.

Finish off your snow-icicle by threading a piece of gold metallic cording or embroidery floss through the top of his hat for hanging.

This craft project, photo and instructions are copyright 2009 by Shelly Hill, All Rights Reserved.

Sewing Project - Mr. and Mrs. Snowman Batting/Felt Holiday Ornament


This easy to make snowman ornament is a great beginner project for someone who is just learning to sew or craft. He can be made from regular white craft felt or from batting. If machine sewing is not your cup of tea, you can certainly hand sew him together with small straight stitches.

Mr. and Mrs. Snowman Batting & Felt Holiday Ornaments

Supplies Needed:

Pattern (see below)
Warm 'N Natural Batting or White Cotton Felt
Disappearing Ink Marker
Poly Fiber Fill Stuffing
Fleece Fabric
5 Black 4 MM Beads
Orange Sculpey Clay Nose
Sewing Machine and Basic Sewing Notions
All-Purpose Craft Glue
Scissors
Thread or Gold Metallic Cord (for hanging)

Pattern: I free-handed my pattern in the traditional three stacked snowball shape onto paper and then cut out my pattern. Mine measures approximately 6" tall by 4" wide at his widest point.


Sewing and Stuffing Directions: Trace your pattern onto your batting or cotton felt using a disappearing marker. Lay two pieces of felt or batting together and pin to secure them. Using your sewing machine, straight stitch around your shape on the traced line. Using scissors, cut out your shape just outside of the stitched line. Cut a 1 1/2" slit near the top of his head (horizontally) and turn him inside out. Lightly stuff him with poly fiber fill and hand sew the opening shut.

Now comes the fun part...you can decorate him however you would like. I decided to add a fleece hat and scarf to mine.

To Make The Fleece Hat and Scarf: I measured the circumference of his head and added on a 1/2" to that measurement and his hat length is 4" tall. So, use those measures to cut out a rectangular shape from your fleece fabric. Using your sewing machine, sew the short edges together so that you have a tube shape. Flip this tube inside out. Fold back 1/4" of one end to resemble the hat cuff. Glue hat into place on top of his head and it should cover your stuffing slit. I used some needle and thread and hand cinched together the top of his hat and then glued a pom-pom on top. From fleece, cut out a piece that measures 1/2" wide by 8" long and tie it around his neck. You can trim the ends down or fringe them if desired.

To Make The Carrot Nose: Roll a small amount of orange Sculpey Clay between your fingers until it measures about the size of a green pea. Gently shape this ball into a triangular shaped cone measuring 1/4" in length. Place nose on a baking sheet in a 200 degree oven and bake for approximately 10 minutes or according to package directions. Baking on low heat causes the clay to harden.

Eyes and Buttons: You can use black 4 MM beads like I used or you can use 'real' buttons. You will need to hand sew them on or use all-purpose craft glue to attach them.

Once you have your snowman ornament completed, thread a needle with some thread or gold metallic cording and make a hanging loop at the top of his hat. He is now ready to be hung onto your holiday tree.

By changing the colors of your fleece, you can make a female one too!


This pattern, instructions and photographs are copyright 2009 by Shelly Hill, All Rights Reserved. Please contact me directly if you would like to reprint my article on your web site. Thanks!

Wednesday, November 25, 2009

Easy Sewing Project - Adding Decorative Fabric Trim To Hand Towels


I needed some new hand towels for my master bathroom but I didn't want to spend a fortune for them. All of the ones I spotted at the local bath store were expensive or too gaudy in design for my liking. I wanted simple cotton white hand towels with just a little something extra to them.

I ended up purchasing some inexpensive but nice quality plain cotton bath hand towels and decided to spruce them up a little bit myself. I went to the fabric store and purchased some cotton fabric.

Here is how I added a little extra touch to my inexpensive towels.

Supplies Needed:

4 Bath Hand Towels
1/4" Yard Cotton Fabric (I went with a tiny floral calico print)
Sewing Machine Plus Basic Sewing Supplies
Measuring Tape
Iron and Ironing Board
Scissors

Tip: Your top thread (spool) color should match your fabric strip and your bottom thread color (bobbin) should match your towel color. In my case, my spool thread was baby blue and my bobbin thread was white. You want to make sure your bobbin thread matches the towel color so that your stitches are not seen on the reverse side.

The first thing you need to do is measure the width of your hand towels. Once you get the measurement, add on 1/2" an inch. Next, decide how wide (thick) you want your band to be. I wanted mine to be 1 1/4" wide, you will then add on a 1/2" inch to that measurement. In my case, I needed a fabric strip that measured 17" by 1 3/4" in size. You will need to cut out eight strips to make four towels, one strip for each end of your towel.

Once you have the strips cut out, you need to iron them. You need to press under 1/4" on all four sides (both short ends and both long ends). Do this step for all eight strips.


Using straight pins, pin down your fabric strip onto your hand towel in the position where you would like it. Mine are approximately 4 1/2" from the end. As you are pinning down the strip, make sure your ironed edges are under the fabric.

Using a straight stitch on your sewing machine, sew about 1/8" in from your fabric edge the entire way around your fabric strip, removing your pins as you go along. Continue this process until you are completely done.

Pretty easy and adds a nice little touch to your plain cotton hand towels. You can buy holiday printed fabric and quickly make yourself an inexpensive set of holiday bathroom and kitchen towels to decorate your home with or to give away as holiday gifts.

Pattern and Project Idea is Copyright Shelly Hill, 2009, All Rights Reserved.

Tuesday, November 24, 2009

Country Style Wooden Snowman Door Hanger Project


This adorable snowman made from 1/4" thick pine wood is just too cute! I was able to make him in just one afternoon with the help of my hubby.

I first sat down and free-handed a pattern. I used a large circle for his head and a rectangle for his hat for the basis of my simple pattern. I then traced him onto a piece of pine wood that was 1/4" thick. Roughly, my head was a 7" diameter circle and the hat is an additional 4 1/2" to his height. You can make it any size that you would like. I had my husband cut the pattern out with his saw and drill two tiny holes in his hat so that I could thread wire through them for hanging.

I then sanded my wood with fine sandpaper and got busy with some painting. I painted the head off-white and the hat black with acrylic paints. I then used some orange paint and painted on a carrot shaped nose. I used the end of my brush to dot on some eyes and some spots for his mouth. I used a very pale pink to blush his cheeks. I left all of the paint dry and then sprayed him with some clear acrylic paint sealer.

I cut out a hat brim using black craft foam and glued it to the bottom of his hat. I had some plastic snowflake shaped buttons and a scrap piece of pine and glued them to the hat for accents. I then got into my fabric stash and found a piece of pink plaid fleece and cut it down to size. I glued it around his neckline to form a bow and attached it with all-purpose craft glue. I then finished up by threading some silvertoned metal wire thru the top of his hat so that I can hang him onto my front door.

I think he turned out pretty good!

Shelly

Monday, November 23, 2009

Primitive Snowman Wooden Spool Holiday Ornament Pattern


As a crafter, I am always looking for unique ways to use up my left-over empty wooden sewing spools and this snowman ornament done in the primitive style is relatively easy to make.

I was able to create my snowman ornament in about an hour and with a few basic crafting supplies that I already had on hand. If you are not into the primitive style of crafting, you can certainly paint him white and not use any crackle medium.

If you are not handy with a drill (needed to affix his nose), you can just paint on a nose with acrylic paint or make one out of orange colored Sculpey Clay.

Primitive Snowman Wooden Spool Holiday Ornament

Supplies Needed For Each One

2" high wooden round sewing spool
1 1/4" high wooden round sewing spool
drill and 1/8" diameter drill bit
round wooden toothpick
acrylic paint - black, off-white and orange
paint brush
crackle medium
all-purpose craft glue or wood glue
scissors
20" long piece of jute
1/4" wide by 12" long piece of red and white checked ribbon

Lay several sheets of newspaper down onto your work surface.

Step 1: Using a drill and a 1/8" diameter drill bit, drill a small hole in the center of your large wooden spool. Paint both of your wooden spools with black acrylic paint. If necessary, apply two coats to completely cover them. Break off a 3/4" long piece from your wooden toothpick and paint with orange paint. Once dry, apply crackle medium on the large wooden spool by following the manufacturer's instructions that are printed on the bottle. Once dry, apply the off-white acrylic paint so that it crackles and the black paint shows through it.

Step 2: Using glue, attach the small spool to the larger spool so that it forms your snowman's hat. Apply a small dab of glue in the drilled hole and stick the broken end of your toothpick inside it for represent a carrot shaped nose. Once dry, fold your jute in half length-wise and thread down through the spool holes. Leaving a 3" long tail, place a knot at the bottom with another knot at the top, right above the hat.

Step 3: Using scissors, cut off a 3" long piece of ribbon and tie a bow around the jute at the top of the hat. Use the remaining ribbon to tie a bow around the bottom of the large spool to represent a scarf.

This pattern and instructions are copyright 2009 by Shelly Hill, All Rights Reserved. Please contact Shelly if you would like to reproduce these instructions on your site.

Sunday, November 22, 2009

FREE Primitive Raggedy Anne Angel Ornament Pattern


Last week I was looking online for a free raggedy annie christmas ornament pattern and came across the free pattern over on the Primraggs Web Site.

You can print out the pattern and instructions directly from her web site. (there is also a free snowman pattern too). Anyway...I found some time this week and got busy making some up for my holiday tree this year. (plus I made a few extra ones for my grand daughters tree).

Mine do differ slightly from hers as I used dark barn red colored wool yarn for the hair and I didn't add a halo or as much blusher to her cheeks. They were super easy to whip up and her pattern and instructions are easy to use. You could make several of them with your homespun and muslin fabric scraps.

While you are there visiting her web site, make sure you check out the main section of the site to purchase some patterns too!

Shelly

Saturday, November 21, 2009

Sewing Project - Chilly Chad Felt Snowman Holiday Ornament


I love making snowmen ornaments for my holiday tree every year, matter of fact, one of my trees are entirely decorated with all handmade snowman ornaments!

What I love about this particular ornament is its larger size. Once sewn, it will be 3 1/2" in diameter which is perfect for larger tree branches. In addition, you can make this ornament in less than one hour, so they work up quickly.

Sewing Project - Chilly Chad Felt Snowman Ornament

Supplies Needed

2 (4" diameter) white felt circles
5 tiny black seed beads (mouth)
2 larger seed beads (eyes)
scrap of orange fabric or felt
7 1/4" by 3" piece of fleece (hat)
1" by 13" piece of fleece (scarf)
1/2" by 8" piece of fleece (hat trim)
1" diameter pom-pom
small amount poly fiber fill
all-purpose craft glue
scissors
sewing machine and basic sewing supplies
6" piece of white embroidery floss (hanging cord)

Step 1: Place two 4" diameter felt circle together and sew around them by using a 1/4" seam allowance. Cut a 1 1/2" slit in one of the felt pieces and turn your circles inside out. Lightly stuff with poly fiber fill and hand sew the opening closed.

Step 2: Fold your fleece for the hat in half lengthwise, right sides together and sew down the long edge to make a tube. Turn right side out. Place a line of glue along one of the open edges and glue to the top of your snowman's head. You might have to hold this in place for a minute or two.

Step 3: Glue your hat trim around the bottom edge of the hat. Using a hand sewing needle and coordinating thread, gather the top edge of the hat and fasten off. Glue a pom-pom on top of the hat.

Step 4: Cut a small triangle from orange fabric or felt and glue onto his face. Glue on the two large black seed beads for his eyes and the smaller black seed beads for his mouth.

Step 5: Place glue around his neckline (front and back) and tie around your fleece scarf. Hold it into place for three to five minutes to allow it to adhere. Thread some embroidery floss through the top of his hat so that you can hang him on your tree.

Pattern and instructions are copyright 2009 by Shelly Hill, All Rights Reserved. If you would like to use my pattern on your site, please contact me first. Thanks!

Friday, November 20, 2009

Sewing - Simplicity Pattern Adult and Child Aprons


I have been busy in my sewing room for the past 6 weeks sewing up these adoreable bib-style aprons for little girls and adult misses. The pattern I have been using is made by Simplicity (tm) and its pattern #2824 Sewing Patterns For Dummies Series so it is really easy to use and great for beginners.

The pattern includes Adult sizes Small thru Large and Child sizes Small thru Large.

You can visit the Simplicity web site ----> HERE

I think I have made around 30 of the adult aprons and 20 of the little girls and I am still busy making more!

The one pictured up above is one I made in a christmas tree patterned fabric. The ones below are little girl size medium ones that I made a few weeks ago. Aren't they just too cute? LOL


This is a great pattern for beginners and experienced seamstresses and these aprons would make great year around gifts. The pattern is easy to use, understand and to construct.

Note: I was not compensated in any way for this post. I personally purchased the pattern at my local fabric store and used it.
~Shelly~

Primitive Rusty Star Snowman Ornament Project


I went to a craft show two weeks ago and saw these primitive style snowman ornaments that were glued onto rusty tin shapes (hearts, circles, stars and squares) and decided I would make one myself.

The ones I saw also had scarfs around their necks, hats on their heads and had totally embroidered faces, I chose to use beads for his eyes, a sculpey clay nose and embroidered french knots for his mouth. You can decorate yours according to your own taste.

Primitive Rusty Star Snowman Ornament

Supplies Needed For Each 

5" diameter rusty tin star
cotton batting or tea-stained felt
poly fill stuffing
2 (6mm) dark brown or black beads
orange Sculpey Clay carrot shaped nose
black embroidery floss (or tiny black beads)
all-purpose craft glue
disappearing ink pen
scissors
Sewing machine or hand sewing supplies

To Make Your Pattern: I traced around a drinking glass to make a circle pattern onto paper. I then cut it out and traced the circle onto my cotton batting with a disappearing ink pen.

Step 1: You can hand sew or machine sew on your traced line. Once it has been sewn, trim around the edges to cut it out. Once finished, cut a small 1 1/2" slit in the backside and turn it inside out.

Step 2: Using 3 strands of black or dark brown embroidery floss, make some french knots for his mouth. If you are using beads for his eyes, this is the time to attach them using embroidery floss and leaving your knots inside the fabric. Lightly stuff with poly fiber fill and hand sew the turning slit shut.

Step 3: I made my own nose out of orange Sculpey Clay and glued it onto the front of his face. Add several globs of glue to the back of his head and glue the head (centered) onto a rusty tin star.

Step 4: You can drill a tiny hole in the top of your star and insert clear fishing line or string so that you can hang up your ornament or you can cut some homespun fabric and tie into a loop and glue to the backside of the rusty tin star. The choice is yours, but I like the clear fishing line on mine.

Craft Project - Seashell and Jute Soup Can Pen and Pencil Holder

This is a really easy craft project that you can make with your children by reusing a clean and empty soup can.

Note: We use a non-cutting style can opener that unseals our can lids so that there are no sharp edges. If you are worried about sharp edges, you can reuse a plastic or glass jar that is roughly the same size.

Recommended Project Ages: 7 and up with adult supervision.

Supplies Needed

Empty and clean soup can
1 roll of twine or jute cording
All-Purpose white crafting glue
Foam paint brush
1 bag various sized sea shells
1 felt circle that fits the circumference of your can
Scissors

Step 1: Cut off 24" long pieces of jute from your roll. I find it easier to work with small lengths. Using your all-purpose craft glue, squirt some glue around the top of your can's sides, in 1" wide sections. Use your foam brush to spread out the glue so that its an even coat. Carefully wrap the jute around the can. As needed, add more glue and cut more jute from the roll. You will continue covering the sides of your can in this manner until done. Set aside to dry.

Step 2: Once your holder is completely dry from the gluing process, its time to glue on the sea shells. Start with the large shells first and then use the small shells and sea pebbles to fill in the design area. We were able to purchase a small bag of dyed shells so that our pen holder would have some color to it.

Step 3: Cut a circle from felt or fabric that will fit the circumference of your can. Glue it to the bottom so that you will protect your desk surface from scratches.

Tips: Its best to lay your can on its side for gluing on the shells. Let them dry for 15 minutes before moving it around. You can do just a design on the front or decorate the entire thing, the choice is yours. If you don't have felt, you can cover the bottom of your can with additional jute cording.

Thursday, November 19, 2009

Country-Style Wooden Cosmetic Brush Holder Craft Project


Last year I was looking around for a cosmetic brush organizer that would fit with the theme of my guest bathroom, but to no avail, I couldn't find a country-styled organizer so I decided to make my own.

I went to our local craft supply store and purchased an unfinished wooden caddie with handle and decided to stain it with wood stain and then decoupage a country design on top.

You can keep your organizer in your bathroom cabinet, under your vanity or on your counter top. I think they would also look cute holding your pens and pencils on your desk top too!

Supplies Needed

1 unfinished wooden caddy measuring 3 1/2" wide by 5 1/2" tall
wood stain (I chose a dark walnut stain)
old cotton cloth or rag
1 small piece of fine sandpaper
Mod Podge (decoupage glue and sealer)
foam paint brush
gift wrap or paper designs (I used country gift wrap with quilted hearts)
scissors
several sheets of newspaper

You will want to cover your work surface with several sheets of newspaper.

Step 1: Lightly sand your wooden caddy if necessary to make sure its smooth and ready for staining. Apply a small amount of stain to a cotton cloth and rub it evenly onto the wood surfaces until they are covered. Let them dry for at least two hours.

Step 2: While your caddy is drying, cut out desired design from gift wrap paper. I found country gift wrap with a pretty heart pattern on it at my local dollar store. You will want to trim close to the edges of the design.

Step 3: Apply some Mod Podge to your foam brush and cover one panel of your caddy at a time with a thin layer of the Mod Podge Glue. Apply your design (hearts) and let dry for 30 minutes. Once dry, apply the Mod Podge on top of your designs and wooden areas to seal them which also gives them a glossy appearance once dried.

Wednesday, November 18, 2009

Country Primitive Stitchery Holiday Ornaments


I really enjoy making these primitive country-style holiday ornaments each and every year because they are easy to make and I can use up a lot of my left-over scrap fabric and embroidery supplies.

Country Primitive Stitchery Holiday Ornaments

Skill Level: Beginner
Time Involved: 1 hour

Supplies Needed

holiday pattern
disappearing ink marker
small piece of tea-dyed muslin fabric
embroidery floss and embroidery needle
small amount of poly fill stuffing
scissors
sewing machine with basic sewing supplies
scrap piece of homespun fabric
wax crayons (optional)

Pattern Notes: You will need to obtain your own holiday pattern. I got mine from a child's coloring book and traced it onto my muslin fabric using a disappearing ink marker. My pattern measures 3" wide by 4" high. You can shrink any pattern you want to use to ornament size by scanning it in and shrinking it down before printing it out.

Optional: If desired, you can use wax crayons and color in a few small areas of your design to add some color to it. You will want to do this before starting your stitching.

Step 1: Trace pattern onto muslin fabric. Using 3 strands of embroidery floss in coordinating colors, hand stitch all pattern lines on the design. In my case, I selected a Santa Claus face and used red, gray, black and green embroidery floss. For his eyes and mouth, I used french knots.

Step 2: Using a tape measure, I measured 1 1/2" past my stitch designed area and cut my muslin down to size. It now measures 4 1/2" by 5 1/2" in size. You will need a second piece of muslin fabric measuring the same size as your first piece. Cut a piece of homespun fabric measuring 1" wide by 4 1/2" long. Pin right sides together with the homespun hanging loop at the top.

Step 3: Sew around 3 1/2 of your edges, leaving 1/2 an edge open so that you can turn your design area inside out. Once you have completed the sewing, lightly stuff your ornament with poly fill stuffing. Using a sewing needle, hand sew the opening shut with little stitches.

Your ornament is now ready to be hung onto your holiday tree, package or off a peg shelf.

These pattern instructions are copyright 2009 by Shelly Hill, All Rights Reserved.

Craft Project - Wooden Spool Bee Hive Shelf Sitter


If you are looking for a little country craft project that features lady bugs and bumble bees, I think you will agree that this one is too cute! You can easily make this wooden spool bee hive shelf sitter in less than 2 hours.

Wooden Spool Bee Hive Shelf Sitter 

Supplies Needed:

unfinished 3" tall wooden spool
unfinished 2 1/2" tall wooden bee hive
3 unfinished wooden 1/4" tall lady bug shapes
2 unfinished wooden 1" tall bee shapes
1 unfinished 1" diameter wooden leaf
3 strands of 12" long raffia (for making the bow)
acrylic paints: brown, gold metallic, yellow, red, black, white
paint brushes - fine tip and a flat brush
wood glue or all-purpose crafting glue
clear acrylic spray sealer
scissors
paper towels and a dish of water (for cleaning your brushes)

Tip: If you own some paint pens, you can certainly paint the smaller items (bumble bees, lady bugs and the leaf with them to save on time).

Step 1: Paint all of your wood pieces with the colors shown in the photograph. Let them dry for 15 to 20 minutes before flipping them over and painting the undersides.

Step 2: Glue the wooden bee hive to the top of your spool, making sure to press them firmly together so that there are no gaps. Glue two lady bugs and two bumble bees to the top and sides of the hive as shown in the photograph, followed up by one lady bug glued onto the wooden spool.

Step 3: Spray your entire project with a light misting of clear acrylic sealer. (note - you want to do this before attaching the raffia bow).

Step 4: Cut your raffia down into 12" long strands and form a bow. Trim ends so that its appropriately sized and glue it onto the front of your spool. You might have to hold it in place for a minute or two. Put a glob of glue onto the backside of your leaf shape and affix it to the center of your raffia bow.

Tuesday, November 17, 2009

How To Make A No-Sew Fleece Scarf


My daughter and I just love the soft and cozy feeling of a fleece scarf up around our necks during a cold winter day, so we decided to make our own.

We went to our local fabric store and were amazed at all of the lovely colors and prints that fleece fabric comes in these days. For our project, we chose anti-pill fleece so that we wouldn't have to worry about it pilling up with washing and drying.

The instructions for this project are for an adult-sized scarf, but you can easily shorten the length and width to make one for a child.

No-Sew Fleece Scarf Patten

Supplies Needed

1 yard of soft anti-pill fleece fabric
straight pins
scissors
measuring tape
(optional) quilting rotary cutter and cutting mat

Note: It is a lot easier to cut your fleece if you use a rotary cutter and cutting mat, however...you can also use a measuring tape and scissors.

Step 1: Lay out your fleece fabric and cut down to size. You will need a piece that measures 64" to 68" in length by 8" in width which will fit an adult. If you are making this for a child, you can manipulate the size of fabric needed to suit your needs.

Step 2: Measure 5" in from each short edge and place straight pins in a horizontal line into your fabric. I do this so I know how long to cut my fringe. Using scissors, cut fringe so that they measure approximately 1" wide by 5" in length. Remove pins.

You can leave the fringe plain or you can tie them together, the choice is yours. Your scarf is machine wash and dry, no special care is needed.

This article and craft project instructions written by Shelly Hill, copyright 2009, all rights reserved. You make link to this post/project on your web site as long as you give me and my site full credit for it. Thanks!

Heart Shaped Fabric Wreaths


Yesterday a friend of mine dropped off a mountain of fabric that she and her aunt didn't want any more...goodness, I am in fabric heaven right now. Tons and tons of fabric, some solids but mostly little calico prints.

Anyway, I was going through my pattern stash and came across an old vintage McCalls pattern from the late 80's or early 1990's and decided to make the heart shaped wreath. It took me less than 1 hour to complete and I think it turned out awesome.

I did this one in a red calico print with a green calico print bow so that it can be hung on my back door during the holiday season. However, you can use any color of fabric that you want to match your home decor and hang it all year long. I am going to make my auntie one next in blues as blue is her favorite color.

Here is one I did in the Pittsburg Steelers NFL Football Print


You can make these easy heart wreaths for any holiday of the year. Super cute for Valentine's Day, Easter, St. Patrick's Day, Christmas, Thanksgiving, Halloween and all of those Patriotic Holidays too! Simply change up your fabric prints and colors to turn them into cute holiday wreathes!


Shelly

Sam and Samantha Batting or Felt Snowman Ornaments


When it comes to decorating my holiday tree, I am a big fan of handcrafted holiday ornaments...especially ones that feature adorable little snowmen!

For this project, you will need your basic crafting supplies and some batting and fabric scraps. You can hand sew or machine sew him together in less than 10 minutes. The really fun part comes when its time to decorate them. Mine are pretty plain and simple but I am sure with your imagination, you could fancy them up even further.

Sam and Samantha Felt Snowman Ornaments

Supplies Needed

pattern
cotton batting (Warm 'N Natural works great) or cotton felt
small amount of poly fill stuffing
black embroidery floss
scraps of a black pipe cleaner
scrap piece of homespun fabric
fabric hats or crochet hats (optional)
orange Sculpey Clay
gold metallic cord for hanging
all-purpose crafting glue
off-white sewing thread with a sewing needle
scissors

Pattern: I made my own by just free-handing a basic snowman shape that measures approximately 5" tall by 3 1/2" wide. My pattern reminds me of a bowling pin shape.

Carrot Nose: I made my own with Sculpey Clay. You will need a piece that measures about the size of a green pea. Roll it into a small ball and then into a carrot or tear drop shape. I used a toothpick to indent lines onto it to give it texture. I then baked it in my toaster oven on 200 degrees for 5 minutes to get it to harden.

Step 1: Trace your pattern onto a double layer of cotton batting, but reserve the cutting for later. Using black embroidery floss (3 strands), hand stitch two X's to resemble eyes and five french knots to resemble the mouth. Glue on the clay nose. (see photograph for placement of stitches and nose).

Step 2: You can hand sew or machine sew on your pattern line, just make sure that the right sides are together. Trim your fabric to within 1/4" of the sewn line. Once completed, cut a small 2" slit in the back of the body and turn the snowman inside out so that the front side is now on the outside. Lightly stuff him with poly fiber fill and hand sew the turning slit closed with thread.

Step 3: Snip off two small pieces from your black pipe cleaner and glue them onto the belly to represent buttons. Cut a piece of homespun fabric that measures 1/2" by 5" in length and tie it around the neck for the scarf. Trim the ends if they are too long.

Step 4: You can make your own little hats out of felt, yarn (crochet/knit) or purchase them pre-made from your local craft supply store. For my project, I used a crochet-style hat on my female and no hat on my male. Just my personal preference.

Step 5: Cut a piece of gold metallic cord that measures 5" in length and thread it through the top of your snowman for the hanging cord. That's it, they are now ready to hang on your holiday tree.


This pattern/instructions is copyright 2009 by Shelly Hill, All Rights Reserved. You make link to this post from your web site/blog but can not directly copy my instructions to your site. Thanks!

Cardmaking | Easy Gift Card Enclosures Project Great For Beginners

It seems that just about everyone I know is expecting a baby right now so I decided to make up my own handcrafted baby theme gift enclosure cards...you know, those little cards that you attach directly onto your gift package.

This was my first time for making them as I usually just stick with regular greeting cards but I was pleasantly surprised at how easy it was to make my own mini cards for the packages.

I started off by purchasing a pack of 20 mini gift enclosure cards in white from my local craft store. I then got into my scrapbooking scrap box and used a bunch of my little scraps to decorate them. I used: rub-ons, mini buttons, stickers, chalk, ink, scraps of paper, ribbon scraps, etc.

This is a great little project where you can put all of your scrap crafting supplies to good use. Perhaps some of the mini cards that I made will inspire you to craft up some of your own.

~Shelly~

Monday, November 16, 2009

Handmade Cotton Felt Snowman Ornaments And Coat Pins


A few days ago, my mother-in-law asked me to make her a snowman pin for her winter coat. I couldn't find a pattern that I liked so I decided to just make my own.

This project is really easy to make...you can do hand sewing or use your sewing machine. (I did hand sewing). You can omit the hat and leave his head plain if desired.

Supplies Needed

scraps of cotton batting or cotton felt
scraps of homespun fabric
poly fiber fill (for stuffing)
eyes - black seed beads
nose - orange wooden toothpick or orange clay nose
needle and off-white sewing thread
all-purpose craft glue
small pom-poms
scissors
pin backs (if making pins)
gold metallic hanging cord (if making ornaments)
disappearing ink pen

Pattern: I just free-handed a basic snowman shape measuring approximately 3 1/4" tall by 1 3/4" wide.

Batting/Felt: You need to cut your felt into rectangles which measure 1" on all sides bigger than your pattern.

Step 1: Place two batting rectangles right-sides together. Center your pattern onto the cotton batting and trace around it with a disappearing ink pen.

Step 2: Using a sewing needle with thread or a sewing machine, stitch directly on your traced line the whole way around your pattern. Once done, use scissors to trim close (but not on) your stitched line. Turn your snowman over to the back side and make a 1 1/2" slit in his body. Turn him right side out. Lightly stuff with poly fiberfill and hand sew the opening closed.

Step 3: Cut a small rectangle from homespun fabric and glue one of the short edges under. Next, glue the two long edges together to form a tube. Set aside to dry. Cut a piece of homespun fabric that measures 1/4" by 5" long and tie it around the snowman's neck to form his scarf. If needed, trim the ends if they are too long.

Step 4: Using craft glue, adhere two tiny black seed beads to his face for eyes. For his nose, you can break off a wooden toothpick and paint it orange or you can make an orange clay carrot shaped nose.

Step 5: Glue the folded under short edge of your fabric tube to the top of your snowman's head as shown in the photo. You might have to hold this in place for a minute or two. Once its stable, bend over the tube and glue the other end to the side of his head along with a tiny pom-pom.

Step 6: If you are turning him into a holiday ornament, thread a piece of gold metallic cord thru the top of his hat. If you are turning him into a coat pin, glue a metal bar pin back to his backside.

If you use this pattern/instructions on your site, you must directly link it to this post. Copyright 2009 by Shelly Hill, All Rights Reserved.

Easy Sewing Project | Homemade Baby Diaper Changing Pads

A few months ago, I became a first time grandma to a precious little baby girl. My daughter needed some portable diaper change pads that were light weight, durable and would fit into her diaper bag.

She wanted the pads to be super soft and absorbent so I decided to use flannel fabric and a cotton batting. Along with the fabric and batting, you will need just basic sewing supplies to make your own baby diaper changing pads.

Homemade Baby Diaper Changing Pads

Here is what you will need:

1 yard soft baby print flannel fabric
1/2 yard cotton batting
Scissors
Sewing Machine
Sewing Supplies - thread, straight pins, measuring tape, sewing needle
Iron and Ironing Board

You need to machine wash and dry your flannel fabric to remove sizing before beginning this project. Once fabric has been washed, iron it so that all wrinkles have been removed. This project was made with 1/2" seam allowances.

Step 1: You will need two pieces of flannel fabric (front and back panel) each measuring 17" wide by 20" long. Cut your cotton batting to measure 16 3/4" wide by 19 3/4" long.

Step 2: Lay your two pieces of flannel right sides together, with the wrong side facing outwards. Lay your cotton batting on top and pin all three layers together. Your batting piece should be slightly smaller than your flannel.

Step 3: Using your sewing machine, sew around 3 1/2 of the sides, leaving 1/2 of one side un-sewn so that you can turn it inside out when completed. When sewing, you want to catch the outer edge of the batting so that it will be stitched into place and won't bunch up when laundering.

Step 4: Clip your corners and trim seams if necessary before turning the pad inside out so that the right sides are now facing out. Using coordinating thread, hand sew the opening closed using small uniform in size hand stitching.

The project instructions and photograph are copyright 2009 by Shelly Hill. If you would like to reprint this article, please contact Shelly directly to ask permission.

Sunday, November 15, 2009

Free Crochet Christmas Candles Pattern


I have a slew of left-over yarn from various craft projects and back in December, I found this pattern online and decided to make a few. It is a great way to use up all of your smaller amounts of yarn scraps and turn that yarn into a beautiful new holiday project.

To make each one, you will need the following items: Green Yarn, Red or Orange Yarn, White or Ivory Yarn, Crochet Hook and an Empty Toilet Paper Roll. Of course you can use any yarn colors that you would like.

You can find the pattern at: http://www.crochetnmore.com/christmascandle.htm

I used left-over green, red and ivory yarn by Red Heart (tm) yarns for mine. They are super easy to make and you can whip up several of them quickly. I bet they would be great at Church Christmas Bazaars!

We made about 20 of these crochet Christmas Candles and donated them to a local nursing home and assisted living center so that they could be used to decorate the patient's rooms. They can't have breakable decorations, electrical powered ones or ones with a candle flame. These are quick & easy to make and very inexpensive! Totally perfect for the nursing home!

Easy Sewing Project - Fabric Coasters


I love to spend time making home decor projects for our home and to give as gifts and these easy to sew fabric coasters is one of my favorite projects. If you are like me, you probably have a ton of left-over fabric scraps that you can use for this project.

From start to finish, you should be able to make all four of the coasters in less than an hour.

Homemade Fabric Beverage Coasters

Supplies Needed:

1/4 yard cotton fabric
1/8 yard cotton batting that is 1/8" thick
Scissors
Coordinating thread, straight pins, measuring tape
Sewing machine

Tip: When you purchase batting for this project, make sure its cotton and not polyester because cotton batting is more absorbent.

Fabric Preparation: Wash and dry fabric to remove sizing.

Step 1: Cut your fabric into 4 3/4" squares, you will need a total of eight squares. Cut your cotton batting into 4 1/2" squares, you will need a total of four batting squares.

Step 2: Lay two of your fabric squares right sides together. Lay a piece of cotton batting on top and pin to hold the squares in place. Machine sew 3 1/2 of the sides together with a 1/4" seam allowance. Before turning your square, trim the corners and seams and then turn your square inside out through the opening. Iron squares to remove wrinkles if needed.

Step 3: Hand sew the opening closed using tiny even stitches with coordinating thread.

You will repeat steps one through three until you have made all four of your coasters. They are machine washable and dryable and will last for several years.

These instructions and photographs are copyright 2009 by Shelly Hill, all rights reserved. You can make these coasters for personal use or craft shows. If you would like to reprint these instructions, please contact me for permission as proper credit will be due.

Photo of Fabric Supplies

FREE Baby Burp Cloth Pattern


I recently became a new grandmother back in May 2009 to our first grandchild (a baby girl) who is just precious. Anyway, my daughter needed some super soft baby burp pads so I went online to search for free sewing patterns.

I came across the C&F Craft and Fabric Links site and found a very easy burp cloth pattern which you can find ----> HERE

Their pattern is very easy to use and even a beginner can whip them up quickly. I was able to make 8 of them in about 3 hours of time for my daughter. I chose to use soft baby print flannel fabric when I made hers and they wash up and hold their shape nicely.

The photo with this post is 3 of the burp cloths that I personally made and I think they are adoreable! All new moms and new grandmother's can certainly use a slew of these homemade baby burp cloths, don't ya think? I do! Happy Sewing!

Craft Project - Framed Snowman Stitchery Project


A very good friend of mine just adores handcrafted snowman items and uses them to decorate her home every winter and Christmas season. I decided that I wanted to make her something unique for her holiday gift this year and this is what I made.

This framed snowman stitchery project will take you one afternoon to make and even a beginner can make this one. If you don't have a pattern, you can find one in a child's coloring book or look for printable coloring pages on the internet that you can print out and use for free.

Materials Needed

barn red 8" by10" wooden frame
double mat set (I selected off-white and barn red) with a 4" by 6" opening
piece of tea-stained muslin measuring 8" by 10" in size
8" by 10" piece vanilla colored card stock
embroidery hoop
needle and black embroidery floss
3 1/2" by 5 1/2" pattern (I got mine from a coloring book)
disappearing ink pen
scissors
wax crayons (optional)

For this project, you will need to find a pattern that you like. I was able to find mine in a child's holiday coloring book. If the pattern you like is large in size, you can scan it into your computer and shrink it to the size that you want.

Step 1: Using a disappearing ink pen, trace the outline and details of your pattern onto tea-stained muslin fabric. Once it has been traced, color in any areas that you want to add a little color to, with your wax crayons. I chose to color in my snowman's gloves, scarf and ear muffs. Once this has been completed, place your muslin fabric into your embroidery hoop.

Step 2: Using black embroidery floss (3 strands) hand stitch your pattern outline onto your fabric. Try to make sure your stitches are even in size and don't pull them too tight.

Step 3: Remove fabric from the embroidery hoop and mount it onto a piece of 8" by 10" card stock. (I selected the card stock that scrapbooker's use because it's acid-free).

Step 4: Layer your finished piece of work along with the double mats into the wooden frame. Make sure your fabric is pulled tightly so that there are no wrinkles.

You can decide if you want to hang this piece on the wall or if you want to sit it on top of your mantle

Saturday, November 14, 2009

Cardmaking ~ Handcrafted Set of 2 Sisters Note Cards

When it comes to card making, you can make simple ones or fancy elaborate ones, the choice is yours. For this project, I decided simple was best and since I have sisters, I wanted to make 2 simple sisters themed note cards.

For my base: white prefolded note cards measuring 4" by 5" in size. I purchased them in a bulk pack and they came with white envelopes.

Card #1: Using your computer and fancy script font, you can print out the word "Sisters" in any color or font that you desire. Mine measures approximately 2" high by 3 3/4" wide. I printed it out onto white card stock and then chalked the edges with purple. I used foam back dots and attached it to solid purple card stock so that it would be raised and have a little 3-d dimension to it. I then used my glue stick and affixed it to the upper portion of my card with the card fold at the top (so that the card opens from the bottom). I had some scraps of light purple grosgrain ribbon and used glue dots to affix it to the bottom of my card and made a bow for the center. (see photo) You can use a stamp and ink and stamp a sentiment inside or leave it blank.

Card #2: I used a scrap piece of striped paper that measured 4" by 5" in size and glue it to my card front. I used the same font and words as in card number 1 and printed it out and mounted it onto light purple card stock. In 2 of the corners, I decided to apply lime colored eyelets to add some accent. I affixed this to my card front using foam glue dots. Right under that, I used a simple rub-on purple colored heart.

I also decided to decorate my white envelopes with hearts or flowers and purple ink.

Friday, November 13, 2009

Cardmaking - Easy Greeting Card Ideas

If you are looking for some greeting card ideas, perhaps some of the ones that I recently made will inspire you. When it comes to cardmaking, I will make your classic simple ones along with some elaborate ones...just depending on my mood and what kind of craft supplies I have on hand.

I am a huge scrapbooker so after I am done with a scrapbooking layout, I like to store all of my little scraps and odds & ends in a bin. Then when I am in the cardmaking mood, I like to get into my bin and use up my leftover supplies.

Most of these cards are 4" by 5" in size...but there are a few of them that are 5" by 7" in size. I also enjoy stamping and decorating the envelopes too!

Cardmaking: Teenager Denim Jeans Note Cards

If you are looking to make some trendy note cards that are geared towards your favorite teenaged girl, I think you will appreciate these denim jeans note cards.

I got the idea for them last year when I was scrapbooking some pictures of my daughter from when she was a teenager. I ended up making my daughter a complete set of note cards and then they became such a big hit with her friends, that I ended up making a lot more of them.

To make these note cards, you will need to check out my post ----> HERE to see how I made the denim jeans.

I made my cards on a basic white 4" by 5" blank card stock note card. I found denim print scrapbooking paper at my local craft store and cut it a 1/4" smaller (on all 4 sides) so that some of the white card stock frames the denim paper. I then inked all 4 sides with navy blue ink and adhered it to my card front with a glue stick.

I had scraps of fringe left-over from another project and accented the ankles of the jeans with that and some matching ribbon for the belt. The rest of the accents are tiny rhinestones. I then stamped on the words "Girly Girl" to add a little more interest.

Isn't it just groooooovy? LOL Seriously, you could whip up an entire set of these cards in one afternoon and give them as a gift to your favorite teenaged girl.

Handcrafted Beach Embellishments For Your Scrapbooking Pages

I enjoy scrapbooking, especially because we love to travel and I like to preserve our memories in my travel scrapbooks. Being a frugal crafter, I like to hand make my beach theme'd embellishments.

This past summer, I had fun making the embellishments that you see in the photograph. Here is how I made them.

Flip Flop Sandals - I free-handed a shoe shape onto a piece of paper and then used that as my template. (They are approximately 2" in length). I then traced the shape onto a scrap piece of crafting foam. Using a contrasting color of foam, I free-handed a shape to resemble a thong strap. I then used glue dots to assemble my sandals and accented the strap with rhinestones or mini flower brads.

Paper Kite - Free hand a kit shape onto blue card stock. You will need to free hand 2 triangular shapes onto dark yellow card stock and cut them down to fit onto your blue kite, adhering them with a glue stick. I used a scrap piece of twine for my kite tail and affixed it to the back of my kite with a glue dot. I took some dark brown chalk and chalked my edges on the kit to give it depth.

Anchor - My friend left me borrow her anchor pattern (not sure where she got it) so I traced her pattern onto silver metallic scrapbooking paper. I inked the edges of my anchor with black ink using a dauber. I used a star shaped mini punch and red card stock and made a little nautical accent for my anchor. I then used a mini hole punch near the top of the anchor and inserted a scrap piece of raffia as a tie.

Beach Title Blocks - I purchased a rubber stamp at my scrapbooking store for $1.00 that says "Gone To The Beach" and stamped it using black ink on white scrapbooking paper. I trimmed it out so it measures 2" by 3" in side. I then inked the edges. I glued it onto an additional piece of scrapbooking paper or card stock and using my cutting system, cut around it so that an 1/8" of an inch shows thru and finally layered it on top of another piece of card stock. You can ink or chalk all of your edges to give it more depth. I accented the one with mini sea shell stickers and the other one with an ice cream cone.

Really simple ideas for beach theme'd scrapbooking pages. You could also use these embellishments on cards.